Dot Cross Diagram Guide: Ace Your GCSE & A-Level Chemistry
You're probably here because one of two things is happening.
Either you've looked at a chemistry question, seen a circle full of dots and crosses, and thought, “I have no idea where any of this goes.” Or you already sort of get it, but the moment the question changes from sodium chloride to something less familiar, your confidence disappears.
That's normal. Dot and cross diagrams look simple, but they test a lot at once. You need to know electron arrangement, bonding type, charges, and when the examiner wants this diagram instead of a displayed formula. Once that clicks, a big chunk of bonding becomes much easier.
Why Dot and Cross Diagrams Matter for Your Grades
A dot and cross diagram isn't just a drawing trick. In UK chemistry, it's a standard way to show only the outer-shell electrons in ionic and covalent bonding, and it's a foundational exam skill because it packs electron configuration, bonding type, and ion charge into one visual method, which is why it appears so often in exam questions according to the Royal Society of Chemistry guidance on drawing dot and cross diagrams.
That matters because exam questions often aren't really asking, “Can you copy a picture?” They're asking whether you understand why atoms bond, what happens to electrons, and how to prove it clearly. A strong diagram answers all three.
Think of it as the chemistry version of showing your working in maths. If you know how to build a good dot and cross diagram, you're not guessing. You're showing the examiner your reasoning.
What examiners are really checking
They want to see whether you can:
- Identify the bond type. Is it ionic or covalent?
- Count the valence electrons. Only the outer shell matters here.
- Show electron movement or sharing clearly. That's the whole point of the notation.
- Add charges and brackets when needed. Neglecting this step often leads to the loss of easy marks.
Practical rule: If a question is about bonding and electrons, a dot and cross diagram is often the clearest way to secure method marks.
Students who are trying to recover their grade usually need a method they can rely on under pressure. Students aiming for top grades need a method that still works when the example gets harder. That's why this topic matters to both groups.
If you want timed practice that feels like the actual exam, Exam Practice for GCSE can help you drill this kind of exam thinking, not just the final answer.
The Building Blocks Atoms Shells and Valence Electrons
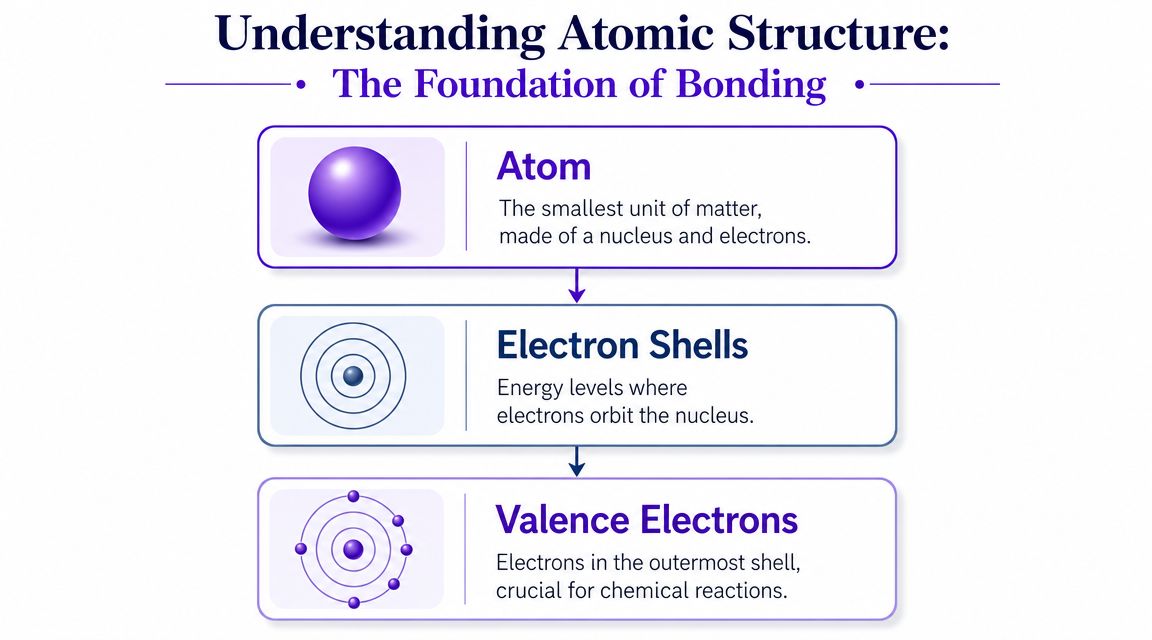
Before you draw anything, you need one idea locked in. Dot and cross diagrams only show the electrons in the outer shell. These are called valence electrons.
The inner electrons are there, but they usually don't take part in bonding at this level. They're like the people sitting in the middle rows of a theatre during a school play. Important to the building, not the ones being asked on stage.
The cheat code from the periodic table
For many common GCSE and early A-Level questions, the periodic table gives you a shortcut.
For the main group elements, the group number tells you how many electrons are in the outer shell. That means:
| Group | Outer-shell electrons |
|---|---|
| 1 | 1 |
| 2 | 2 |
| 3 | 3 |
| 4 | 4 |
| 5 | 5 |
| 6 | 6 |
| 7 | 7 |
| 0 | Full outer shell |
That one shortcut saves a lot of time.
So if you see sodium in Group 1, you know it has 1 outer electron. Oxygen is in Group 6, so it has 6 outer electrons. Chlorine is in Group 7, so it has 7 outer electrons.
Why the outer shell controls bonding
Atoms bond because they become more stable when their outer shell is full. At GCSE, that usually means thinking in terms of the octet model, where atoms aim for 8 electrons in the outer shell. Hydrogen is the common smaller case, aiming for 2.
This is why:
- metals often lose electrons
- non-metals often gain or share electrons
- the number of outer electrons tells you what an atom is likely to do
If you can count valence electrons quickly, most bonding questions stop feeling random.
A fast routine to use every time
When you meet a bonding question, do this in your head first:
- Find each element on the periodic table
- Write down the outer-shell electrons
- Decide whether the atoms are metals or non-metals
- Predict the bond type before drawing
That last step is underrated. If you know metal plus non-metal usually means ionic, and non-metal plus non-metal usually means covalent, the diagram becomes much easier to organise.
Students often get stuck because they start drawing too soon. Don't. Count first. Predict second. Draw third.
Drawing Diagrams for Ionic Bonding The Electron Transfer
Ionic bonding is the one that students often think they understand, right up until they lose marks on the final diagram.
The big idea is simple. A metal transfers electron(s) to a non-metal. But the mark-winning detail comes after that. You must draw the resulting ions properly.
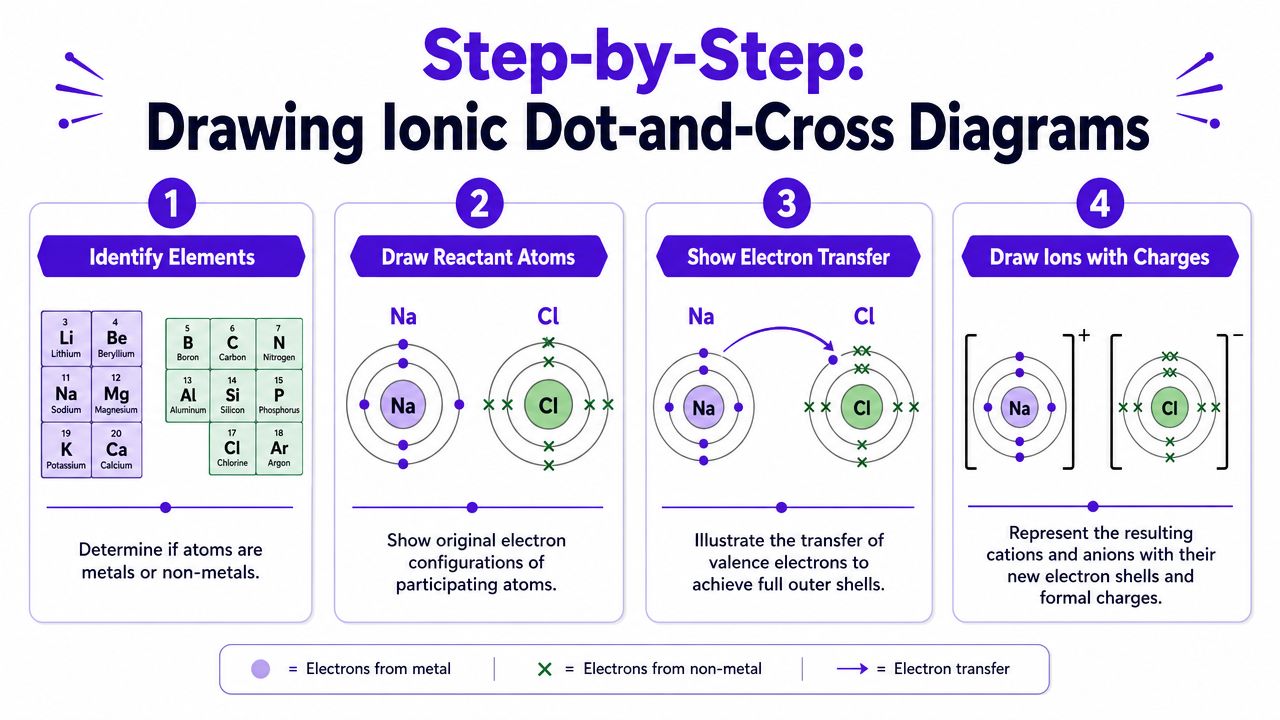
Many explanations stop at “an electron is transferred”. That's not enough. UK exam guidance stresses that the important part is showing the final ions in square brackets with the charge clearly outside the bracket, and it often helps to leave out empty outer shells on the positive ion to avoid confusion, as explained in the Royal Society of Chemistry fact sheet on ionic diagrams.
The four-step method
Step 1 and pick the bonding type
Check the elements first.
- Metal plus non-metal usually means ionic bonding.
- The metal will lose electrons.
- The non-metal will gain them.
Sodium and chlorine are the classic pair. Magnesium and oxygen are another.
Step 2 and draw the starting outer electrons
Only draw the valence electrons for each atom.
Use dots for one atom and crosses for the other. It doesn't matter which gets dots and which gets crosses. What matters is staying consistent.
For sodium, draw 1 outer electron.
For chlorine, draw 7 outer electrons.
Step 3 and move the electron
Show the electron from sodium ending up in chlorine's outer shell.
Now sodium has lost one electron, so it becomes Na⁺. Chlorine has gained one, so it becomes Cl⁻.
Students often still draw them like neutral atoms. Don't.
Step 4 and draw the final ions correctly
This part is essential:
- Put each ion in square brackets
- Write the charge outside the bracket
- Show the full outer shell on the negative ion
- Don't clutter the positive ion with empty shells
Worked example with sodium chloride
Your final picture should show:
- sodium in brackets with a + charge
- chlorine in brackets with a - charge
- chlorine's outer shell containing eight electrons, including the transferred one
Worked example with magnesium oxide
This one catches students because magnesium loses two electrons, not one.
- Magnesium has 2 outer electrons
- Oxygen has 6 outer electrons
- Magnesium transfers both electrons to oxygen
- Final ions are Mg²⁺ and O²⁻
So the final oxygen ion must show a full outer shell with two electrons that came from magnesium.
A lot of students draw just one transferred electron because they rush. Slow down and count.
Here's a quick video if you want to see the process in motion after reading it through:
What to check before you move on
Use this mini-checklist:
- Bond type right? Metal plus non-metal
- Electrons transferred properly?
- Brackets included?
- Charges outside the brackets?
- Final outer shells correct?
If you want more general revision help across chemistry topics, MasteryMind's revision support is worth a look.
Drawing Diagrams for Covalent Bonding The Electron Share
Covalent bonding is different. No one is handing electrons over. The atoms are sharing them.
This happens between non-metals. Each shared pair helps both atoms count those electrons in their outer shell.
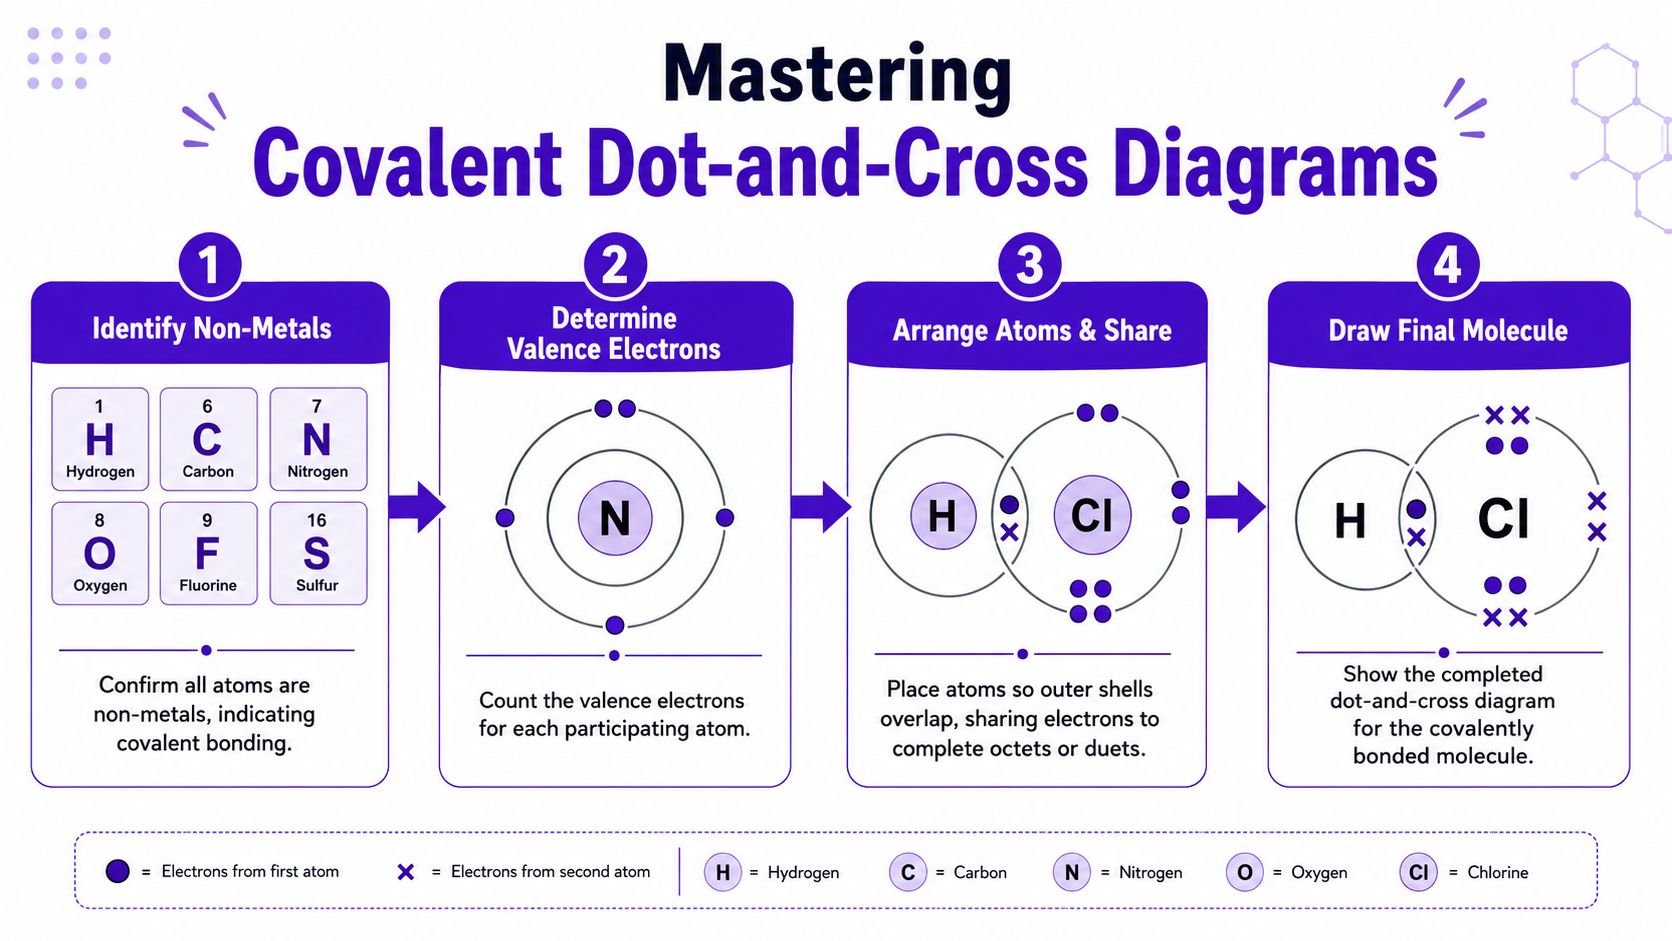
The whole point of dot and cross notation here is that it lets you track where each electron came from. That matters because in covalent bonding you need to show shared pairs accurately, and UK teaching guidance uses this to distinguish single bonds with 2 shared electrons, double bonds with 4, and triple bonds with 6, as explained in this UK chemistry video on dot and cross diagrams.
Start with the shared pair idea
A single covalent bond is one shared pair of electrons. That means 2 electrons in the overlap.
One electron comes from one atom. The other comes from the second atom.
That's why the overlap often has one dot and one cross.
Three quick examples
Hydrogen H₂
Each hydrogen has 1 electron. They share those two electrons.
That gives each hydrogen access to 2 electrons in the shared space, which is enough for hydrogen.
Chlorine Cl₂
Each chlorine has 7 outer electrons. Each atom needs one more to complete its shell.
So they share one pair.
Final picture:
- one shared pair between the chlorines
- three lone pairs around each chlorine outside the shared region
Methane CH₄
Carbon has 4 outer electrons. Each hydrogen has 1.
Carbon forms four single covalent bonds, one with each hydrogen. Every bond is one shared pair.
Students often forget that carbon should have four bonds here, not two or three.
Your first question in covalent bonding should be, “How many electrons does each atom still need?”
Double and triple bonds
The counting really matters here.
| Bond type | Shared electrons |
|---|---|
| Single | 2 |
| Double | 4 |
| Triple | 6 |
Oxygen O₂
Each oxygen has 6 outer electrons. Each needs 2 more.
So they share two pairs, which gives a double bond.
Your diagram must show 4 electrons in the overlap, not two.
Nitrogen N₂
Each nitrogen has 5 outer electrons. Each needs 3 more.
So they share three pairs, making a triple bond.
Your overlap must show 6 electrons.
A simple routine for covalent molecules
Try this every time:
- Confirm all atoms are non-metals
- Count outer electrons
- Work out how many electrons each atom needs
- Create enough shared pairs to fill those gaps
- Add lone pairs after the bonds are in place
Students often do step 5 too early. They fill the outside of the atom before sorting the bonding. That leads to messy errors.
The neat way is to build the bonds first, then place any leftover electrons as lone pairs.
Advanced Cases for A-Level Success
Once you move beyond basic GCSE bonding, dot and cross diagrams become more than a counting exercise. They start testing whether you understand exceptions, not just rules.
That's where A-Level students often split into two groups. One group still treats every atom as if the octet rule always works in the same way. The other group knows when the pattern changes.

Coordinate bonding
A coordinate bond, also called a dative covalent bond, still contains a shared pair of electrons. The difference is in the source of that pair.
In an ordinary covalent bond, each atom provides one electron. In a coordinate bond, both electrons in the shared pair come from the donor atom. In UK A-Level notation, that electron origin is the key thing the dot and cross diagram must show, according to A-Level guidance on dot and cross diagrams.
That means your diagram has to make the donor's contribution visible. If you draw it like an ordinary covalent bond, you've missed the whole point.
A common example is the ammonium ion, NH₄⁺. Ammonia has a lone pair on nitrogen. A hydrogen ion can accept that pair. The resulting bond is coordinate because the pair came from nitrogen.
Expanded octets
At GCSE, the octet rule is a strong starting point. At A-Level, you need to know where it stops being enough.
According to Chemistry Guru's explanation of dot and cross diagrams, Period 2 elements like C, N, and O cannot expand their octet, while atoms in Period 3 and below can form expanded-octet species such as PCl₅ and SF₆.
That gives you a very useful exam rule:
- Carbon, nitrogen, oxygen and fluorine stay octet-limited
- Phosphorus and sulphur can go beyond eight outer electrons in the right compounds
Why students get caught out
They learn “every atom wants eight electrons” and then apply it blindly.
That works until it doesn't.
When an A-Level question includes phosphorus or sulphur as the central atom, stop and check whether the molecule needs more than four shared pairs.
If you're aiming higher at sixth form level, Online Revision for A-Level can help you practise these more demanding patterns across topics.
Common Mistakes and How to Avoid Them
Most lost marks in dot and cross questions don't come from impossible chemistry. They come from small slips that are easy to fix once you know what to watch for.
The mistakes examiners keep seeing
Missing charges on ions
Students draw the electrons correctly, then forget the actual charge. In ionic diagrams, the charge is part of the answer.No square brackets around ions
If you've made ions, show them as ions. Neutral-looking atoms won't get full credit.Wrong number of outer electrons
This usually starts with poor periodic table recall. Count before drawing.Shared pairs drawn wrongly
In covalent bonding, one shared pair means two electrons. Not one. Not three.Mixing up the diagram type
Some students give a displayed formula when the question asks for a dot and cross diagram, or vice versa.
Dot and cross diagram or displayed formula
This confusion is common because both diagrams show bonding, but they do different jobs.
According to exam guidance on dot and cross diagrams versus displayed formulae, a dot and cross diagram is used to show outer-shell electrons and their origin in bonding, while a displayed formula shows which atoms are bonded to which, without showing the electrons.
Use this quick comparison:
| If the question wants to show... | Best representation |
|---|---|
| Where the electrons came from | Dot and cross diagram |
| Which atoms are connected | Displayed formula |
A five-second checking habit
Before you move on from any bonding diagram, ask:
- Have I shown only the outer electrons?
- Have I used brackets and charges where needed?
- Are the shared pairs complete?
- Have I kept dots and crosses consistent?
- Did I answer the exact diagram type asked for?
That habit saves marks.
Students often think chemistry rewards speed. It rewards accurate decisions under time pressure. That's different.
Quick-Fire Practice Questions
Grab a pen and try these without scrolling to the answers immediately.
Questions
- Draw a dot and cross diagram for NaCl.
- Draw a dot and cross diagram for MgO.
- Draw a dot and cross diagram for H₂.
- Draw a dot and cross diagram for Cl₂.
- Draw a dot and cross diagram for O₂.
- Draw a dot and cross diagram for N₂.
- Draw a dot and cross diagram for CH₄.
- A-Level challenge. Draw the bonding in NH₄⁺ and identify the coordinate bond.
Try saying out loud why each bond is ionic, covalent, or coordinate before you draw it. If you can explain it, you usually understand it.
Answers to check against
NaCl
Sodium loses one electron. Chlorine gains one. Final answer must show bracketed ions with + and - charges.MgO
Magnesium loses two electrons. Oxygen gains two. Final answer shows Mg²⁺ and O²⁻.H₂
One shared pair between the two hydrogens.Cl₂
One shared pair between the chlorines, plus three lone pairs on each chlorine.O₂
Two shared pairs. That means a double bond with 4 electrons in the shared region.N₂
Three shared pairs. That means a triple bond with 6 electrons in the shared region.CH₄
Carbon in the centre with four single bonds to four hydrogens.NH₄⁺
Start from ammonia and add the hydrogen ion. One bond is coordinate because both electrons in that shared pair come from nitrogen.
For more exam-style chemistry practice, GCSE Past Papers are one of the best ways to find out whether you can do this under real paper conditions.
If you want a smarter way to revise bonding, equations, essays, maths working, and exam technique in one place, MasteryMind is built for UK learners preparing for GCSEs and A-Levels. It gives you curriculum-aligned practice, instant feedback, and a clear route from “I kind of get this” to “I can do this in the exam”.
Ready to master this topic?
Practise with quizzes, blurt exercises and exam questions on MasteryMind.
7 days Premium · Then free forever · No card, no charge