Food Tests for Starch: The Complete Iodine Method

You've probably seen this practical in class or on a revision sheet, a white tile, a few drops of iodine, then that sudden colour change that's supposed to tell you everything. The problem is, plenty of students stop at the headline and lose marks on the bits examiners care about, like clean technique, controls, and what to do when the colour looks faint or patchy. If you've ever stared at a tile and thought, “Is that really blue-black, or am I imagining it?”, you're in the right place.
Food tests for starch are one of the simplest GCSE Biology practicals, but they still expose sloppy method fast. A good answer needs more than “iodine turns starch blue-black”, because the test of understanding is knowing what counts as a valid result, what can go wrong, and how to explain the chemistry without panicking under exam pressure. For teachers, it's also one of those topics where a neat explanation can turn a shaky class memory into something that truly sticks.
What Starch Testing Actually Looks Like in a Lab
In a Year 10 lab, the scene is usually the same. White tiles out, iodine bottles open, food samples lined up in small, labelled portions, and one student trying to guess whether bread, potato, or rice will change colour first. That moment is the classic iodine test for starch, the standard school method used in UK GCSE biology because starch gives a blue-black result when iodine solution is added, while samples without starch stay brown, orange-brown, or unchanged, as described in BBC Bitesize's GCSE food test guidance and the Royal Society of Chemistry's iodine test description.
Why schools use this test so often
The reason it shows up everywhere is simple. It's quick, visible, and needs only a tiny amount of sample, so students can see a result almost immediately without any complex kit. That's why it became such a staple classroom assay for carbohydrate identification, and why teachers keep coming back to it when they want a practical that feels real but doesn't need expensive equipment.
At molecular level, the test works because starch contains amylose, and iodine fits into the helix to form a dark complex. That's the science behind the colour, not just a memorised fact. If a student can say that starch is identified by a blue-black colour change because of the iodine-amylose complex, they're already writing at a stronger level than the bare minimum.
Practical rule: if you're looking at a GCSE food test, you're not hunting for a number. You're deciding whether the colour is convincingly blue-black or not.
A proper lab assay is different from the classroom version. In analytical work, accuracy matters more, so methods move towards careful sampling and instrument readings rather than a simple visual check. A peer-reviewed starch assay method recommends triplicate measurement of about 100 mg test sample with a blank control, and another enzymatic protocol uses 200 mg ground sample, 39°C incubation for 2 hours, and absorbance at 630 nm for quantification, which shows how starch testing becomes more formal when precision matters (starch assay method).
If you're comparing exam boards or subject routes, the subjects for exam boards page is a useful place to keep your revision organised.
Gathering Your Materials and Setting Up Safely
Before the iodine comes anywhere near the food, the bench needs to be tidy. A clean setup makes the result easier to trust, and it stops one sample ruining the next. For a standard school practical, you want iodine solution, often labelled potassium iodide-iodine, white spotting tiles or a clean white plate, droppers, distilled water, and a small spread of food samples such as bread, potato, rice, milk, and a clear negative like lettuce.
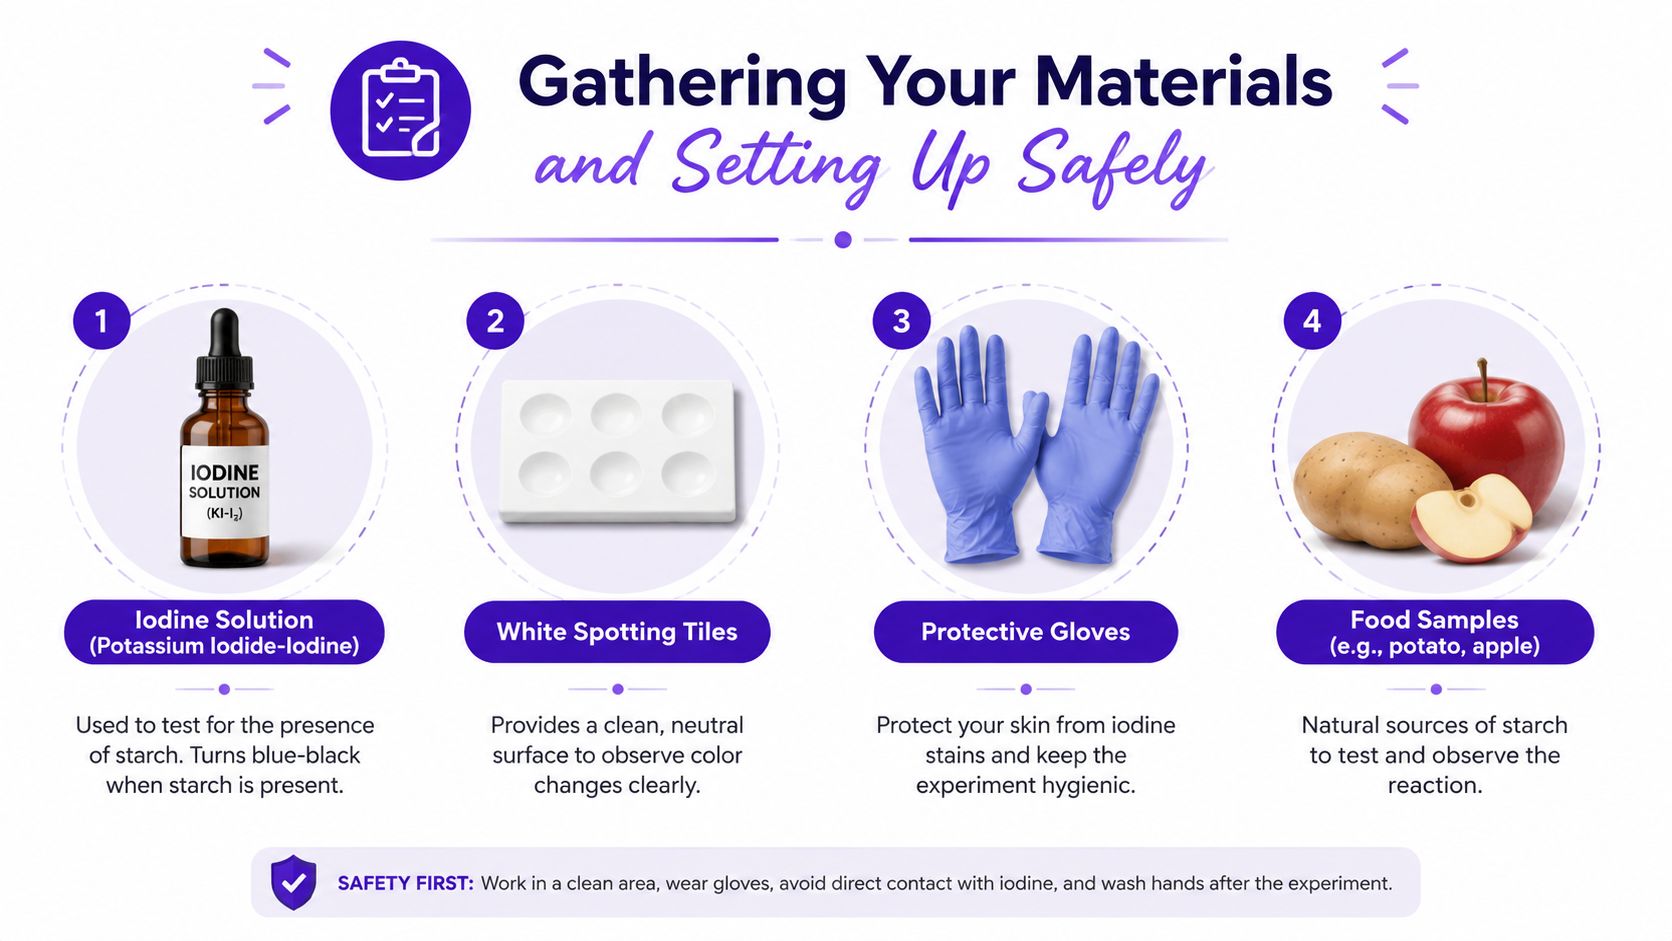
Set up like you mean it
The white surface matters because colour changes are easier to judge against it. A dark bench can make a weak reaction look stronger or weaker than it really is, which is exactly how careless practical work loses marks. Labelling each space on the tile before you start also helps, because once iodine is on the plate, nobody wants to guess which sample is which.
Clean transfer is part of the science, not a nice extra.
Safety is straightforward, but it still matters. Iodine stains skin and clothing, so a lab coat and gloves are sensible, and iodine should never be pipetted by mouth. If you're preparing solids, crush or chop them into small pieces so the iodine can touch more surface area. For liquids, place a small drop on the tile first, then test that drop, instead of flooding the bench and creating a mess.
A calm bench gives a calm result. That's the version teachers want to see, and it's the version that makes your observation easy to trust.
For students who need extra structured support on related science topics, MasteryMind Nutrition topics can be useful for keeping revision tidy without jumping between random notes.
Running the Iodine Test Step by Step
The cleanest way to do the test is to think in small, controlled moves. Put each sample in its own labelled space, use only a little iodine, and watch what happens straight away. Most food test mistakes come from rushing, overloading the sample, or trying to guess the result after the colour has already spread unevenly.
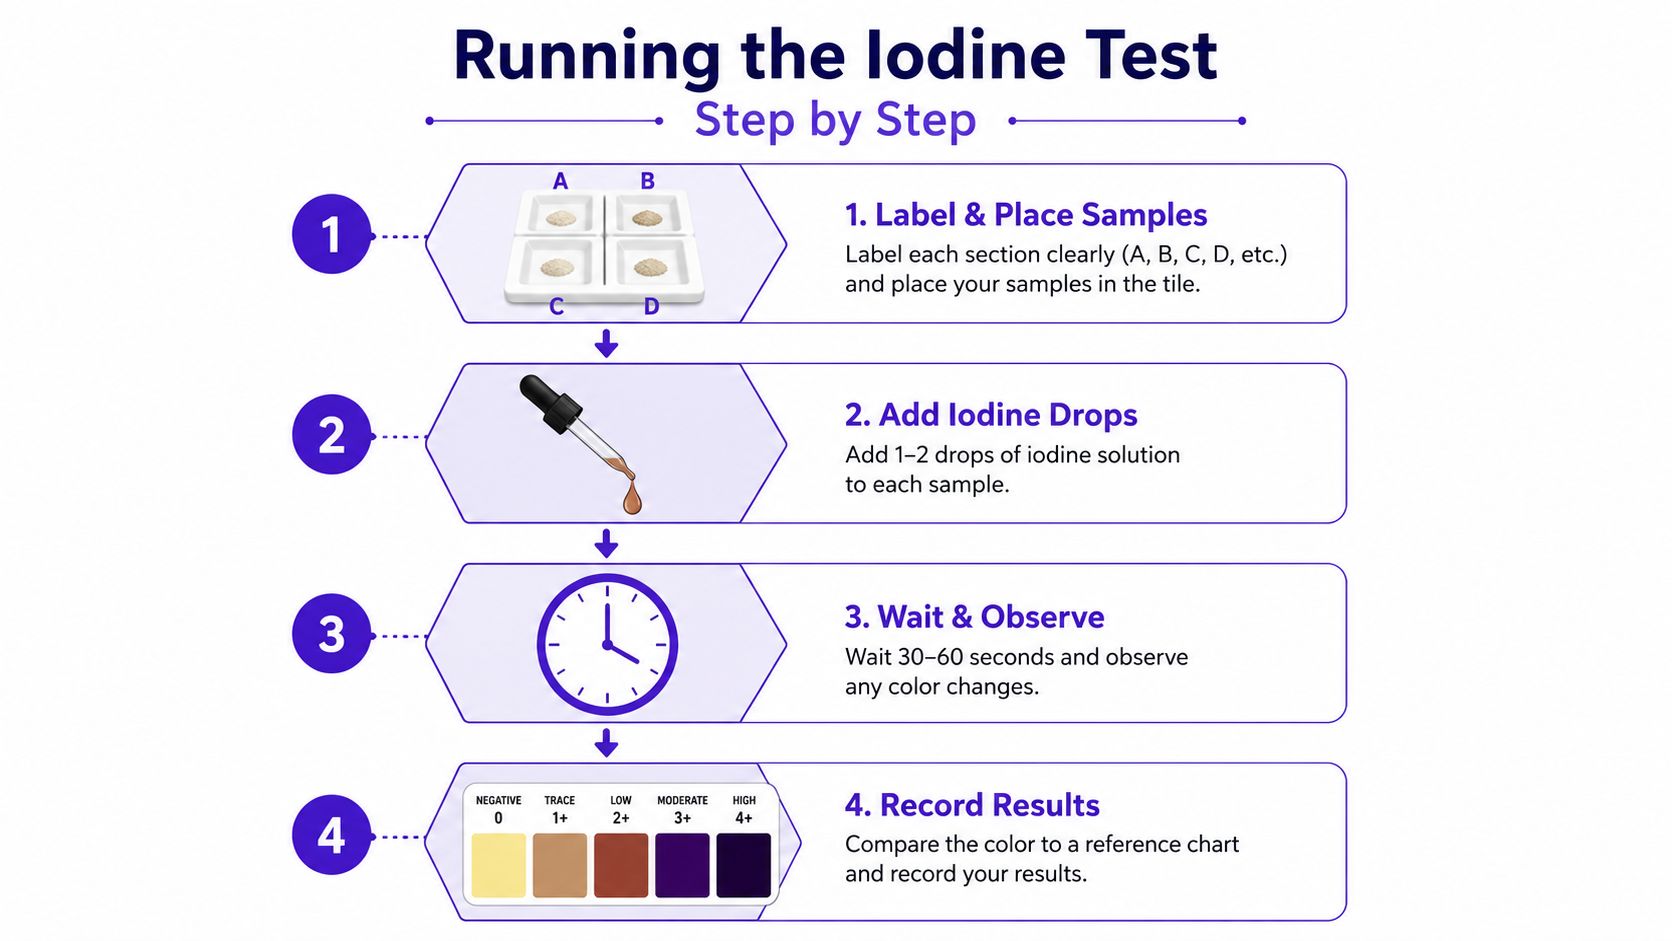
A method that stays neat under pressure
Label and place the sample. Put a small amount of each food on its own marked area of the tile. If you're testing solids, place the food directly on the tile. If you're testing a liquid or suspension, add a small drop to the tile first.
Add iodine carefully. One or two drops is enough. Flooding the sample makes the colour harder to read and can blur a weak positive into something unclear.
Watch immediately. A true starch reaction should appear quickly, usually within seconds. If you're waiting ages for a result, the sample is probably too dilute, poorly prepared, or contaminated.
Record what you see. Use the colour you observed, not the colour you expected. That sounds obvious, but it's where students often slip.
A positive control is a known starchy food, such as bread or potato, and a negative control is a known non-starchy food such as lettuce. Running both on the same tile gives you a direct reference. If the bread goes blue-black and the lettuce stays orange-brown, your result makes sense. If both change, or both stay the same, you should question the setup before you write your conclusion.
Examiner-friendly habit: if the colour is weak, don't pretend it's textbook perfect. Say it's faint, patchy, or unclear, then link that to the sample or method.
For revision that mirrors the same level of precision, MasteryMind GCSE Chemistry support is a handy reference point when you want to practise explaining practicals clearly.
Reading Your Results and Understanding the Chemistry
The obvious part is easy. Blue-black means starch is present, and orange-brown or unchanged means it isn't, or at least not enough to give a clear positive. That's the headline students remember, but top answers go one step further and explain why the colour appears in the first place.
What the colour change actually means
The chemistry depends on the structure of starch. Amylose, the linear part of starch, forms a deep-blue complex with iodine, while amylopectin gives a reddish-brown shade instead, as explained in the starch chemistry discussion on PubMed Central. That's useful because it shows the test isn't magic, it depends on how the iodine interacts with the starch structure itself.
A faint or patchy colour usually means one of two things. The sample may contain only a small amount of starch, or it may have been too dilute to give a strong visual change. In exam language, that's the point where you describe the observation carefully instead of forcing it into a yes-or-no answer that doesn't fit what you saw.
Here's a simple way to write it in a results table:
| Food | Prediction | Observation | Conclusion |
|---|---|---|---|
| Bread | Starch present | Blue-black | Starch present |
| Lettuce | No starch | Orange-brown | No starch detected |
That structure helps because it separates what you thought would happen from what happened. Examiners like that. It shows method, observation, and conclusion clearly, which is what practical questions reward.
If the colour looks doubtful, write what you saw first, then decide what it means. Don't do it the other way round.
A good answer doesn't overclaim. It states the result, links it to starch, and keeps the reasoning tight.
Common Mistakes That Wreck a Perfect Result
A lot of bad practical answers come from tiny slips, not big disasters. The worst part is that the test is so simple that students assume it can't go wrong. It can, and the exam questions love the exact places where people get careless.
The mistakes examiners keep testing
Shared droppers: A dirty dropper can carry starch from one sample to another and create a false positive. One practical guide warns that touching the dropper tip to starchy food can transfer starch straight into the iodine sample, which is exactly the kind of contamination that ruins a negative result (DocBrown practical guide).
Too much sample or too little iodine: If the food is overloaded, or the iodine is barely present, the reaction can look weak, grey, or patchy instead of clearly blue-black. That's not a new colour to memorise, it's a sign the setup was poor.
Cross-contamination: Hands, benches, and reused equipment can move starch around the tile. A clean plate and separate droppers for each sample save time in the long run because you're not second-guessing the observation afterwards.
Wrong controls: If you don't include a known positive and a known negative, you've got nothing to compare the sample against. That makes borderline colours much harder to interpret.
A result only counts if the setup lets you trust it.
There's another trap in processed foods. Students often predict “no starch” because the food doesn't look obviously starchy, but processed products can contain hidden starches in ingredients like flour. That means your prediction has to be based on the food's likely composition, not just its appearance. If the sample seems wrong, don't immediately blame the chemistry. Check the dropper, the controls, the tile, and whether the food was prepared properly first.
The best rescue strategy is simple, clean, and boring. Start again with fresh equipment and a clear sample. Boring is good in a food test.
Adapting the Test for Home and Classroom Demos
Not every school cupboard is fully stocked, and not every home has proper lab iodine. That doesn't mean the practical is off-limits. It just means you need to adapt the method carefully so you still end up with a result you can trust.
Making it work outside the lab
A lower-concentration povidone-iodine antiseptic can sometimes be used as a household alternative, but concentration differences matter, so the result may be weaker than in a school lab. That means you should treat it as a demo, not a perfect substitute for formal practical work. Clear, starchy foods such as bread or boiled potato are easier to test than pale, watery foods like apple or cucumber, because the contrast is easier to see.
Photographing the result in daylight helps too. Artificial light can shift the shade enough to make a blue-black look more brown or purple, especially when the reaction is faint. If you're working at home, use a white plate, keep the background plain, and test a water control alongside the food so any colour change is clearly linked to the sample.
Teachers can also run the practical as a set of mini-stations, one for each sample, which keeps things moving without turning the room into chaos. Students at home can do something similar by arranging the samples in a straight line and working left to right so nothing gets mixed up. If you need a digital revision space to organise the method before you try it, tutoring software like Tutorbase can help you structure practice without losing the science.
Wash hands afterwards, keep iodine away from eyes and mouth, and don't treat the practical like a kitchen experiment you can half-remember. The method is still the method, even on a countertop.
Exam-Style Questions and Quick Revision Checklist
A lot of marks on this topic come from short, precise answers. The exam paper usually wants one of three things, describe the method, identify the colour change, or explain why a control is needed. If you can do those cleanly, you're in good shape.
Typical questions and the kind of answer they want
Describe the test. Start with “Place a small amount of food on a white tile, add a few drops of iodine solution, and observe the colour change.” This explains the method without rambling.
State the result for starch. Say blue-black. Don't add extra fluff unless the question asks for explanation.
Explain the control. A control shows that the test works and gives a comparison for the sample. That's enough for most GCSE mark schemes.
The command word matters. Describe means what you did or saw. Explain means give the reason. State means a short answer. Compare means show the difference. If you answer the right way round, you stop dropping easy marks for the wrong style of response.
| Observation | Interpretation | Likely Cause |
|---|---|---|
| Blue-black | Starch present | Positive iodine reaction |
| Orange-brown | No starch detected | Negative result |
| Faint or patchy colour | Unclear result | Dilute sample, contamination, or poor preparation |
Night-before checklist
- Kit: iodine solution, white tile, droppers, labelled samples.
- Method: place sample, add a drop or two, observe straight away.
- Results: blue-black is positive, orange-brown is negative.
- Chemistry: amylose and iodine form the dark complex.
- Avoid: dirty droppers, contamination, weak controls.
If you want a way to practise command words and practical recall in one place, Exam Practice for GCSE gives you a simple route to test yourself under exam-style conditions.
If you're revising tonight, don't just reread the colour change. Say the method out loud, write one results table from memory, and check whether you can explain why a dirty dropper causes a false positive. Then go and use MasteryMind to lock in the practical with exam-style questions that make the same mistakes impossible to ignore.
Ready to master this topic?
Practise with quizzes, blurt exercises and exam questions on MasteryMind.
7 days Premium · Then free forever · No card, no charge