AQA · GCSE · Combined Science
Course version: 8464 · Version from Sept 2018
Plot and draw appropriate graphs selecting appropriate scale for axes
Full specification wording
Rate of photosynthesis: plot and draw appropriate graphs selecting appropriate scale for axes
Plotting photosynthesis data requires choosing axes, scales and a graph type that show the relationship clearly.
Checked against the AQA 8464 specification (opens in a new tab) on .
- Point 4 of 10
- 4 key terms
Study notes
From the checked teaching notes for this specification point.
The idea
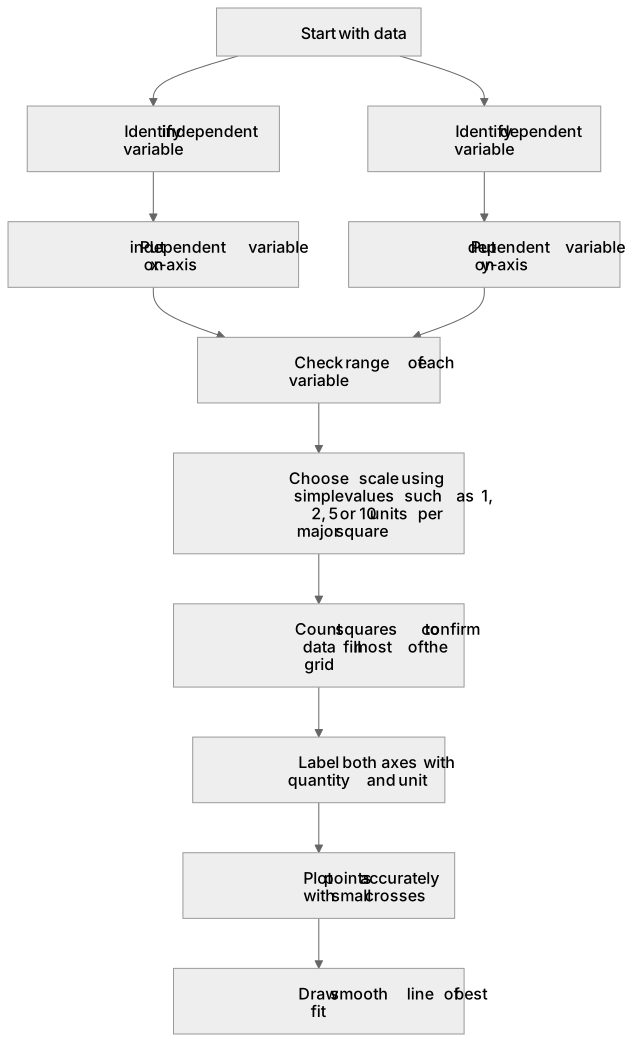
Plotting photosynthesis data requires choosing axes, scales and a graph type that show the relationship clearly. Put the independent variable, such as light intensity or carbon dioxide concentration, on the x-axis and the dependent variable, such as rate of photosynthesis or volume of oxygen produced, on the y-axis. Choose a scale that uses most of the grid: each major square should represent a sensible amount, such as 1, 2, 5 or 10 units, not 3 or 7. Label each axis with the quantity and unit. Plot points accurately with small crosses, then draw a smooth line of best fit or join points with straight lines only if instructed.
For example: If light intensity ranges from 0 to 50 arbitrary units and rate ranges from 0 to 20 mm³ min⁻¹, use 10 units per major square on x and 5 units per major square on y.
What earns the marks
- Place the independent variable on the x-axis and the dependent variable on the y-axis.
- Choose a scale where each major square represents a simple value and the data fill most of the grid.
- Label both axes with the quantity and its unit, for example 'Rate of photosynthesis in mm³ min⁻¹'.
- Plot points accurately using small crosses or dots, then draw a smooth curve or line of best fit.
- Use a ruler for straight-line sections and keep the line consistent with the overall trend.
- Include a clear title or key where needed to identify the graph.
Common mistakes and how to put them right
Using an awkward scale such as 3 or 7 units per square.
Put it right by using 1, 2, 5 or 10 units per square.
Swapping the axes so the dependent variable is on the x-axis.
Put it right by putting the independent variable on the x-axis.
Joining points with a jagged dot-to-dot line when a smooth curve is appropriate.
Put it right by drawing a smooth line of best fit through the trend.
Exam tips
- Check the range of each variable before choosing a scale, then count squares to confirm the data fit.
- Label axes with both quantity and unit; marks are often available for correct labels.
- Plot points with a sharp pencil and small crosses so the line of best fit is easy to draw.
Try the lesson
The start of the Rate of photosynthesis: plot and draw appropriate graphs selecting appropriate scale for axes lesson, made from checked teaching notes for this specification point.
Have a go first
A student plots a graph of photosynthesis rate against light intensity. The light intensity values range from 0 to 50 and the rate values range from 0 to 20. Which axis scale is most appropriate?
Listen
Plotting photosynthesis data requires choosing axes, scales and a graph type that show the relationship clearly. Put the independent variable, such as light intensity or carbon dioxide concentration, on the x-axis and the dependent variable, such as rate of photosynthesis or volume of oxygen produced, on the y-axis. Choose a scale that uses most of the grid: each major square should represent a sensible amount, such as 1, 2, 5 or 10 units, not 3 or 7. Label each axis with the quantity and unit. Plot points accurately with small crosses, then draw a smooth line of best fit or join points with straight lines only if instructed. For example, if light intensity ranges from 0 to 50 arbitrary units and rate ranges from 0 to 20 mm³ min⁻¹, use 10 units per major square on x and 5 units per major square on y. A strong answer earns marks for these points. Place the independent variable on the x-axis and the dependent variable on the y-axis. Choose a scale where each major square represents a simple value and the data fill most of the grid. Label both axes with the quantity and its unit, for example 'Rate of photosynthesis in mm³ min⁻¹'. Plot points accurately using small crosses or dots, then draw a smooth curve or line of best fit. A common slip: Using an awkward scale such as 3 or 7 units per square. Instead, using 1, 2, 5 or 10 units per square. Exam tip: Check the range of each variable before choosing a scale, then count squares to confirm the data fit.
See it
Key words
Say what each word means before you turn the card.
Choosing scales
Try answering aloud or in your head before turning the card.
Variables and axes
Try answering aloud or in your head before turning the card.
Lines of best fit
Try answering aloud or in your head before turning the card.
Data presentation
Try answering aloud or in your head before turning the card.
See every definition
- Choosing scales
- Selecting a scale where each major square represents a simple value such as 1, 2, 5 or 10 units, so the data fill most of the grid.
- Variables and axes
- Putting the independent variable on the x-axis and the dependent variable on the y-axis, with each axis labelled with the quantity and unit.
- Lines of best fit
- A smooth line drawn through the trend of plotted points, or straight lines joining points only if instructed.
- Data presentation
- Plotting points accurately with small crosses, then drawing a smooth curve or line of best fit, including a clear title or key where needed.
Label the diagram
Some boxes have lost their names. Pick the right name for each number.
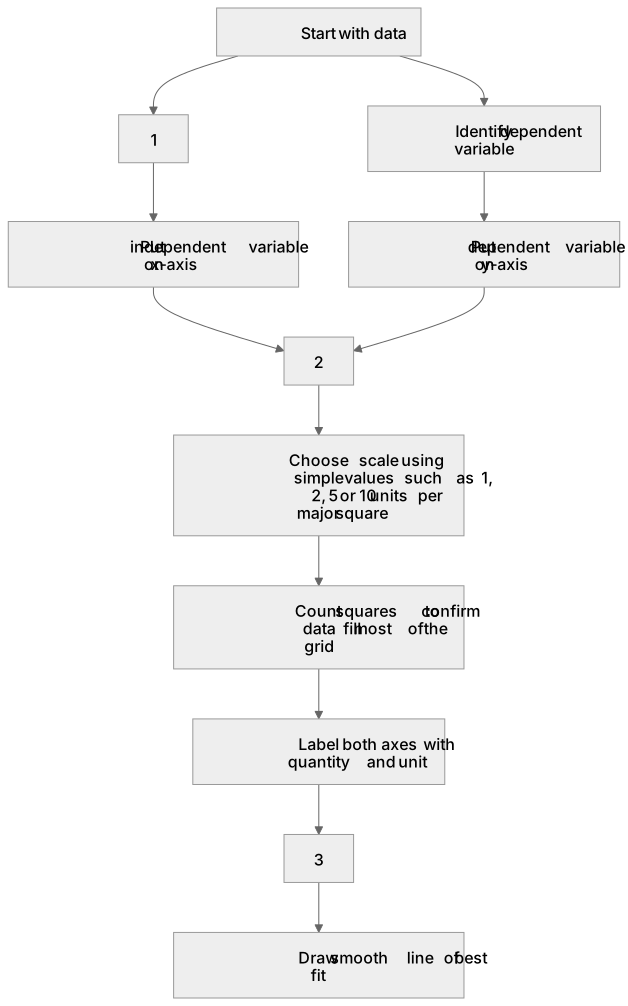
1Box 1
2Box 2
3Box 3
There is more to this lesson
The full lesson goes on to check your understanding and help you earn the marks. Create a free account to carry on, with your progress saved.
A week of Premium from your first lesson · Then the free plan continues · No card, no charge
Test your understanding of Rate of photosynthesis: plot and draw appropriate graphs selecting appropriate scale for axes
Active recall beats re-reading. Take an instant quiz now to test what you’ve learned and lock it into long-term memory.
A week of Premium from your first lesson · Then the free plan continues · No card, no charge