Pearson Edexcel · GCSE · History
Course version: 1HI0 · Version from Sept 2016
Key topic 1: Anglo-Saxon England and the Norman Conquest, 1060–66 - 4 The…
Full specification wording
Option B1: Key topic 1: Anglo-Saxon England and the Norman Conquest, 1060–66 - 4 The Norman invasion: Reasons for William’s victory, including the leadership skills of Harold and William, Norman and English troops and tactics.
William’s victory at Hastings resulted from a combination of superior leadership, diverse troops, and flexible tactics.
Checked against the Pearson Edexcel 1HI0 specification (opens in a new tab) on .
- Point 2 of 2
- 4 key terms
Study notes
From the checked teaching notes for this specification point.
The idea
William’s victory at Hastings resulted from a combination of superior leadership, diverse troops, and flexible tactics. William demonstrated excellent leadership by securing papal backing, organising a complex logistical crossing, and maintaining morale during the battle. In contrast, Harold’s leadership was compromised by his rushed march south, failing to wait for reinforcements. Regarding troops, the English relied heavily on the inexperienced fyrd alongside elite housecarls, fighting exclusively as infantry. The Normans possessed a balanced force of archers, infantry, and highly trained cavalry. Tactically, the English relied solely on the static shield wall. William’s flexible tactics, notably the feigned retreat, successfully dismantled this formation, allowing his cavalry to exploit the gaps and secure victory.
What earns the marks
- Compare William's meticulous preparation and logistical planning with Harold's rushed response and exhausted troops.
- Evaluate the composition of the armies, contrasting the mixed Norman force of cavalry, archers, and infantry with the solely infantry-based English army.
- Analyse the tactical superiority of the Norman feigned retreat in breaking the static English shield wall.
- Assess William's battlefield leadership, such as showing his face to dispel rumours of his death, compared to Harold's rigid defensive posture.
Common mistakes and how to put them right
Arguing that Harold lost solely because his army was small.
Put it right: Harold's army was roughly equal in size to William's; the defeat was due to exhaustion, composition, and tactics.
Ignoring William's pre-battle preparations.
Put it right: Include William's logistical achievements, such as building flat-bottomed boats and securing the Papal Banner, as key leadership skills.
Stating the English had no elite troops.
Put it right: The English had highly trained housecarls, but they were depleted from Stamford Bridge and unsupported by cavalry.
Exam tips
- When evaluating reasons for the outcome, weigh the importance of William's strengths against Harold's weaknesses to form a balanced judgement.
- Use the specific categories mentioned in the specification (leadership, troops, tactics) to structure your paragraphs in an essay.
- Avoid simply telling the story of the battle; explicitly link events to why they caused William to win.
Try the lesson
The start of the Option B1: Key topic 1: Anglo-Saxon England and the Norman Conquest, 1060–66 - 4 The Norman invasion: Reasons for William’s victory, including the leadership skills of Harold and William, Norman and English troops and tactics. lesson, made from checked teaching notes for this specification point.
Have a go first
Which of the following was a key advantage of the Norman troops at the Battle of Hastings?
Listen
William’s victory at Hastings resulted from a combination of superior leadership, diverse troops, and flexible tactics. William demonstrated excellent leadership by securing papal backing, organising a complex logistical crossing, and maintaining morale during the battle. In contrast, Harold’s leadership was compromised by his rushed march south, failing to wait for reinforcements. Regarding troops, the English relied heavily on the inexperienced fyrd alongside elite housecarls, fighting exclusively as infantry. The Normans possessed a balanced force of archers, infantry, and highly trained cavalry. Tactically, the English relied solely on the static shield wall. William’s flexible tactics, notably the feigned retreat, successfully dismantled this formation, allowing his cavalry to exploit the gaps and secure victory. A strong answer earns marks for these points. Compare William's meticulous preparation and logistical planning with Harold's rushed response and exhausted troops. Evaluate the composition of the armies, contrasting the mixed Norman force of cavalry, archers, and infantry with the solely infantry-based English army. Analyse the tactical superiority of the Norman feigned retreat in breaking the static English shield wall. Assess William's battlefield leadership, such as showing his face to dispel rumours of his death, compared to Harold's rigid defensive posture. A common slip: Arguing that Harold lost solely because his army was small. Instead, Harold's army was roughly equal in size to William's; the defeat was due to exhaustion, composition, and tactics. Exam tip: When evaluating reasons for the outcome, weigh the importance of William's strengths against Harold's weaknesses to form a balanced judgement.
See it

Key words
Say what each word means before you turn the card.
Leadership
Try answering aloud or in your head before turning the card.
Military tactics
Try answering aloud or in your head before turning the card.
Preparation and logistics
Try answering aloud or in your head before turning the card.
Army composition
Try answering aloud or in your head before turning the card.
See every definition
- Leadership
- The skills shown by Harold and William, including William securing papal backing, organising a complex logistical crossing and maintaining morale during the battle, while Harold's was compromised by his rushed march south.
- Military tactics
- The methods used in battle, with the English relying solely on the static shield wall and William's flexible tactics, notably the feigned retreat, dismantling this formation so his cavalry could exploit the gaps.
- Preparation and logistics
- William's meticulous planning, including organising a complex logistical crossing, compared with Harold's rushed response and exhausted troops.
- Army composition
- The make-up of the forces, with the English relying on the inexperienced fyrd alongside elite housecarls and fighting exclusively as infantry, while the Normans possessed a balanced force of archers, infantry and highly trained cavalry.
Label the diagram
Some boxes have lost their names. Pick the right name for each number.
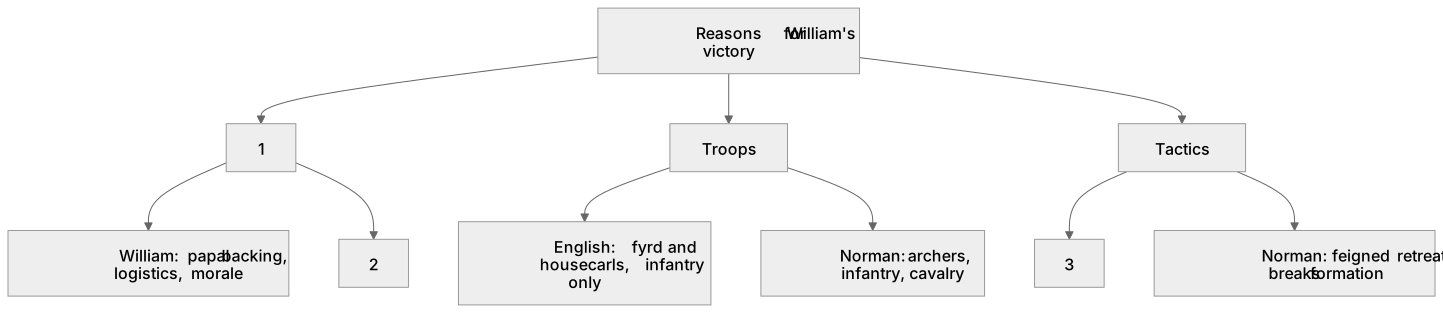
1Box 1
2Box 2
3Box 3
There is more to this lesson
The full lesson goes on to check your understanding and help you earn the marks. Create a free account to carry on, with your progress saved.
A week of Premium from your first lesson · Then the free plan continues · No card, no charge
Test your understanding of Option B1: Key topic 1: Anglo-Saxon England and the Norman Conquest, 1060–66 - 4 The Norman invasion: Reasons for William’s victory, including the leadership skills of Harold and William, Norman and English troops and tactics.
Active recall beats re-reading. Take an instant quiz now to test what you’ve learned and lock it into long-term memory.
A week of Premium from your first lesson · Then the free plan continues · No card, no charge