Illustration — OCR GCSE Study Guide
Exam Board: OCR | Level: GCSE
This guide provides a comprehensive overview of the Illustration component (3.2) for OCR GCSE Art and Design. It focuses on developing narrative skills, mastering technical processes, and building a high-scoring portfolio that meets all four Assessment Objectives.
## Overview
Illustration, within the OCR GCSE Art and Design specification, is the art of visual communication. It is a powerful discipline where candidates synthesise narrative intent with technical proficiency to tell stories, convey moods, and communicate complex ideas. The specification mandates a seamless trajectory from investigating contextual sources (AO1) to realising a personal, visual response (AO4), emphasising the communicative power of image-making. Unlike other fine art disciplines, illustration is often created for a specific context, such as a book cover, an editorial piece, or a product packaging, and therefore must balance personal expression with the needs of a brief or audience.
## Key Knowledge & Theory
### Core Concepts
To excel, candidates must grasp the core theoretical pillars of illustration. This is not just about drawing well; it is about thinking like a designer and a storyteller. Key concepts include **Narrative Construction** (how an image tells a story), **Compositional Hierarchy** (guiding the viewer's eye), **Visual Language** (the way style and technique create meaning), and the relationship between **Image and Typography**. Understanding these concepts is crucial for providing the analytical annotation that examiners reward.
### Key Practitioners/Artists/Composers
Credit is given for analysing how practitioners use visual language, not for reciting their biographies. Your research (AO1) must inform your own practical explorations (AO2).
| Name | Period/Style | Key Works | Relevance |
|---|---|---|---|
| Quentin Blake | Contemporary | *The BFG*, *Matilda* (Illustrations for Roald Dahl) | Master of expressive, economical line work. His seemingly simple ink drawings convey immense character and energy, proving that technical polish is not the only route to successful illustration. |
| Malika Favre | Contemporary | *The New Yorker* covers, *Kama Sutra* alphabet | A leading figure in modern vector illustration. Her work is a masterclass in using bold, flat colour, negative space, and Art Deco-inspired geometric forms to create elegant and conceptually clever images. |
| Ralph Steadman | Contemporary | *Fear and Loathing in Las Vegas* | The king of 'Gonzo' journalism's visual equivalent. His chaotic, aggressive ink splatters and distorted caricatures are a powerful example of how a specific technique can be used to convey a strong political or emotional message. |
| Beatrice Potter | Late 19th/Early 20th Century | *The Tale of Peter Rabbit* | A foundational figure who combined meticulous, scientific observation of nature with anthropomorphic characters. Her work demonstrates how to create a believable, immersive world through precise watercolour technique and careful character design. |
### Technical Vocabulary
Using subject-specific terminology correctly is essential for high-level analysis in your annotations (AO3) and any written components.
- **Mark-making**: The different types of lines, dots, textures, and shapes created in an artwork.
- **Line Weight**: The thickness or thinness of a line, used to create emphasis, depth, and form.
- **Compositional Hierarchy**: The arrangement of visual elements to guide the viewer's eye in order of importance.
- **Narrative Arc**: The progression of a story within a single image or series of images.
- **Anthropomorphism**: Giving human characteristics or behaviours to animals or objects.
- **Vector Illustration**: Creating digital images using mathematical paths, which allows for infinite scaling without loss of quality (e.g., using Adobe Illustrator).
- **Raster/Bitmap Illustration**: Creating digital images using a grid of pixels, where quality is dependent on resolution (e.g., using Procreate or Photoshop).
- **Maquette**: A small-scale model or rough draft of an unfinished sculpture or piece of work.
## Practical Skills
### Techniques & Processes
Purposeful selection of media (AO2) is critical. You must experiment with different techniques and document *why* you have chosen a specific approach to enhance your narrative.
### Materials & Equipment
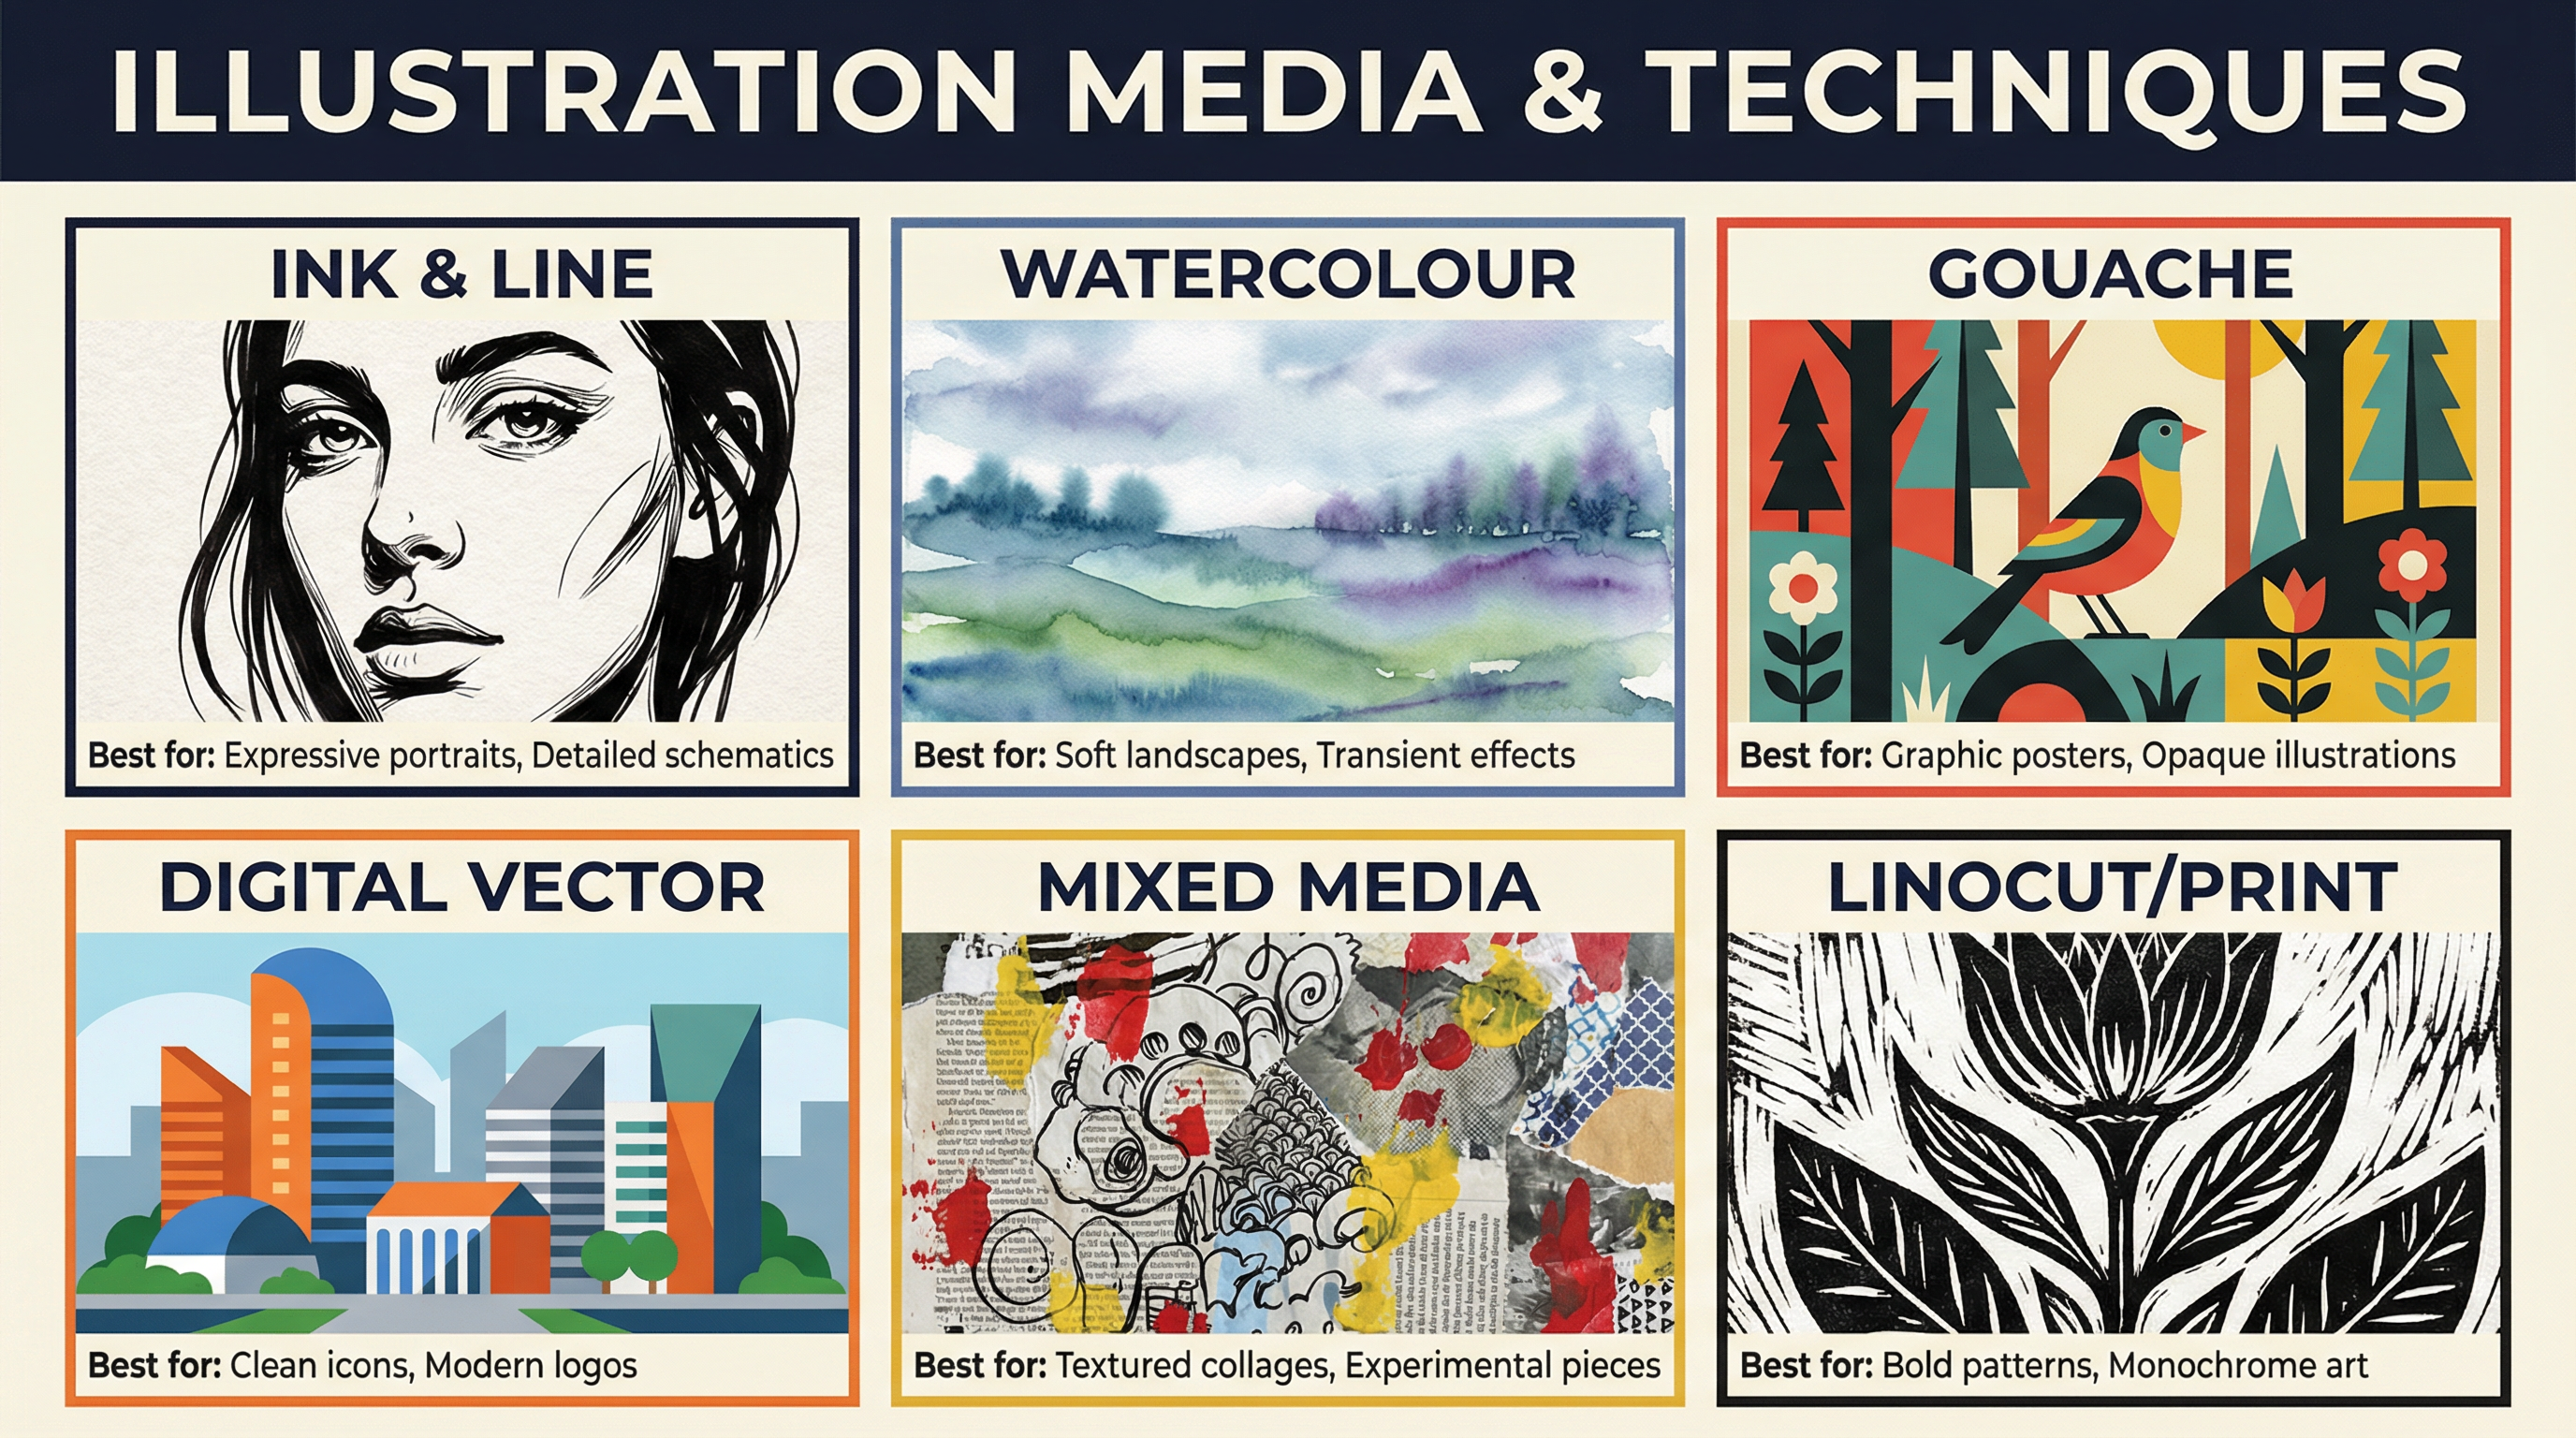
Understanding your tools is fundamental. The table below outlines common materials and their typical applications in illustration.
| Material/Equipment | Primary Use | Key Consideration |
|---|---|---|
| **Dip Pen & Ink** | Creating expressive lines with varying weight. | Can be messy; requires practice to control ink flow. |
| **Fine-liners** | Detailed, consistent line work and technical drawing. | Offers less line variation than a dip pen. |
| **Watercolour** | Creating atmospheric, transparent washes of colour. | Difficult to correct mistakes; requires planning. |
| **Gouache** | Producing flat, opaque, vibrant blocks of colour. | Can be reactivated with water, allowing for blending but risking muddying colours. |
| **Graphic Tablet & Stylus** | Digital drawing, painting, and vector illustration. | The disconnect between hand and screen (on non-display tablets) requires coordination. |
| **Lino & Cutting Tools** | Relief printing for bold, graphic, and textured results. | A physically demanding process that requires careful health and safety consideration. |
## Portfolio/Coursework Guidance
### Assessment Criteria
Your entire portfolio is assessed against four equally weighted Assessment Objectives. Your project must show clear evidence for all four.
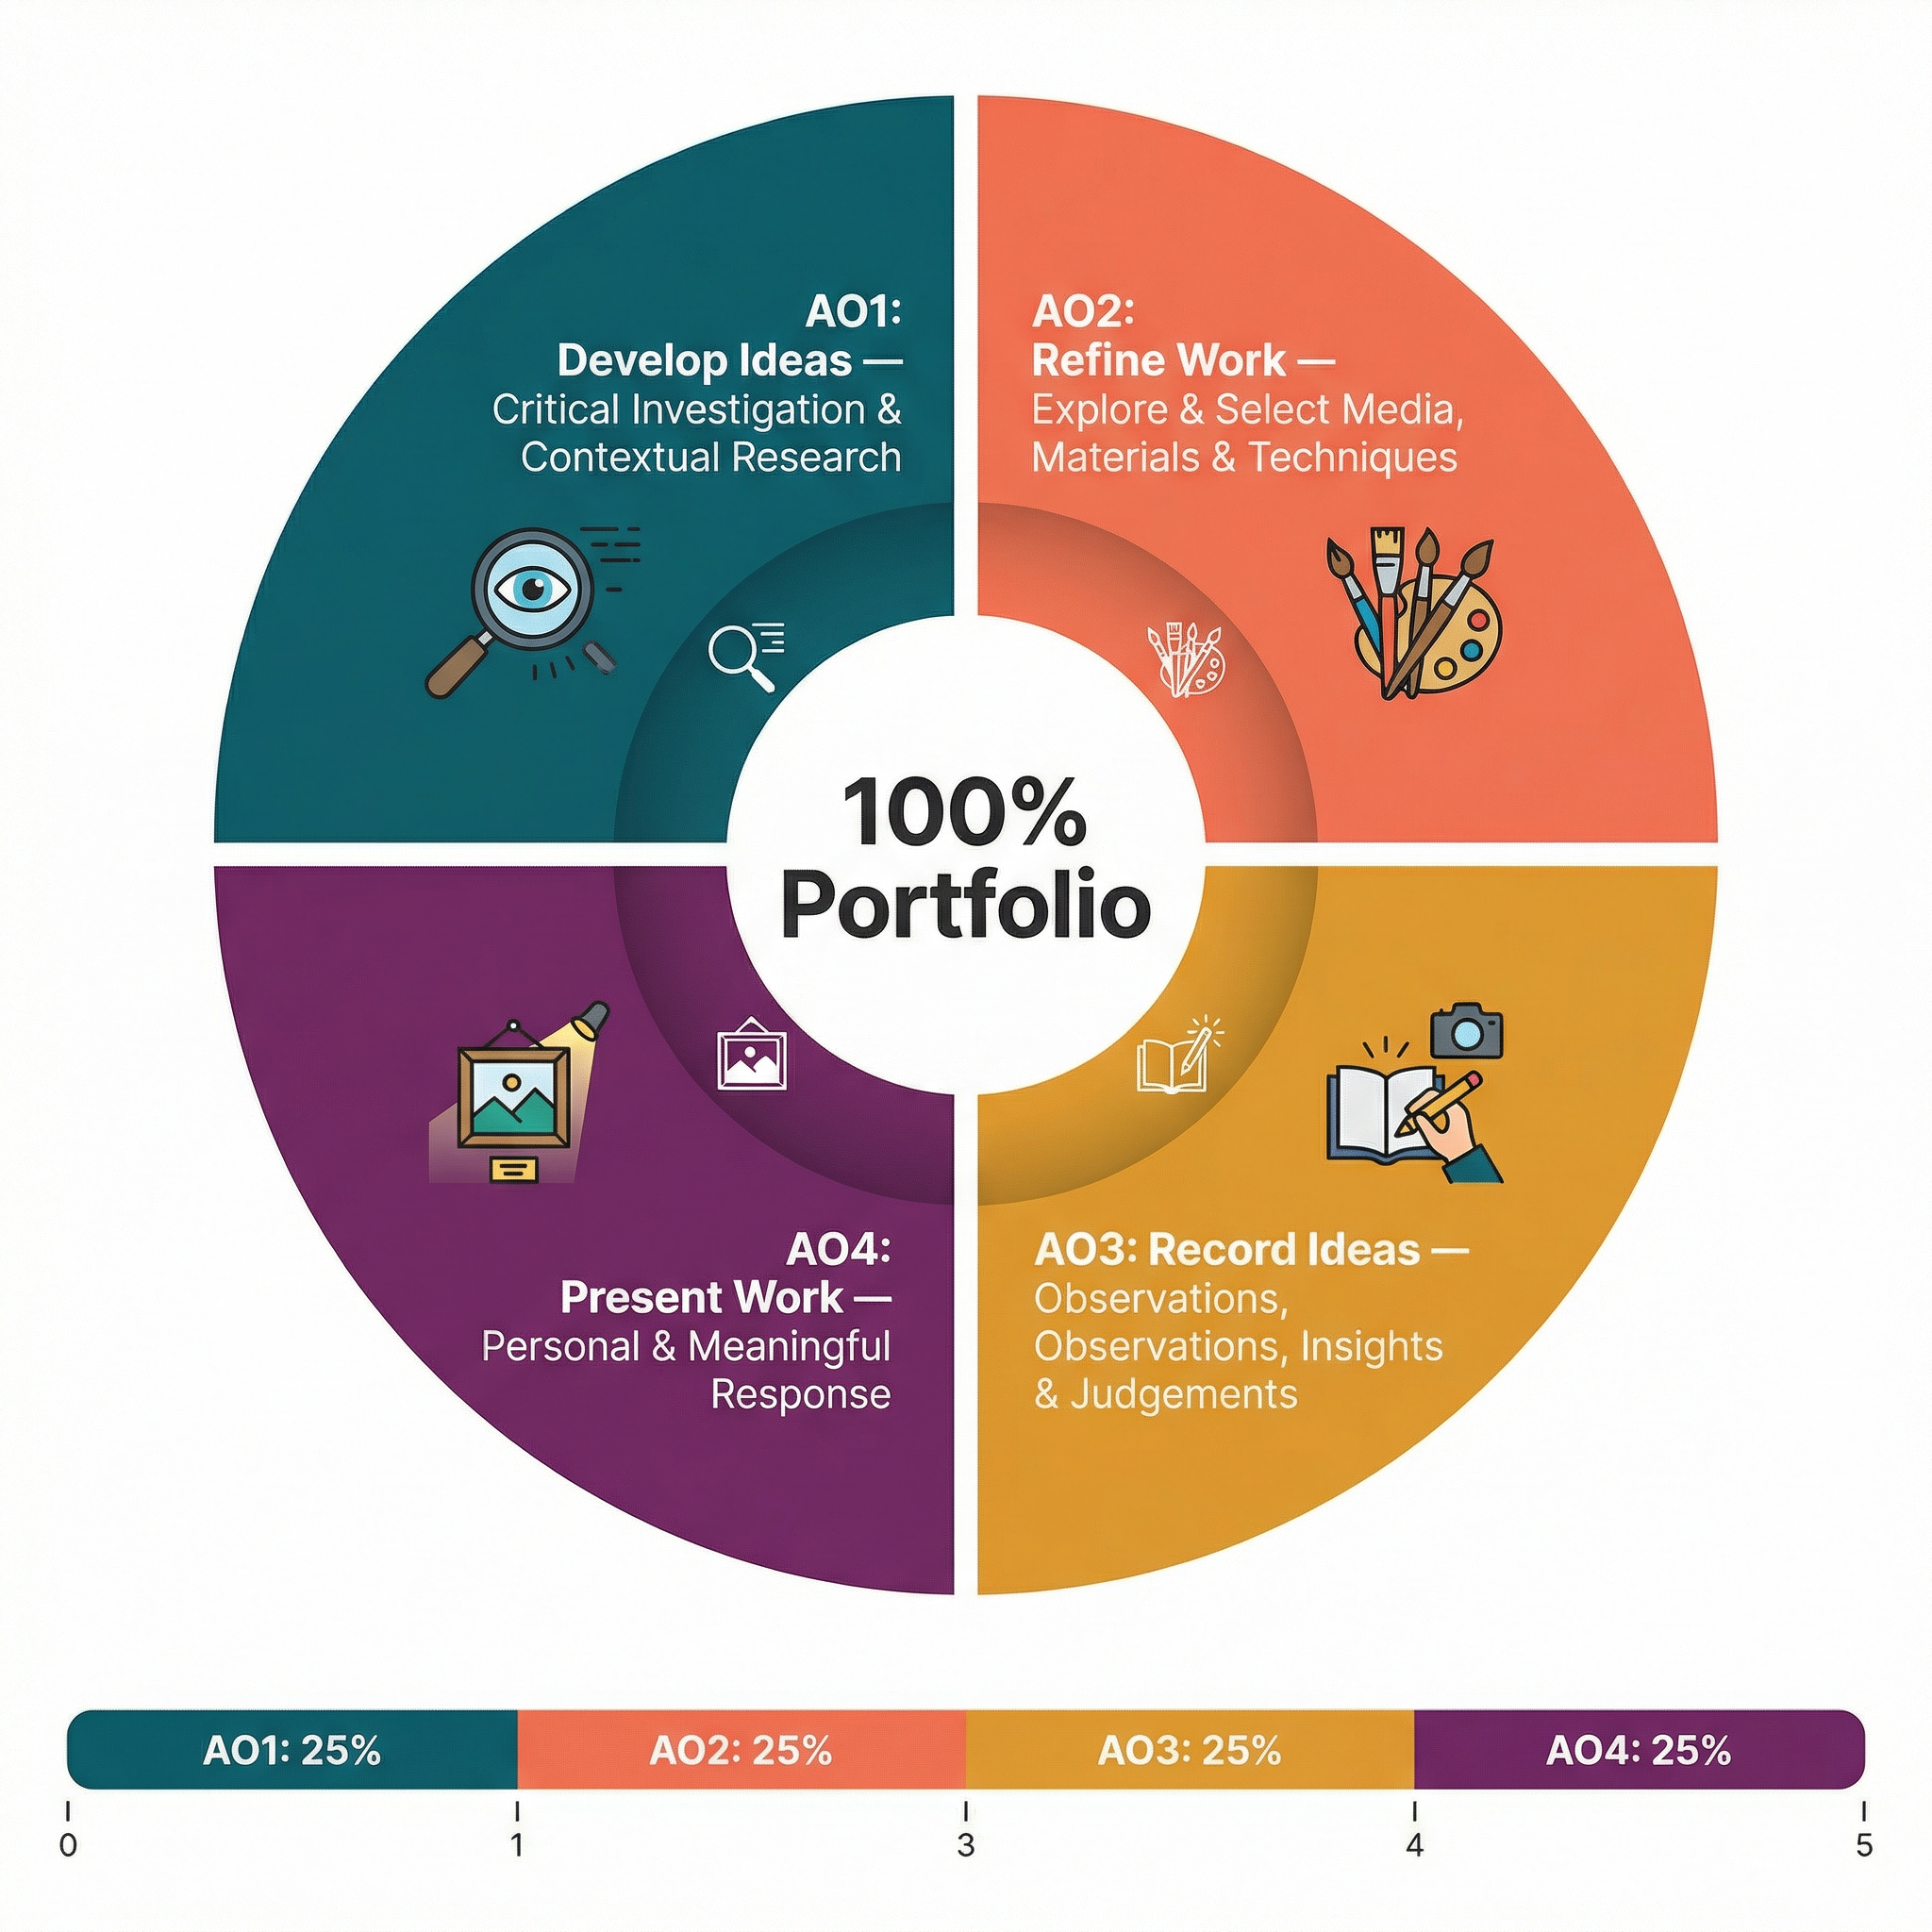
- **AO1: Develop** - Research artists, collect primary and secondary source imagery, and analyse them to inform your own ideas.
- **AO2: Refine** - Experiment with different media, techniques, and compositions. Show your failures and explain what you learned.
- **AO3: Record** - Use your sketchbook to draw from observation, make notes, and document your creative journey. Annotate everything!
- **AO4: Present** - Create a final, personal, and meaningful outcome that successfully connects to all the preparatory work you have done.
### Building a Strong Portfolio
A successful portfolio tells the story of your creative journey. It is not just a collection of your best drawings. Examiners want to see your thought process.
- **Annotate Everything**: Explain your ideas, your influences, and your technical choices. Use the 'What, How, Why' formula when analysing artists' work. Write your annotations as you work, not all at the end.
- **Show Development**: Your final piece shouldn't come out of nowhere. Your sketchbook must show the journey: initial sketches, character development, compositional thumbnails, colour tests, and media experiments.
- **Embrace 'Failure'**: Documenting what went wrong and how you solved the problem is excellent evidence of refinement (AO2). A page showing a print that failed, with notes on how you will improve it next time, is more valuable than a page of flawless but simple studies.
- **Primary Observation is Non-Negotiable**: Your portfolio MUST contain drawings made from life. Go out and sketch people, places, and objects relevant to your theme. It provides an authenticity that cannot be faked by copying photos.
## Exam Component
### Written Exam Knowledge
The 'exam' for OCR Art and Design is the **Externally Set Assignment**. You will choose a theme from a paper released by OCR and have a set amount of prep time to develop a project, before creating a final outcome in a supervised, timed period (usually 10 hours).
### Practical Exam Preparation
Success in the timed exam is all about the quality of your preparatory work. By the time the 10 hours begin, you should have a crystal-clear plan for your final piece.
- **Deconstruct the Brief**: Spend time breaking down your chosen theme. Create a mind map of initial ideas.
- **Plan Your Prep Time**: Work backwards from the exam date. Allocate specific weeks to AO1, AO2, and AO3. Your prep work should be a complete, self-contained project.
- **Prepare Maquettes**: Before the timed test, create at least one detailed, full-colour 'final draft' of your intended outcome. This allows you to solve all compositional and technical problems before the clock starts ticking.
- **Organise Your Materials**: Have all your required materials and equipment prepared and ready to go on day one of the exam.
