Surface Pattern — OCR GCSE Study Guide
Exam Board: OCR | Level: GCSE
This guide provides a comprehensive overview of Surface Pattern for OCR GCSE Art and Design, focusing on the practical skills, theoretical knowledge, and portfolio strategies needed to excel. Candidates will learn to master repeat structures, analyse key practitioners, and develop a strong personal response to achieve top marks."
## Overview
Surface Pattern (4.3) is a core component of the Art and Design specification that requires candidates to design and create patterns for specific surfaces. This involves a deep understanding of repeat structures, the manipulation of motifs through both digital and manual processes, and a critical engagement with historical and contemporary design contexts. Success in this area hinges on a candidate's ability to demonstrate a sustained investigation, from initial research and observational drawing through to a technically proficient final outcome. Examiners are looking for a seamless journey that connects critical thinking with practical skill.

## Key Knowledge & Theory
### Core Concepts
The fundamental principle of surface pattern is the **repeat unit**. A single design element, or **motif**, is repeated across a surface according to a defined structure. Mastery of these structures is non-negotiable for achieving high marks.
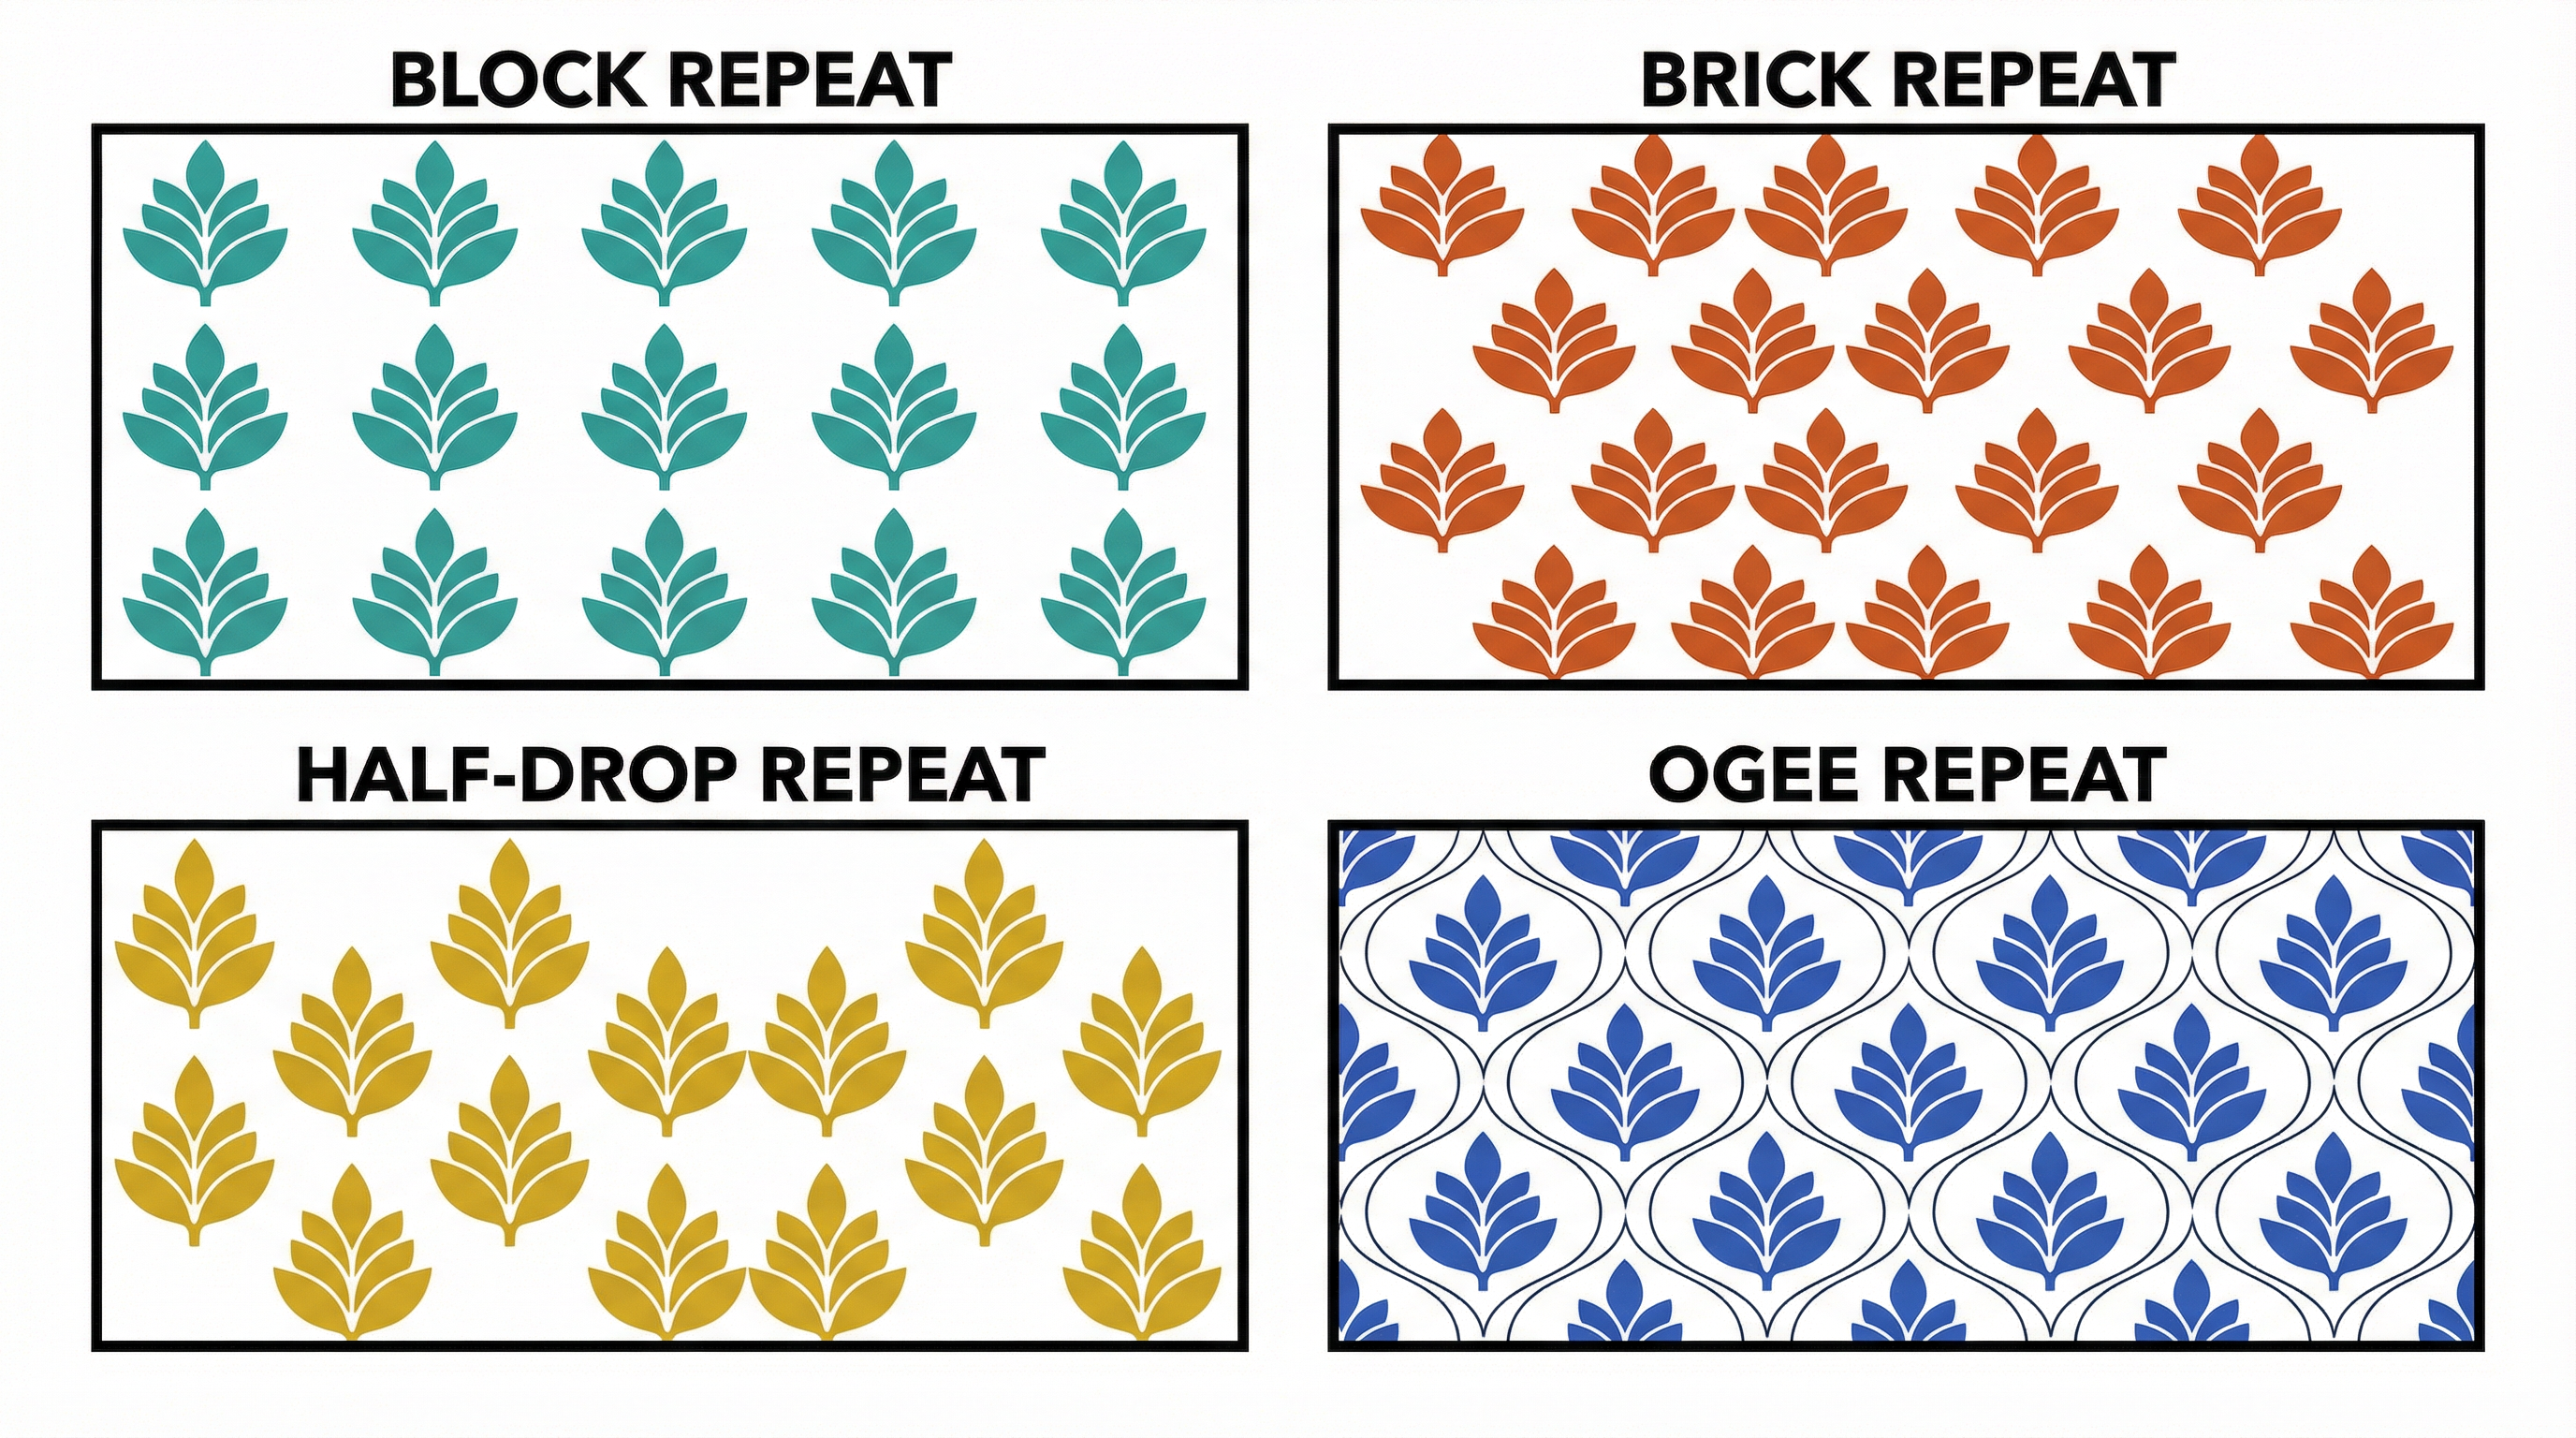
* **Block Repeat**: The simplest structure, where the motif is repeated in a simple grid. This creates a formal, static effect.
* **Brick Repeat**: Each row is offset by half a unit horizontally, creating a more dynamic, staggered arrangement like a brick wall.
* **Half-Drop Repeat**: Each column is offset by half a unit vertically. This creates a flowing, diagonal movement and is one of the most common and versatile repeat structures in textile and wallpaper design.
* **Ogee Repeat**: A more complex structure based on an S-shaped curve that forms interlocking diamond or onion shapes. This creates a sense of opulence and is often seen in historical and decorative patterns.
### Key Practitioners/Artists/Composers
| Name | Period/Style | Key Works | Relevance |
|---|---|---|---|
| William Morris | 1834-1896 / Arts & Crafts | *Strawberry Thief*, *Acanthus*, *Willow Bough* | A foundational figure. His emphasis on hand-craft, natural forms, and complex, layered repeat structures (often ogee and half-drop) provides a crucial historical context. His design process—from direct observation of nature to simplified motif to complex repeat—is a model for portfolio development. |
| Lucienne Day | 1917-2010 / Mid-Century Modern | *Calyx*, *Dandelion Clocks* | Revolutionised post-war textile design with her abstract, linear, and optimistic patterns. Her work provides a vital counterpoint to Morris, demonstrating that pattern can be minimalist, graphic, and contemporary. Essential for showing awareness of modernist principles. |
| The Memphis Group | 1981-1987 / Postmodernism | *Bacterio* laminate pattern by Ettore Sottsass | A radical design collective that challenged 'good taste'. Their work is characterised by bold, clashing colours, geometric shapes, and a playful, kitsch aesthetic. A key reference for projects exploring themes of pop culture, postmodernism, or anti-design. |
| Timorous Beasties | 1990-Present / Contemporary | *Glasgow Toile*, *Thistle* | A contemporary Scottish studio known for their subversive and often provocative take on traditional patterns. They blend historical motifs with challenging modern imagery (e.g., depicting social decay within a classical toile de Jouy). Excellent for demonstrating engagement with contemporary practice. |
### Technical Vocabulary
Using precise terminology is essential for high-level annotation and analysis. Credit is given for candidates who can articulate their ideas with the vocabulary of a designer.
* **Motif**: A single, recurring design element in a pattern.
* **Repeat Unit**: The smallest tile or block of the design that, when repeated, forms the complete pattern.
* **Registration**: The correct alignment of separate colours or screens in a multi-colour print. Poor registration is a common technical fault.
* **Colour Separation**: The process of breaking down a design into separate layers, one for each colour to be printed.
* **Symmetry/Asymmetry**: The arrangement of motifs. Symmetrical patterns are balanced and formal; asymmetrical patterns are more dynamic and modern.
* **Tessellation**: A pattern of shapes that fit together perfectly without any gaps, like a mosaic.
## Practical Skills
### Techniques & Processes
1. **Motif Development (AO3)**: This is the starting point. Begin with **primary source observational drawing**. Draw from life, not from photos on the internet. Record plants, objects, or architectural forms in your sketchbook. Then, begin a process of **simplification and abstraction**. Trace your drawing, removing detail and focusing on the essential lines and shapes. Show this journey clearly in your portfolio.
2. **Repeat Construction (AO2)**: Once you have a simplified motif, you must experiment with placing it into a repeat structure. This can be done manually by tracing and tiling, or digitally using software like Adobe Illustrator or Photoshop. Test your motif in at least two different repeat structures (e.g., block and half-drop) to analyse the different visual effects.
3. **Printing (AO2 & AO4)**: Experiment with different printing methods to refine your ideas.
* **Lino Printing**: Carve your motif into a lino block. This technique produces bold, graphic results. Focus on clean carving and consistent ink application.
* **Screen Printing**: A versatile and professional technique. This requires you to create a stencil on a mesh screen. It is excellent for printing on fabric and allows for precise colour separation and layering.
* **Digital Printing (Sublimation)**: Design your pattern digitally and use a heat press to transfer it to a synthetic fabric. This allows for unlimited colour and photographic detail, but you must still evidence the design process that led to the digital file.
### Materials & Equipment
* **Surfaces**: Cartridge paper, fabric (calico, cotton, silk), specialist printing papers.
* **Drawing Media**: Pencils (2B, 4B), fine liner pens, charcoal, ink.
* **Printing Inks**: Water-based block printing inks, screen printing inks (for fabric or paper), sublimation inks.
* **Tools**: Lino cutting tools, rollers (brayers), screens, squeegees, heat press.
* **Safety**: Always use a bench hook when cutting lino. Ensure good ventilation when using screen printing chemicals or a heat press.
## Portfolio/Coursework Guidance
### Assessment Criteria
Your portfolio is a visual story of your creative journey. It must provide clear evidence for all four Assessment Objectives. Examiners need to see your thinking, not just your final piece.
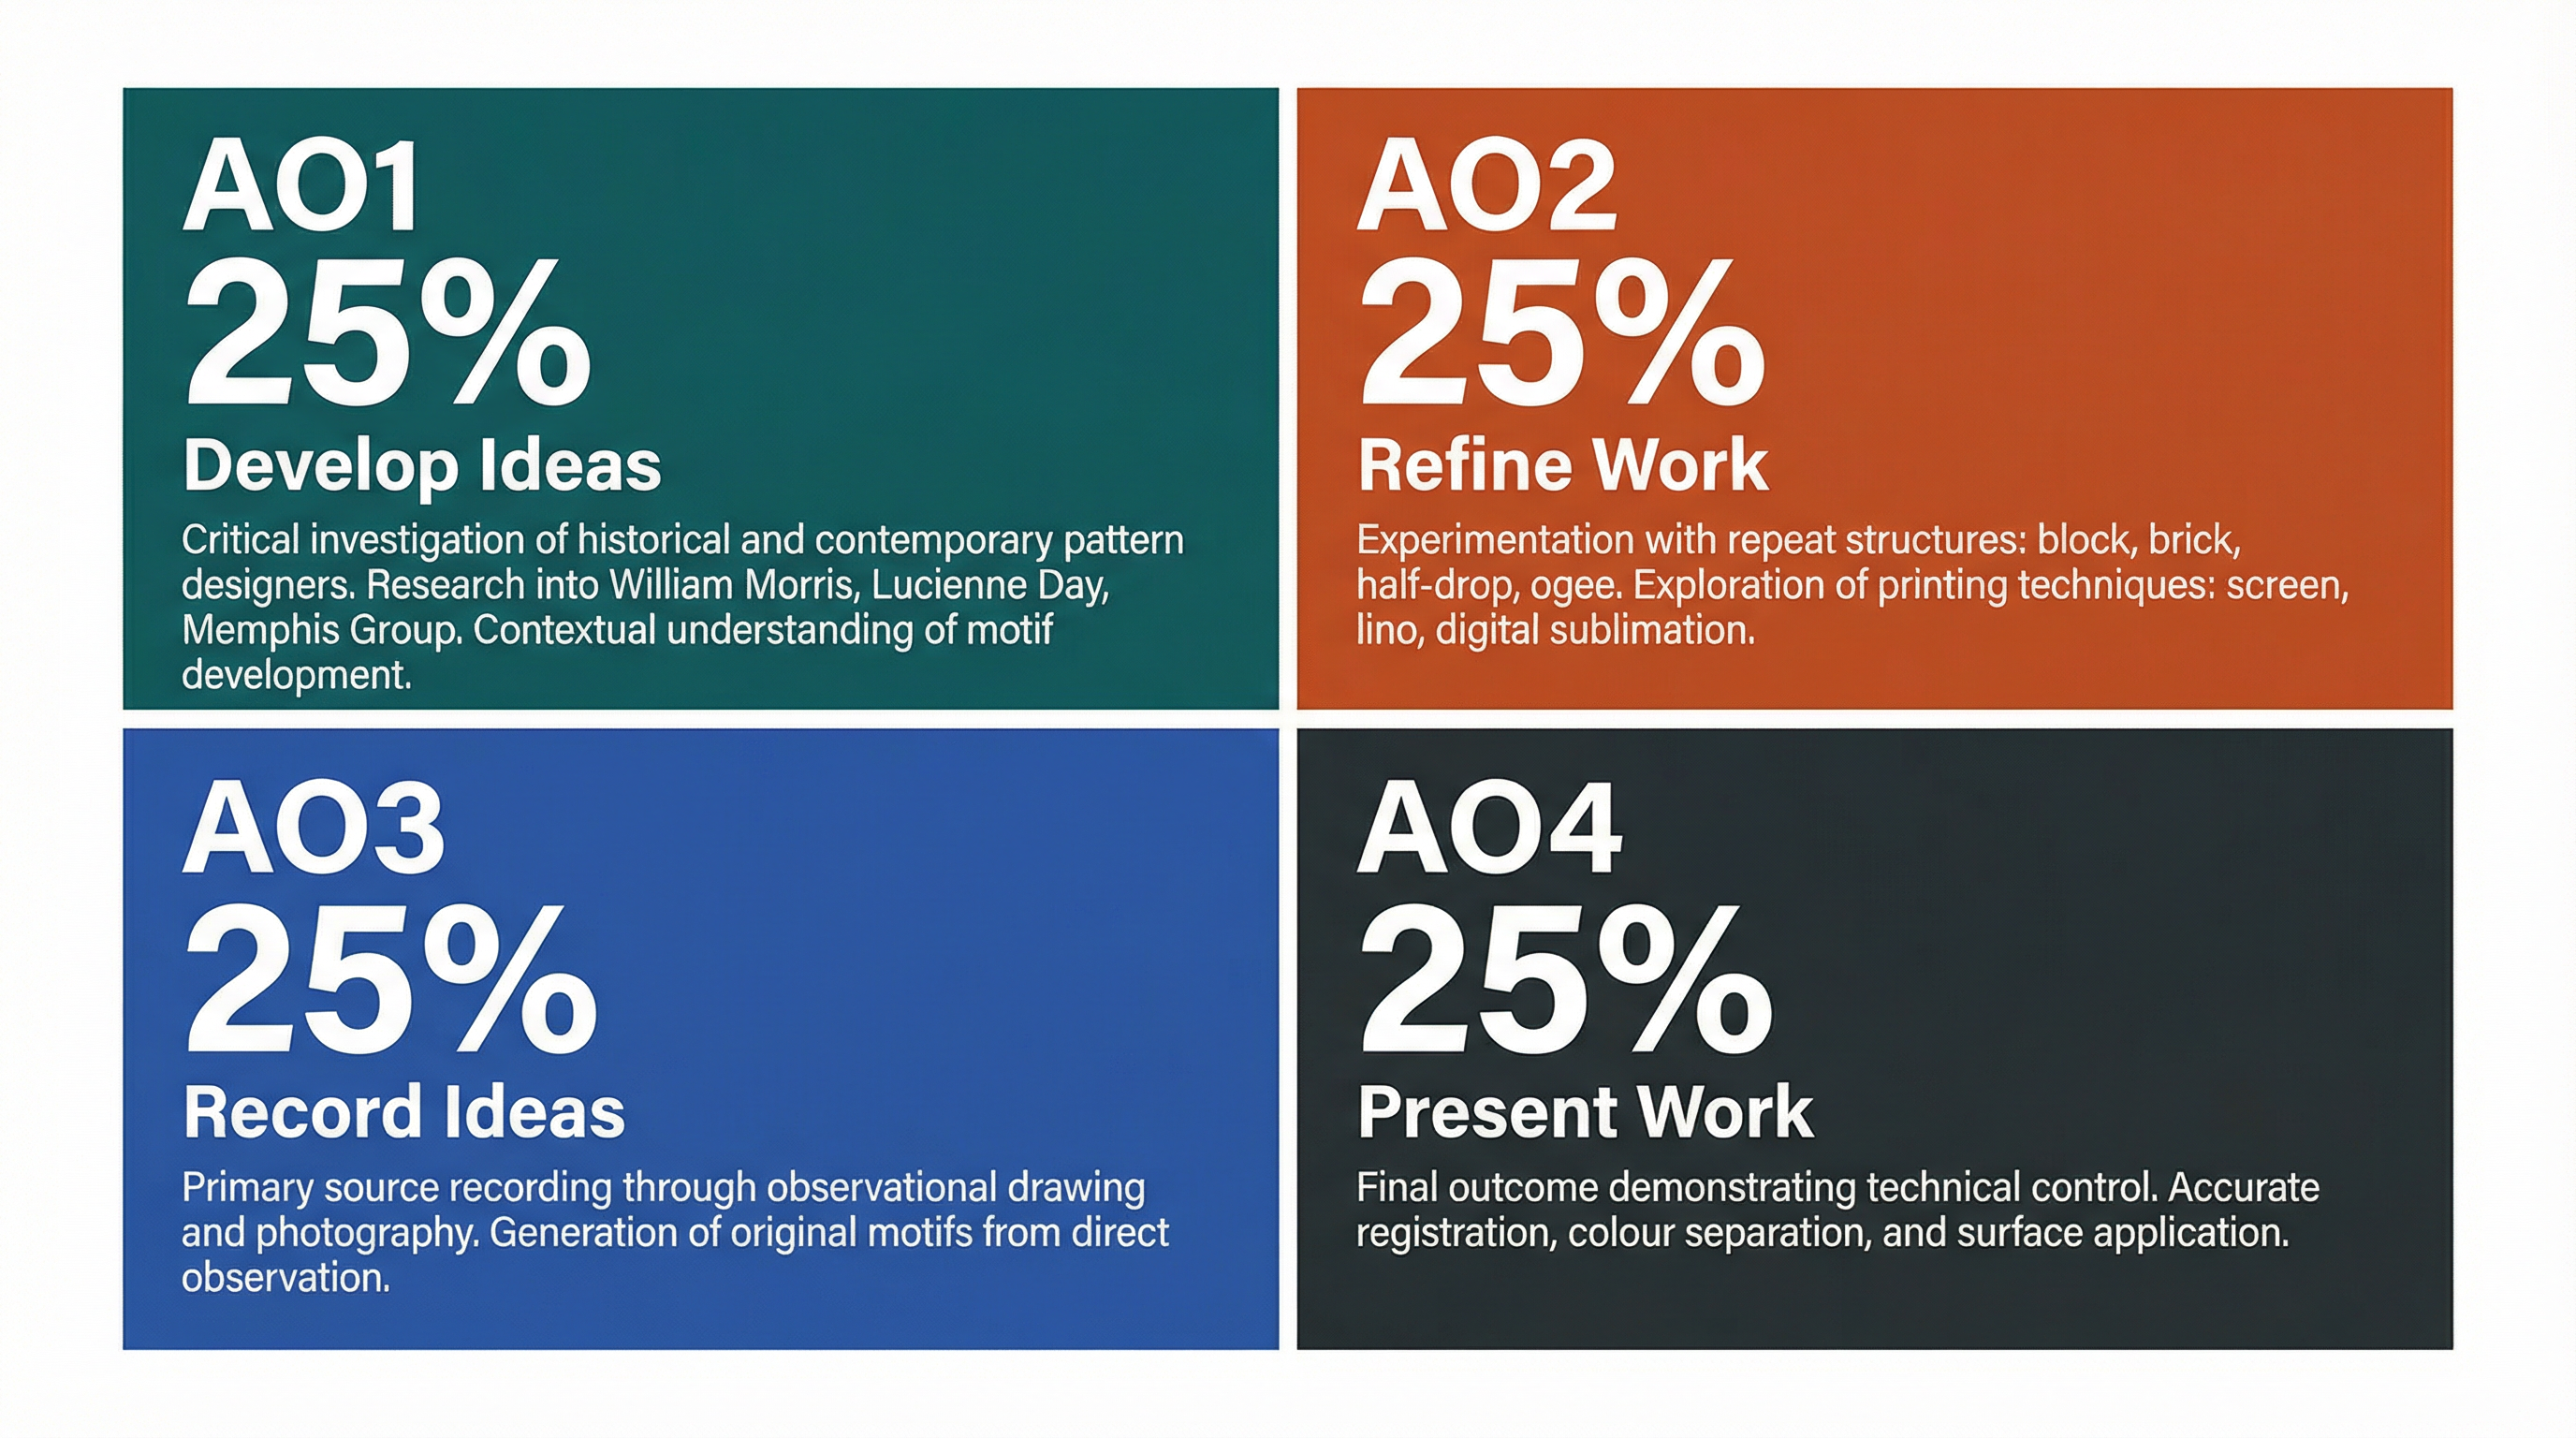
* **AO1: Develop Ideas**: Show your research. Include artist analysis, mind maps, and mood boards. Your annotations must explain *how* your research has influenced your own ideas.
* **AO2: Refine Work**: This is your experimentation. Show tests with different repeat structures, colour palettes, and printing techniques. Annotate what worked, what didn't, and why.
* **AO3: Record Ideas**: This is your drawing. Include your initial detailed observational drawings and the subsequent process of simplification. Photography can be used, but it must be your own and should be used as a starting point for drawing.
* **AO4: Present Work**: Your final outcome. This should be a polished, well-executed piece that is the culmination of all your development work. It must demonstrate technical skill and a clear personal vision.
### Building a Strong Portfolio
* **Annotation is King**: Your annotations are your voice. They explain your decisions and demonstrate your understanding. Use analytical language (explain *why*), not descriptive language (explain *what*).
* **Show the Journey**: Don't just show the perfect final prints. Include misprints, test strips, and failed experiments. These are evidence of a rigorous working process and are crucial for AO2 marks.
* **Link Everything**: Your portfolio should have a clear narrative thread. Your research (AO1) should inform your drawings (AO3), which should lead to your experiments (AO2), which culminate in your final piece (AO4). Use annotations to explicitly state these connections.
## Exam Component
### Written Exam Knowledge
While OCR Art and Design does not have a traditional written exam, the **annotation in your portfolio serves the same function**. You will be assessed on your ability to use specialist vocabulary and write critically about your own work and the work of others. The quality of your written analysis can be the difference between a top grade and a mediocre one.
### Practical Exam Preparation
The **Externally Set Task (ESA)** is a practical exam where you are given a theme and a preparation period (usually around 8-10 weeks), culminating in a timed practical test (10 hours).
* **Use the Prep Period**: This is not a suggestion; it is essential. Use this time to conduct all your AO1, AO2, and AO3 work. Develop your motifs, test your repeat structures, and resolve any technical issues with your chosen printing method.
* **Plan for the Timed Test**: Walk into the 10-hour exam with a clear plan of what you are going to produce for your final outcome (AO4). You should have already tested and proven your design. The timed test is for execution, not for last-minute experimentation.
* **Time Management**: Break the 10 hours down. For a multi-colour screen print, for example, you might allocate time for screen preparation, colour mixing, printing the first layer, drying time, and printing subsequent layers. Practice this under timed conditions."