AQA · GCSE · Biology
Course version: 8461 · Version from Sept 2018
Required practical activity 1: use a light microscope to observe, draw and…
Full specification wording
Animal and plant cells: Required practical activity 1: use a light microscope to observe, draw and label a selection of plant and animal cells. A magnification scale must be included.
In this required practical you prepare slides and use a light microscope to observe plant and animal cells.
Checked against the AQA 8461 specification (opens in a new tab) on .
- Point 6 of 8
- 4 key terms
Study notes
From the checked teaching notes for this specification point.
The idea
In this required practical you prepare slides and use a light microscope to observe plant and animal cells. For an onion epidermis slide, peel a thin layer, place it on a slide, add a drop of iodine solution as a stain, and lower a coverslip carefully to avoid air bubbles. For a cheek cell slide, swab the inside of your mouth, smear the sample on a slide, and stain with methylene blue. Start on the lowest power objective, focus with the coarse adjustment, then move to higher power and focus with the fine adjustment. Draw what you see using clear, unbroken lines, label visible structures such as the nucleus, cytoplasm, cell membrane, cell wall and vacuole, and add a magnification scale. The scale may be a scale bar or a statement such as 'magnification ×400'.
What earns the marks
- Prepares a slide correctly, including a thin specimen, a suitable stain and a coverslip lowered to reduce air bubbles.
- Uses the microscope safely and correctly, starting on low power and focusing with the appropriate adjustment knob.
- Draws cells using clear continuous lines without shading, showing the observed shape and arrangement.
- Labels visible structures accurately, such as the nucleus, cytoplasm, cell membrane, cell wall and vacuole.
- Includes a magnification scale, either as a scale bar or a stated magnification, with correct units where used.
Common mistakes and how to put them right
Drawing cells from memory rather than from the observed field of view.
Put it right by drawing only what is visible in the eyepiece.
Shading or sketching with broken lines.
Put it right by using clear, unbroken lines and no shading.
Omitting the magnification scale.
Put it right by adding a scale bar or stating the magnification used.
Exam tips
- Label lines should be straight, drawn with a ruler, and touch the structure they identify without arrowheads.
- Record the objective lens or total magnification you used so the scale you add is meaningful.
- If a drawing looks cluttered, draw fewer cells larger rather than many tiny cells.
Try the lesson
The start of the Animal and plant cells: Required practical activity 1: use a light microscope to observe, draw and label a selection of plant and animal cells. A magnification scale must be included. lesson, made from checked teaching notes for this specification point.
Have a go first
When drawing a selection of plant and animal cells observed under a light microscope, which of the following must be included with the drawing?
Listen
In this required practical you prepare slides and use a light microscope to observe plant and animal cells. For an onion epidermis slide, peel a thin layer, place it on a slide, add a drop of iodine solution as a stain, and lower a coverslip carefully to avoid air bubbles. For a cheek cell slide, swab the inside of your mouth, smear the sample on a slide, and stain with methylene blue. Start on the lowest power objective, focus with the coarse adjustment, then move to higher power and focus with the fine adjustment. Draw what you see using clear, unbroken lines, label visible structures such as the nucleus, cytoplasm, cell membrane, cell wall and vacuole, and add a magnification scale. The scale may be a scale bar or a statement such as 'magnification ×400'. A strong answer earns marks for these points. Prepares a slide correctly, including a thin specimen, a suitable stain and a coverslip lowered to reduce air bubbles. Uses the microscope safely and correctly, starting on low power and focusing with the appropriate adjustment knob. Draws cells using clear continuous lines without shading, showing the observed shape and arrangement. Labels visible structures accurately, such as the nucleus, cytoplasm, cell membrane, cell wall and vacuole. A common slip: Drawing cells from memory rather than from the observed field of view. Instead, drawing only what is visible in the eyepiece. Exam tip: Label lines should be straight, drawn with a ruler, and touch the structure they identify without arrowheads.
See it
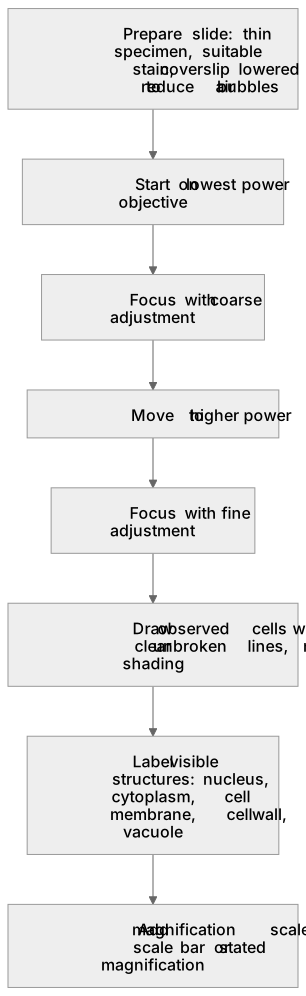
Put it in order
Put these steps in the order they happen.
- 1. Focus with fine adjustment
- 2. Add magnification scale: scale bar or stated magnification
- 3. Draw observed cells with clear unbroken lines, no shading
- 4. Prepare slide: thin specimen, suitable stain, coverslip lowered to reduce air bubbles
- 5. Start on lowest power objective
- 6. Label visible structures: nucleus, cytoplasm, cell membrane, cell wall, vacuole
- 7. Focus with coarse adjustment
- 8. Move to higher power
Key words
Say what each word means before you turn the card.
Practical microscopy skills
Try answering aloud or in your head before turning the card.
Cell structure
Try answering aloud or in your head before turning the card.
Scientific drawing and labelling
Try answering aloud or in your head before turning the card.
Magnification and scale
Try answering aloud or in your head before turning the card.
See every definition
- Practical microscopy skills
- Preparing slides and using a light microscope to observe plant and animal cells, starting on the lowest power objective and focusing with the coarse then fine adjustment.
- Cell structure
- The visible structures labelled in observed cells, such as the nucleus, cytoplasm, cell membrane, cell wall and vacuole.
- Scientific drawing and labelling
- Drawing what you see using clear, unbroken lines without shading, and labelling visible structures accurately.
- Magnification and scale
- A magnification scale included with a drawing, either as a scale bar or a statement such as 'magnification ×400'.
Label the diagram
Some boxes have lost their names. Pick the right name for each number.
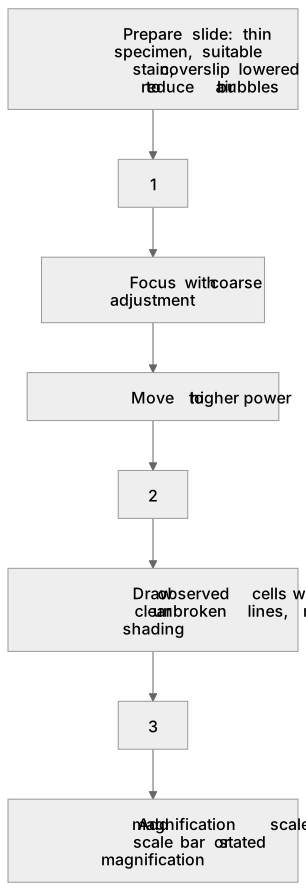
1Box 1
2Box 2
3Box 3
There is more to this lesson
The full lesson goes on to check your understanding and help you earn the marks. Create a free account to carry on, with your progress saved.
A week of Premium from your first lesson · Then the free plan continues · No card, no charge
Test your understanding of Animal and plant cells: Required practical activity 1: use a light microscope to observe, draw and label a selection of plant and animal cells. A magnification scale must be included.
Active recall beats re-reading. Take an instant quiz now to test what you’ve learned and lock it into long-term memory.
A week of Premium from your first lesson · Then the free plan continues · No card, no charge