AQA · GCSE · Combined Science
Course version: 8464 · Version from Sept 2018
Describe how to plot the magnetic field pattern of a magnet using a compass
Full specification wording
Magnetic fields: describe how to plot the magnetic field pattern of a magnet using a compass
To plot a magnetic field pattern, place a magnet on paper and put a small plotting compass near one pole.
Checked against the AQA 8464 specification (opens in a new tab) on .
- Point 6 of 8
- 4 key terms
Study notes
From the checked teaching notes for this specification point.
The idea
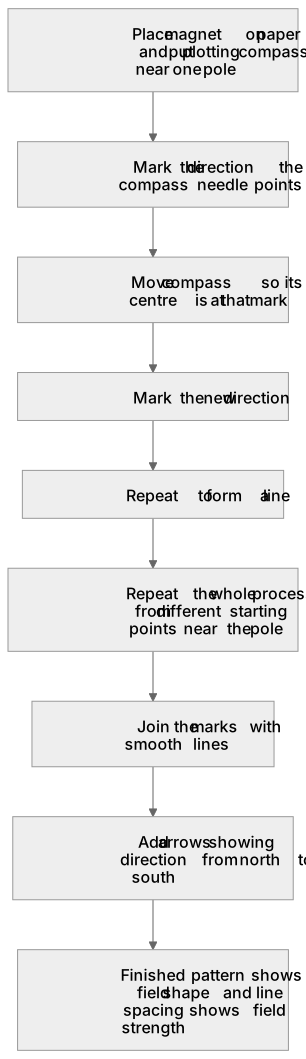
To plot a magnetic field pattern, place a magnet on paper and put a small plotting compass near one pole. Mark the direction the compass needle points, move the compass so its centre is at that mark, and mark the new direction. Repeat this around the magnet to form a line. Crucially, repeat this entire process from different starting points near the pole to draw multiple field lines. Join the marks with smooth lines and add arrows showing the direction from the north to the south pole. The finished pattern shows the field's shape, and the spacing of the lines indicates field strength. Keep the compass away from other magnetic materials to avoid distortion.
What earns the marks
- Place the magnet on paper and place a plotting compass near one pole.
- Mark the direction in which the compass needle points, then move the compass to that mark and repeat to form a line.
- Repeat the process from different starting points near the pole to draw multiple field lines.
- Join the marks with smooth lines and add arrows showing the direction from north to south.
- Keep the compass away from other magnets or magnetic materials to avoid a distorted pattern.
Common mistakes and how to put them right
Moving the compass randomly instead of placing it at the previous mark.
Put it right by moving the compass centre to the last marked point.
Drawing straight lines between marks instead of smooth curves.
Put it right by joining the marks with a smooth line that follows the field direction.
Plotting only a single field line.
Put it right by repeating the method from different starting points to reveal the full field pattern and line spacing.
Exam tips
- Write the method as a clear sequence of steps, including the repeated move-and-mark step.
- Remember to state that the process must be repeated from different starting points to show the spacing between multiple field lines.
- Mention that the paper, magnet and compass should be kept away from other magnetic materials.
Try the lesson
The start of the Magnetic fields: describe how to plot the magnetic field pattern of a magnet using a compass lesson, made from checked teaching notes for this specification point.
Have a go first
A student is using a small plotting compass to plot the magnetic field pattern of a bar magnet. Which of the following describes the correct next step after placing the compass near the magnet and marking the position of the needle's tip?
Listen
To plot a magnetic field pattern, place a magnet on paper and put a small plotting compass near one pole. Mark the direction the compass needle points, move the compass so its centre is at that mark, and mark the new direction. Repeat this around the magnet to form a line. Crucially, repeat this entire process from different starting points near the pole to draw multiple field lines. Join the marks with smooth lines and add arrows showing the direction from the north to the south pole. The finished pattern shows the field's shape, and the spacing of the lines indicates field strength. Keep the compass away from other magnetic materials to avoid distortion. A strong answer earns marks for these points. Place the magnet on paper and place a plotting compass near one pole. Mark the direction in which the compass needle points, then move the compass to that mark and repeat to form a line. Repeat the process from different starting points near the pole to draw multiple field lines. Join the marks with smooth lines and add arrows showing the direction from north to south. A common slip: Moving the compass randomly instead of placing it at the previous mark. Instead, moving the compass centre to the last marked point. Exam tip: Write the method as a clear sequence of steps, including the repeated move-and-mark step.
See it
Key words
Say what each word means before you turn the card.
Practical plotting method
Try answering aloud or in your head before turning the card.
Compass use
Try answering aloud or in your head before turning the card.
Field line direction
Try answering aloud or in your head before turning the card.
Accuracy and control of variables
Try answering aloud or in your head before turning the card.
See every definition
- Practical plotting method
- Place the magnet on paper and put a small plotting compass near one pole, then mark the direction the compass needle points.
- Compass use
- Move the compass so its centre is at the last mark and mark the new direction, repeating this to form a line.
- Field line direction
- Join the marks with smooth lines and add arrows showing the direction from the north to the south pole.
- Accuracy and control of variables
- Keep the compass away from other magnets or magnetic materials to avoid a distorted pattern.
Label the diagram
Some boxes have lost their names. Pick the right name for each number.
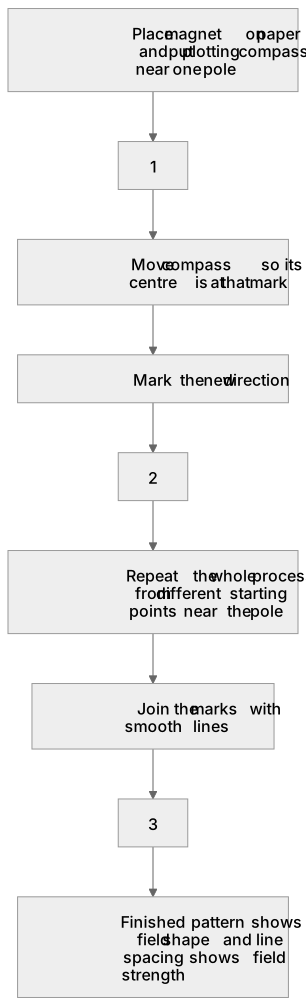
1Box 1
2Box 2
3Box 3
There is more to this lesson
The full lesson goes on to check your understanding and help you earn the marks. Create a free account to carry on, with your progress saved.
A week of Premium from your first lesson · Then the free plan continues · No card, no charge
Test your understanding of Magnetic fields: describe how to plot the magnetic field pattern of a magnet using a compass
Active recall beats re-reading. Take an instant quiz now to test what you’ve learned and lock it into long-term memory.
A week of Premium from your first lesson · Then the free plan continues · No card, no charge