OCR · A-Level · Physics
Course version: H556 · Version from Sept 2015
(f) correctly constructing circuits from circuit diagrams using DC power…
Full specification wording
Practical skills: (f) correctly constructing circuits from circuit diagrams using DC power supplies, cells, and
This practical skill is about turning a circuit diagram into a working circuit.
Checked against the OCR H556 specification (opens in a new tab) on .
- Point 6 of 11
- 4 key terms
Study notes
From the checked teaching notes for this specification point.
The idea
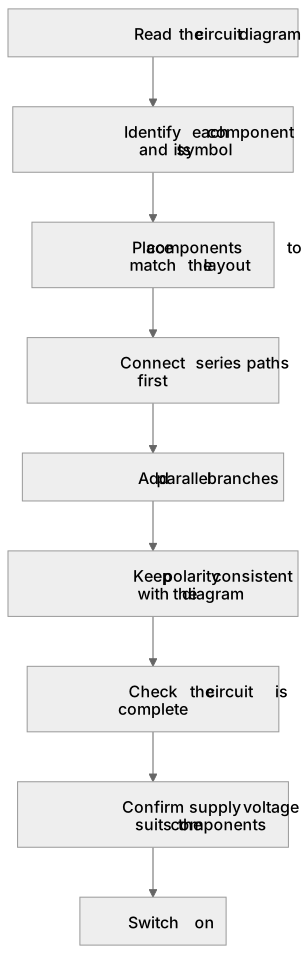
This practical skill is about turning a circuit diagram into a working circuit. You read the diagram, identify each component and its symbol, then connect DC power supplies, cells, and the other components in the topology shown. Work methodically: place components to match the layout, connect series paths first, then add parallel branches, and keep polarity consistent with the diagram. Check that the circuit is complete before switching on, and confirm that the power supply voltage suits the components. A correct build reproduces the intended current paths, so measurements taken from it are valid.
What earns the marks
- Recognise standard circuit symbols and match each symbol to the correct physical component.
- Reproduce the series and parallel topology shown in the diagram rather than an approximate layout.
- Connect DC power supplies and cells with the polarity and terminal arrangement indicated.
- Check the circuit is complete and correctly connected before switching on the supply.
- Identify a wiring error that would prevent the circuit from operating as the diagram intends.
Common mistakes and how to put them right
Treating a circuit diagram as a rough sketch and connecting components in a different order.
Put it right: Trace each node and branch and reproduce that topology exactly.
Ignoring polarity when connecting cells or a DC power supply.
Put it right: Match the positive and negative terminals to the diagram before switching on.
Leaving a component in a parallel branch unconnected or shorted.
Put it right: Check every branch forms a complete path as drawn.
Exam tips
- Trace the diagram with your finger from one supply terminal to the other and confirm each component lies on a complete path.
- Check polarity and supply voltage before considering the circuit ready to switch on.
- When a question shows a wiring error, compare the physical connections with the diagram node by node rather than guessing from the component list.
Try the lesson
The start of the Practical skills: (f) correctly constructing circuits from circuit diagrams using DC power supplies, cells, and lesson, made from checked teaching notes for this specification point.
Listen
This practical skill is about turning a circuit diagram into a working circuit. You read the diagram, identify each component and its symbol, then connect DC power supplies, cells, and the other components in the topology shown. Work methodically: place components to match the layout, connect series paths first, then add parallel branches, and keep polarity consistent with the diagram. Check that the circuit is complete before switching on, and confirm that the power supply voltage suits the components. A correct build reproduces the intended current paths, so measurements taken from it are valid. A strong answer earns marks for these points. Recognise standard circuit symbols and match each symbol to the correct physical component. Reproduce the series and parallel topology shown in the diagram rather than an approximate layout. Connect DC power supplies and cells with the polarity and terminal arrangement indicated. Check the circuit is complete and correctly connected before switching on the supply. A common slip: Treating a circuit diagram as a rough sketch and connecting components in a different order. Instead, trace each node and branch and reproduce that topology exactly. Exam tip: Trace the diagram with your finger from one supply terminal to the other and confirm each component lies on a complete path.
See it
Key words
Say what each word means before you turn the card.
Circuit symbols and component recognition
Try answering aloud or in your head before turning the card.
Series and parallel topology
Try answering aloud or in your head before turning the card.
Polarity and DC supply connections
Try answering aloud or in your head before turning the card.
Systematic checking before powering a circuit
Try answering aloud or in your head before turning the card.
See every definition
- Circuit symbols and component recognition
- Reading the diagram to identify each component and its symbol, then matching each symbol to the correct physical component.
- Series and parallel topology
- Reproducing the series and parallel connections shown in the diagram rather than an approximate layout, connecting series paths first and then adding parallel branches.
- Polarity and DC supply connections
- Connecting DC power supplies and cells with the polarity and terminal arrangement indicated, keeping polarity consistent with the diagram.
- Systematic checking before powering a circuit
- Checking that the circuit is complete and correctly connected, and confirming the supply voltage suits the components, before switching on the supply.
Label the diagram
Some boxes have lost their names. Pick the right name for each number.
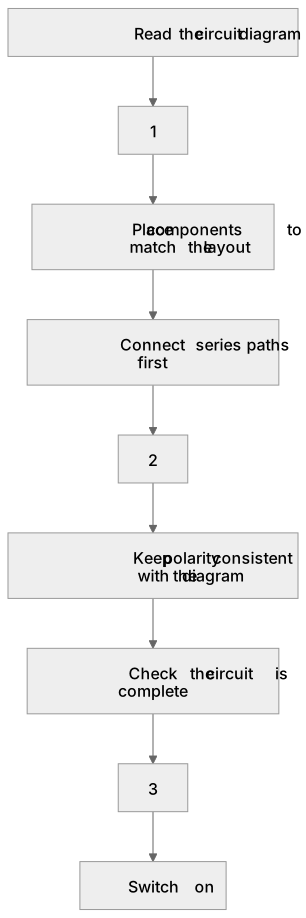
1Box 1
2Box 2
3Box 3
There is more to this lesson
The full lesson goes on to check your understanding and help you earn the marks. Create a free account to carry on, with your progress saved.
A week of Premium from your first lesson · Then the free plan continues · No card, no charge
Test your understanding of Practical skills: (f) correctly constructing circuits from circuit diagrams using DC power supplies, cells, and
Active recall beats re-reading. Take an instant quiz now to test what you’ve learned and lock it into long-term memory.
A week of Premium from your first lesson · Then the free plan continues · No card, no charge