OCR · A-Level · Biology
Course version: H420 · Version from Sept 2025
(e) production of scientific drawings from observations with annotations
Full specification wording
Use of apparatus and techniques: (e) production of scientific drawings from observations with annotations
Scientific drawing is a transferable practical skill: you observe a specimen, then produce a clear, accurate representation that another biologist could interpret.
Checked against the OCR H420 specification (opens in a new tab) on .
- Point 5 of 14
- 4 key terms
Study notes
From the checked teaching notes for this specification point.
The idea
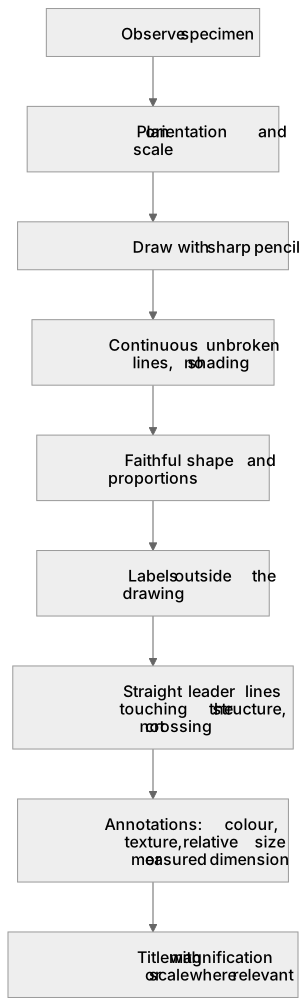
Scientific drawing is a transferable practical skill: you observe a specimen, then produce a clear, accurate representation that another biologist could interpret. Work with a sharp pencil on plain paper, draw large enough to show detail, and use continuous single lines rather than sketching or shading. Keep proportions faithful to what you observe rather than making the specimen look tidy. Labels are written outside the drawing with straight, unbroken leader lines that touch the structure named and do not cross. Annotations go beyond naming: they record observations such as colour, texture, relative size or a measured dimension. Add a title stating what is drawn and, where relevant, the magnification or scale. Drawings are assessed on accuracy of shape and proportion, clarity of line, correct labelling and the quality of annotations, so plan space before starting.
What earns the marks
- Draws with a sharp pencil using continuous, unbroken lines and no shading or artistic sketching, so structural outlines are unambiguous.
- Represents the specimen's shape and relative proportions faithfully, with structures large enough to show the detail actually observed.
- Labels placed outside the drawing, each with a straight leader line that touches the named structure without crossing other lines or labels.
- Annotations record observed features beyond a name, for example colour, texture, relative size or a measured dimension, and a title identifies the specimen with magnification or scale where appropriate.
Common mistakes and how to put them right
Learners shade or sketch loosely to make the drawing attractive.
Put it right: Use clean continuous outlines only, because shading obscures the structural detail being assessed.
Learners draw small, cramped diagrams that cannot show observed detail.
Put it right: Use most of the available space so proportions and internal structure are visible.
Learners write labels inside the drawing or use crossing leader lines.
Put it right: Place labels outside with straight lines that touch, but do not cross, the structure named.
Learners treat labelling as annotation.
Put it right: A label names a structure, whereas an annotation adds an observation such as colour, texture or measured size.
Exam tips
- Before drawing, decide the orientation and scale so the whole specimen fits and detail can be shown.
- Check every leader line ends on the correct structure and that no two lines cross.
- Add at least one annotation recording a measured or observed feature, plus a title and magnification or scale where relevant.
Try the lesson
The start of the Use of apparatus and techniques: (e) production of scientific drawings from observations with annotations lesson, made from checked teaching notes for this specification point.
Have a go first
A student makes a scientific drawing of a specimen seen under the microscope. Which feature is expected in a good scientific drawing?
Listen
Scientific drawing is a transferable practical skill: you observe a specimen, then produce a clear, accurate representation that another biologist could interpret. Work with a sharp pencil on plain paper, draw large enough to show detail, and use continuous single lines rather than sketching or shading. Keep proportions faithful to what you observe rather than making the specimen look tidy. Labels are written outside the drawing with straight, unbroken leader lines that touch the structure named and do not cross. Annotations go beyond naming: they record observations such as colour, texture, relative size or a measured dimension. Add a title stating what is drawn and, where relevant, the magnification or scale. Drawings are assessed on accuracy of shape and proportion, clarity of line, correct labelling and the quality of annotations, so plan space before starting. A strong answer earns marks for these points. Draws with a sharp pencil using continuous, unbroken lines and no shading or artistic sketching, so structural outlines are unambiguous. Represents the specimen's shape and relative proportions faithfully, with structures large enough to show the detail actually observed. Labels placed outside the drawing, each with a straight leader line that touches the named structure without crossing other lines or labels. Annotations record observed features beyond a name, for example colour, texture, relative size or a measured dimension, and a title identifies the specimen with magnification or scale where appropriate. A common slip: Learners shade or sketch loosely to make the drawing attractive. Instead, use clean continuous outlines only, because shading obscures the structural detail being assessed. Exam tip: Before drawing, decide the orientation and scale so the whole specimen fits and detail can be shown.
See it
Key words
Say what each word means before you turn the card.
Accuracy of observation transferred to paper
Try answering aloud or in your head before turning the card.
Clarity and convention in biological drawing
Try answering aloud or in your head before turning the card.
Purposeful labelling with leader lines
Try answering aloud or in your head before turning the card.
Annotation as recorded evidence
Try answering aloud or in your head before turning the card.
See every definition
- Accuracy of observation transferred to paper
- Representing the specimen's shape and relative proportions faithfully, with structures large enough to show the detail actually observed.
- Clarity and convention in biological drawing
- Drawing with a sharp pencil using continuous, unbroken lines and no shading or artistic sketching, so structural outlines are unambiguous.
- Purposeful labelling with leader lines
- Placing labels outside the drawing, each with a straight leader line that touches the named structure without crossing other lines or labels.
- Annotation as recorded evidence
- Recording observed features beyond a name, for example colour, texture, relative size or a measured dimension, with a title identifying the specimen.
Label the diagram
Some boxes have lost their names. Pick the right name for each number.
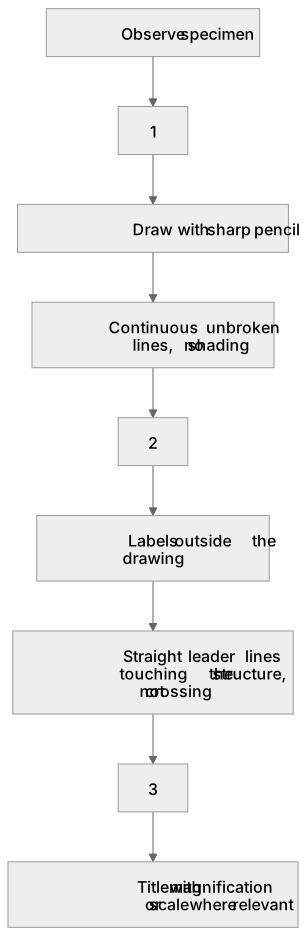
1Box 1
2Box 2
3Box 3
There is more to this lesson
The full lesson goes on to check your understanding and help you earn the marks. Create a free account to carry on, with your progress saved.
A week of Premium from your first lesson · Then the free plan continues · No card, no charge
Test your understanding of Use of apparatus and techniques: (e) production of scientific drawings from observations with annotations
Active recall beats re-reading. Take an instant quiz now to test what you’ve learned and lock it into long-term memory.
A week of Premium from your first lesson · Then the free plan continues · No card, no charge