OCR · A-Level · Chemistry
Course version: H432 · Version from Sept 2017
Use of apparatus and techniques: (h) use of melting point apparatus
Melting point apparatus gives a sharp, reproducible melting range that helps identify a solid and judge its purity.
- Point 12 of 17
- 4 key terms
Study notes
From the teaching notes for this specification point.
The idea
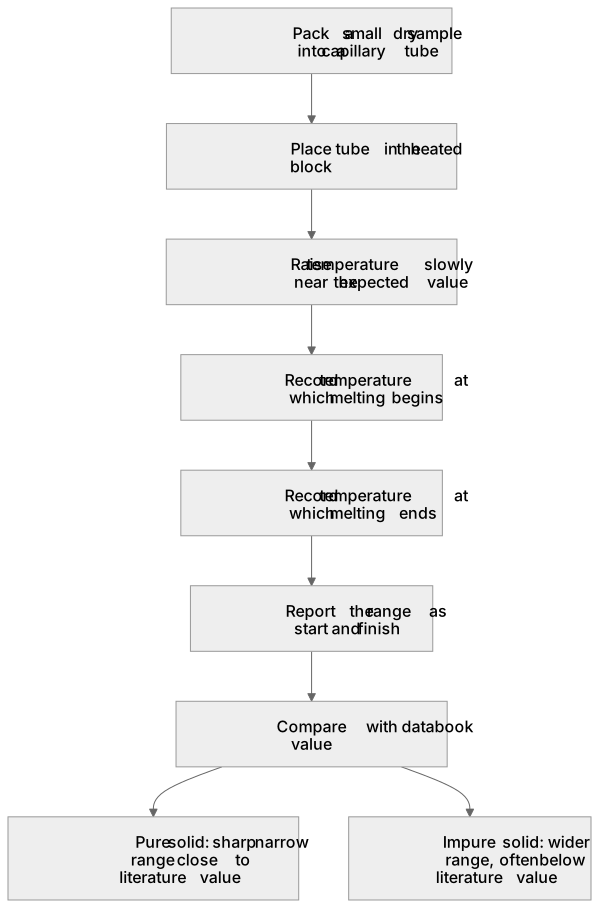
Melting point apparatus gives a sharp, reproducible melting range that helps identify a solid and judge its purity. A pure solid melts sharply, usually within about 1–2 °C, at a value close to its literature melting point; an impure solid melts over a wider range and often below the literature value. In the practical, a small dry sample is packed into a capillary tube to a depth of a few millimetres, the tube is placed in the heated block and the temperature is raised slowly near the expected value. The learner records the temperature at which melting begins and ends, reports the range and compares it with a data book value. Slow heating near the melting point reduces error; a fast ramp gives a falsely wide or high reading.
What earns the marks
- States that a pure solid melts sharply over a narrow range close to its literature melting point.
- Explains that an impurity widens the melting range and usually lowers the melting point.
- Describes packing a small dry sample into a capillary tube and heating slowly near the expected melting point.
- Records the temperature at which melting starts and finishes and reports the range for comparison with a data book value.
Common mistakes and how to put them right
Uses a large or damp sample.
Put it right: Pack a small dry sample so heat transfers evenly and the range is sharp.
Heats rapidly through the melting point.
Put it right: Raise the temperature slowly near the expected value to read the range accurately.
Assumes any melting range identifies a compound on its own.
Put it right: Compare the measured range with a literature value and consider purity evidence.
Exam tips
- Link the width of the melting range to purity and the position of the range to identity.
- State explicitly that slow heating near the melting point improves accuracy.
- Quote the measured range as two temperatures, start and finish, rather than a single value.
Try the lesson
The start of the Use of apparatus and techniques: (h) use of melting point apparatus lesson, made from teaching notes for this specification point.
Listen
Melting point apparatus gives a sharp, reproducible melting range that helps identify a solid and judge its purity. A pure solid melts sharply, usually within about 1–2 °C, at a value close to its literature melting point; an impure solid melts over a wider range and often below the literature value. In the practical, a small dry sample is packed into a capillary tube to a depth of a few millimetres, the tube is placed in the heated block and the temperature is raised slowly near the expected value. The learner records the temperature at which melting begins and ends, reports the range and compares it with a data book value. Slow heating near the melting point reduces error; a fast ramp gives a falsely wide or high reading. A strong answer earns marks for these points. States that a pure solid melts sharply over a narrow range close to its literature melting point. Explains that an impurity widens the melting range and usually lowers the melting point. Describes packing a small dry sample into a capillary tube and heating slowly near the expected melting point. Records the temperature at which melting starts and finishes and reports the range for comparison with a data book value. Exam tip: Link the width of the melting range to purity and the position of the range to identity.
See it
Key words
Say what each word means before you turn the card.
Melting point as a purity indicator
Try answering aloud or in your head before turning the card.
Melting point as an identification tool
Try answering aloud or in your head before turning the card.
Practical technique with capillary tube and heated block
Try answering aloud or in your head before turning the card.
Recording and comparing a melting range
Try answering aloud or in your head before turning the card.
See every definition
- Melting point as a purity indicator
- A pure solid melts sharply over a narrow range close to its literature melting point, while an impurity widens the melting range and usually lowers the melting point.
- Melting point as an identification tool
- The measured range is compared with a data book value to help identify a solid and judge its purity.
- Practical technique with capillary tube and heated block
- A small dry sample is packed into a capillary tube to a depth of a few millimetres, the tube is placed in the heated block and the temperature is raised slowly near the expected value.
- Recording and comparing a melting range
- The learner records the temperature at which melting begins and ends, reports the range and compares it with a data book value.
Label the diagram
Some boxes have lost their names. Pick the right name for each number.
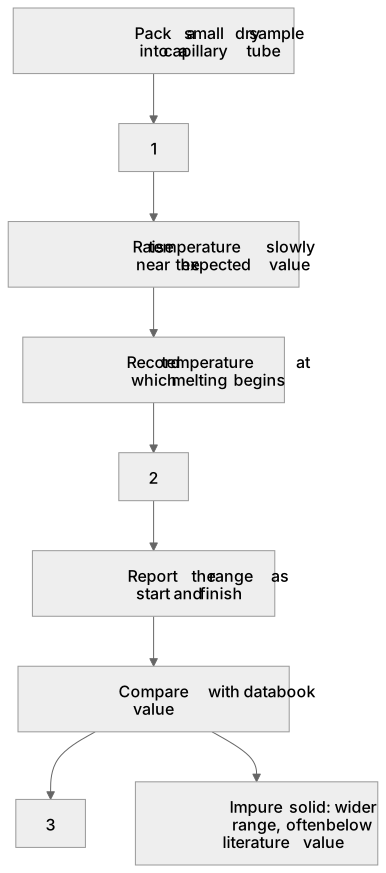
1Box 1
2Box 2
3Box 3
There is more to this lesson
The full lesson goes on to check your understanding and help you earn the marks. Create a free account to carry on, with your progress saved.
A week of Premium from your first lesson · Then the free plan continues · No card, no charge
Test your understanding of Use of apparatus and techniques: (h) use of melting point apparatus
Active recall beats re-reading. Take an instant quiz now to test what you’ve learned and lock it into long-term memory.
A week of Premium from your first lesson · Then the free plan continues · No card, no charge