Pearson Edexcel · GCSE · Design and Technology
Papers and Boards: Specialist techniques, tools, equipment and processes to shape, fabricate, construct and assemble a high-quality paper and board prototype
This topic covers the essential specialist techniques, tools, and materials required to shape, fabricate, and assemble high-quality paper and board prototypes. Mastering these practical skills is crucial for both your Non-Exam Assessment (NEA) portfolio and the written exam.
- 6 min read
- 3 worked examples
- 4 practice questions
- 6 key terms
Study Notes
Overview
Papers and boards are fundamental materials in Design and Technology. Topic 3.7 focuses on the practical application of specialist techniques, tools, equipment, and processes to shape, fabricate, construct, and assemble high-quality paper and board prototypes. Whether you are creating a packaging net, an architectural model, or an intricate paper-engineered mechanism, your ability to select the right material and apply the correct fabrication technique is essential for securing high marks in both your Non-Exam Assessment (NEA) and written examinations.
Listen to the revision podcast below for an in-depth audio guide to this topic:

Key Knowledge & Theory
Core Concepts
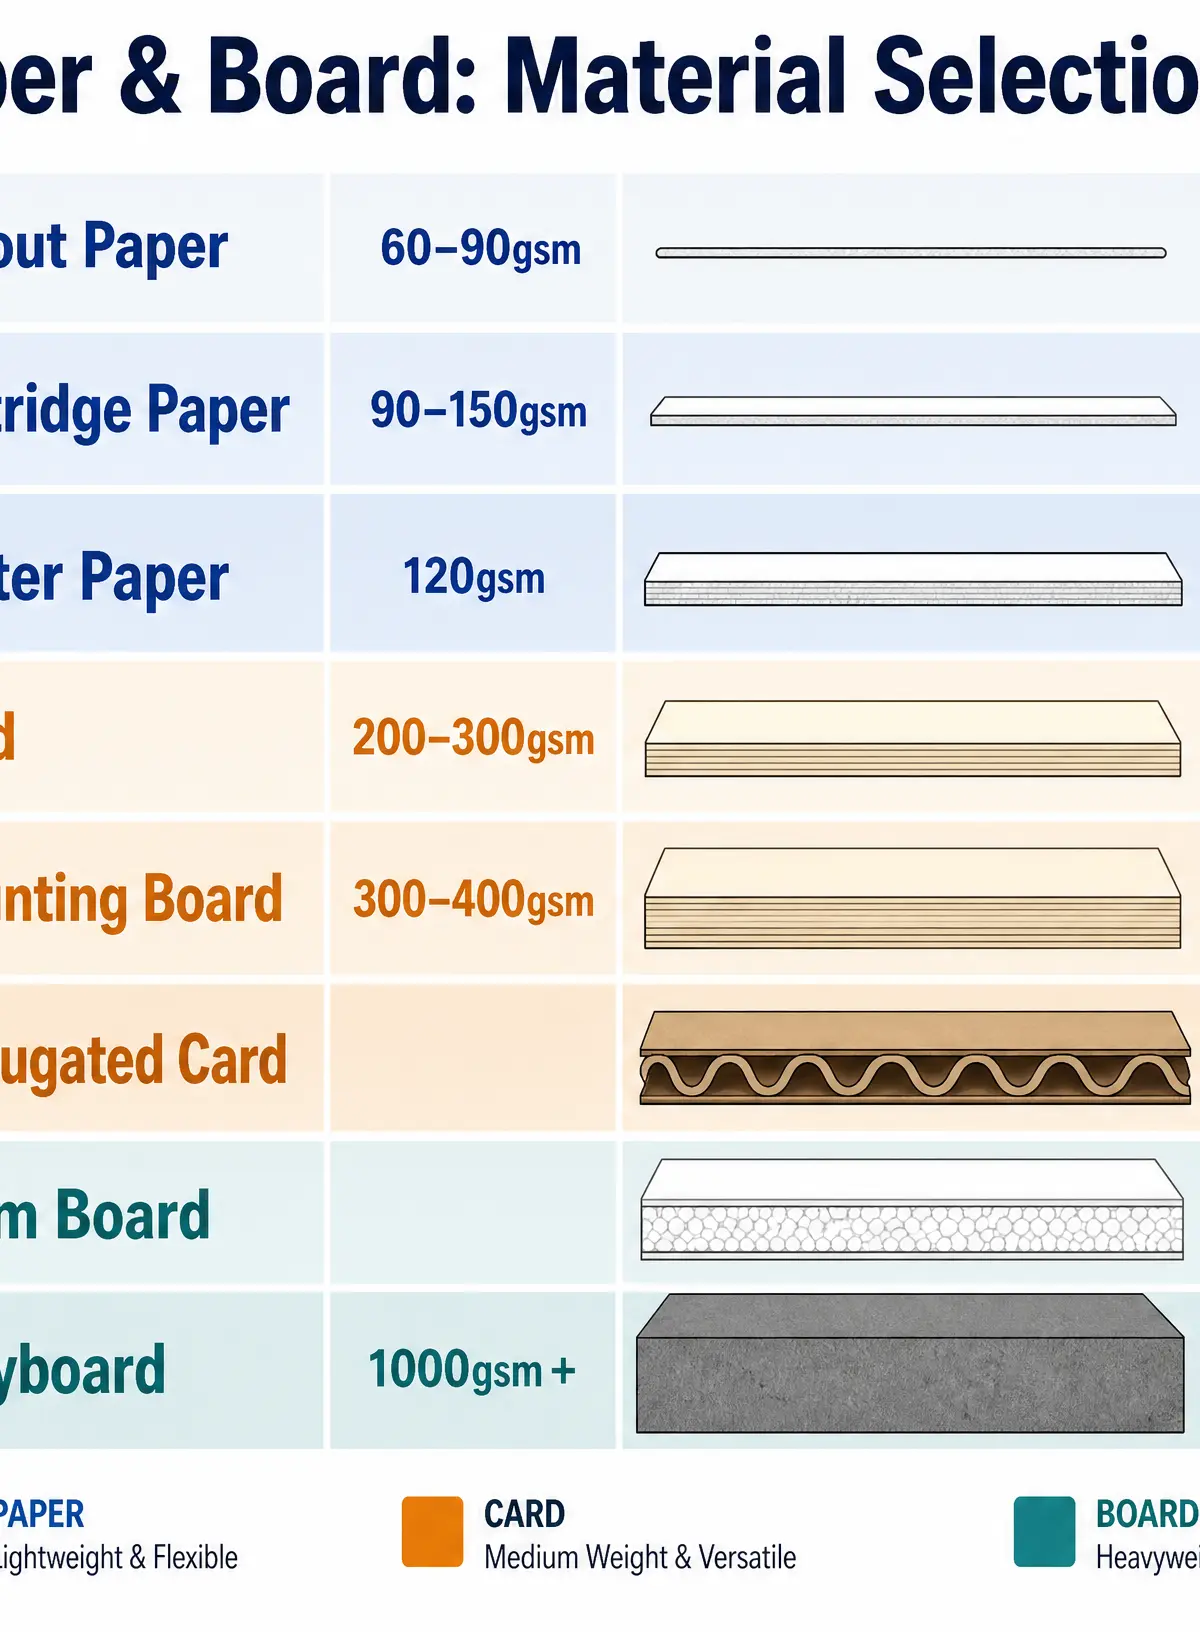
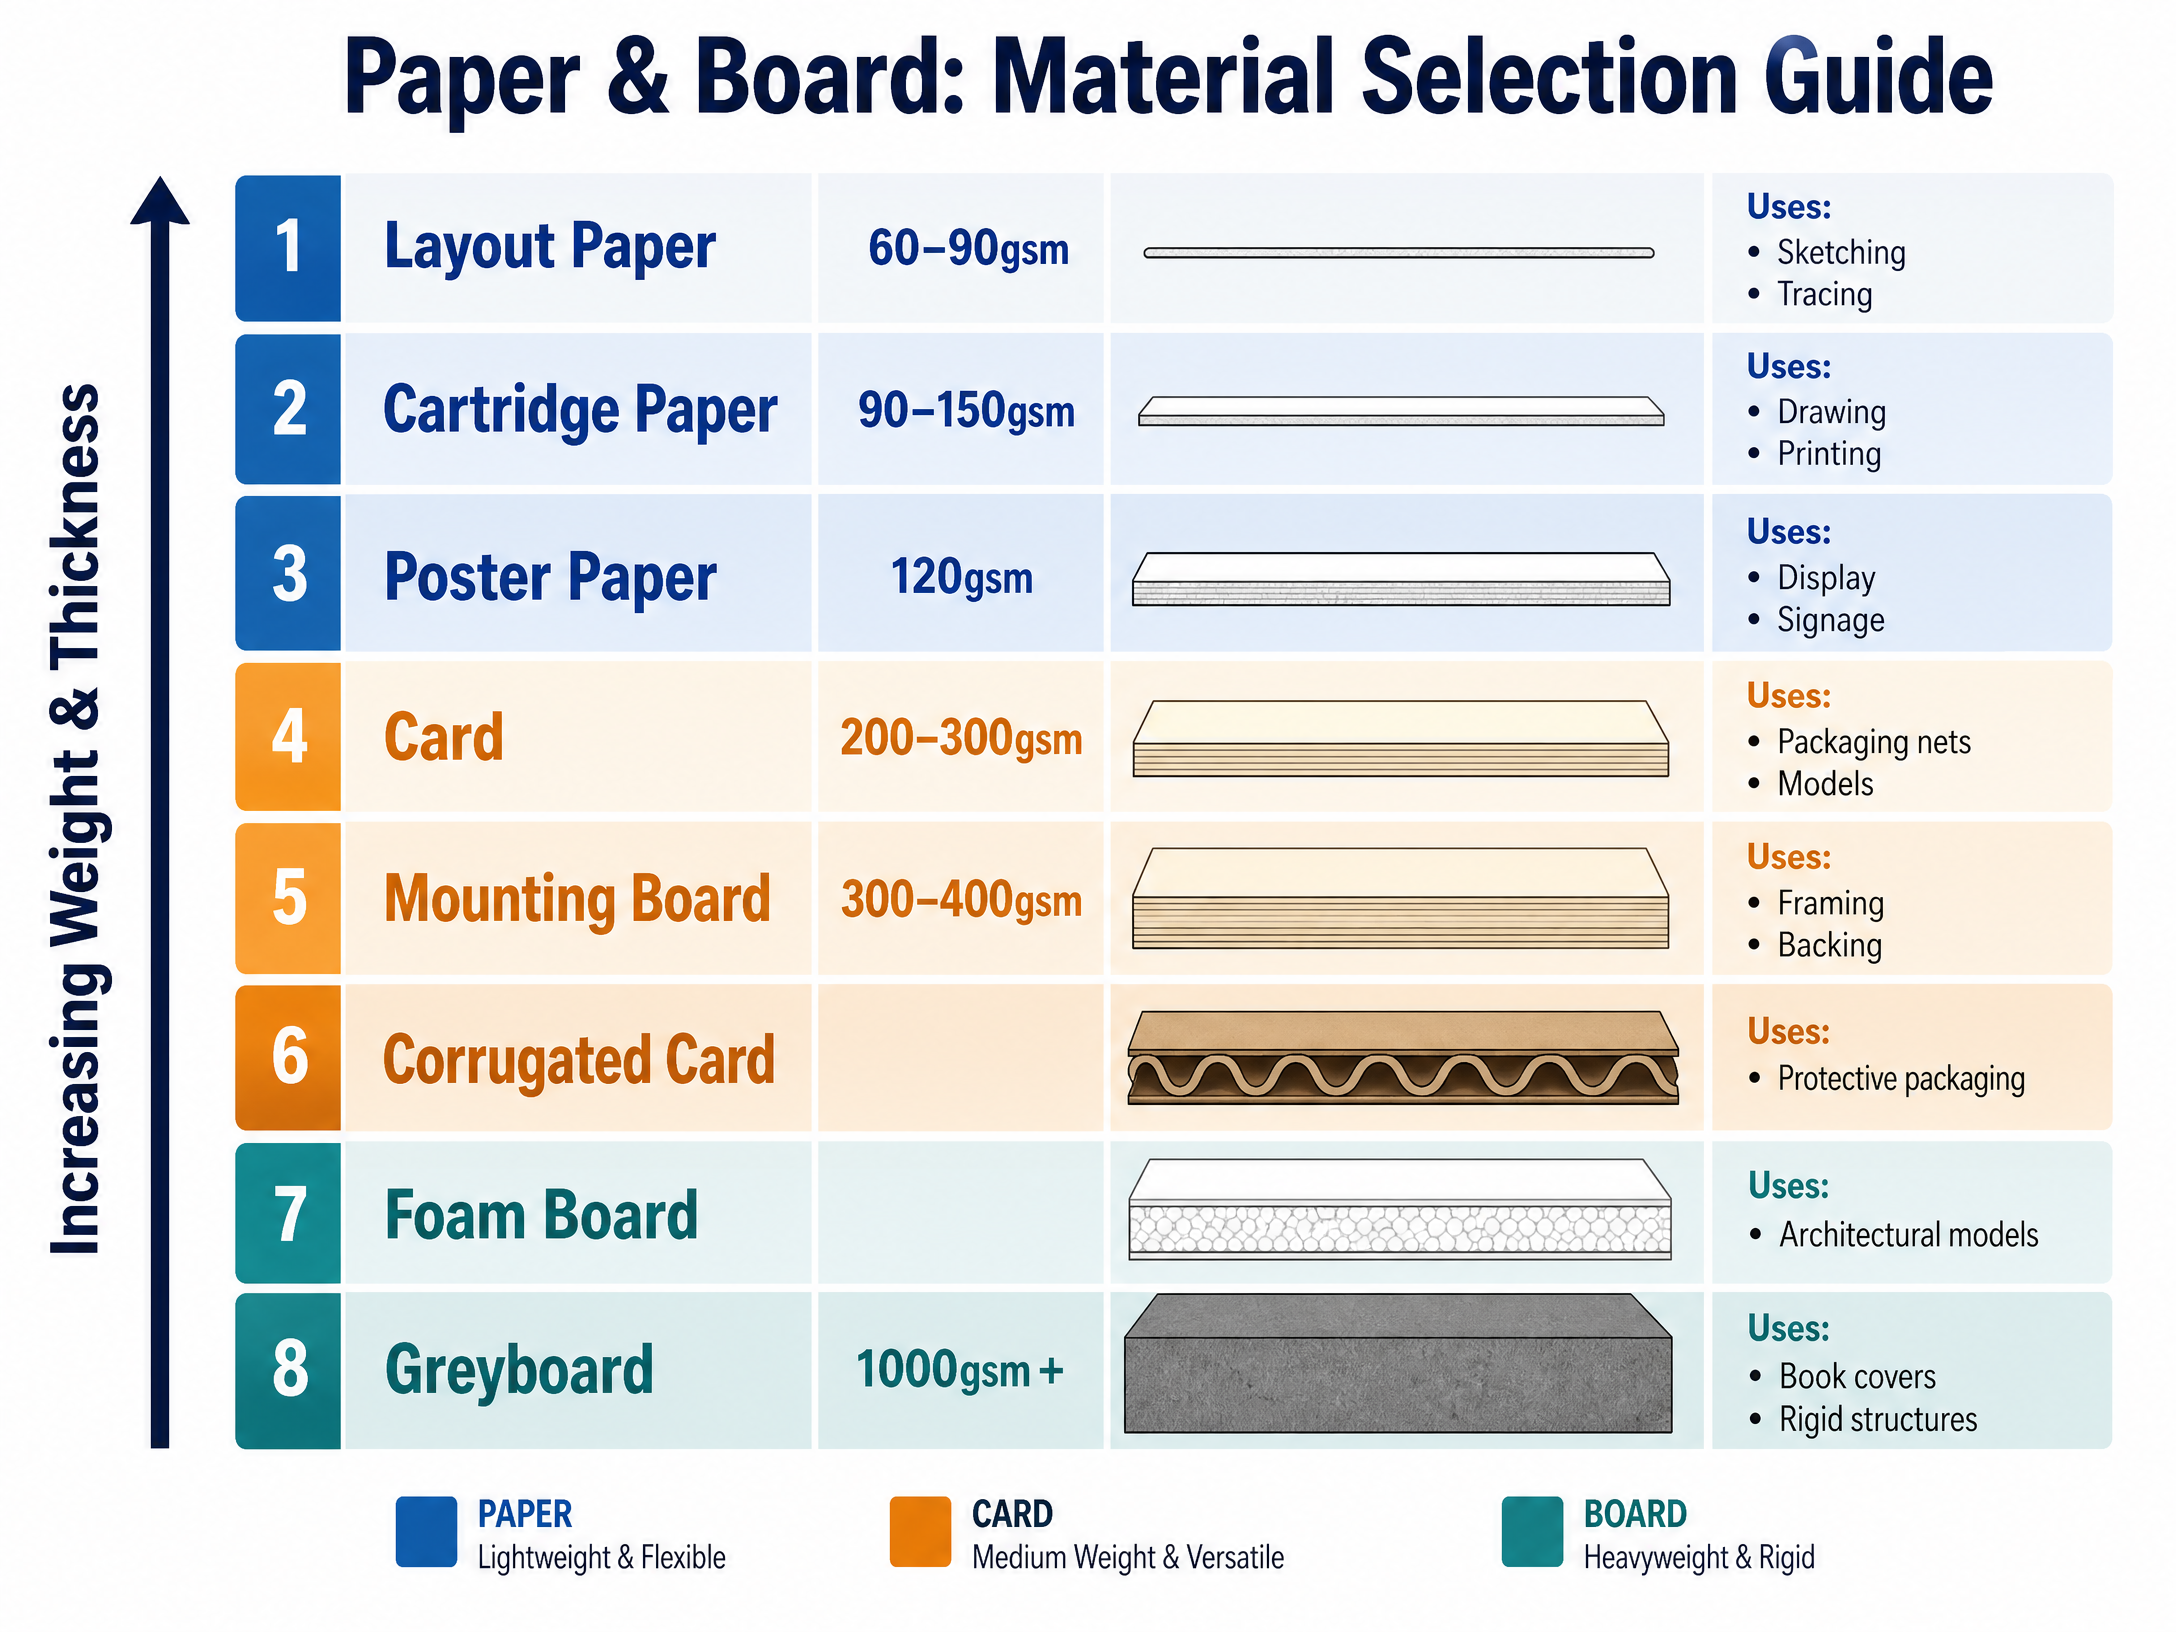
The foundation of paper and board fabrication lies in understanding material properties. Papers and boards are measured by weight, specifically in grams per square metre (gsm). The higher the gsm, the thicker and more rigid the material. You must be able to justify your material selection based on its intended function. For instance, layout paper (60-90gsm) is highly translucent and ideal for tracing initial ideas, whereas 250gsm card offers the perfect balance of rigidity and workability for creating structural packaging nets.
Key Materials and Their Applications
| Material | Weight (gsm) | Key Properties | Typical Applications |
|---|---|---|---|
| Layout Paper | 60-90 | Thin, slightly translucent, smooth surface | Sketching, tracing, marker rendering |
| Cartridge Paper | 90-150 | Opaque, slightly textured, accepts dry media well | Drawing, printing, presentation work |
| Card | 200-300 | Rigid enough to hold a fold, easy to cut cleanly | Packaging nets, structural models, templates |
| Mounting Board | 300-400 | Dense, highly rigid, smooth coloured surface | Framing, backing boards, architectural models |
| Corrugated Card | Variable | Fluted inner core, high compressive strength-to-weight ratio | Protective packaging, large structural models |
| Foam Board | Variable | Polystyrene core between paper faces, rigid but very lightweight | Architectural models, presentation boards |
Technical Vocabulary
To achieve top band marks, candidates must consistently use appropriate technical vocabulary. Terms such as compressive strength, lamination, former, scoring, net, and gsm should be used naturally when describing processes and justifying design decisions.
Practical Skills
Techniques & Processes
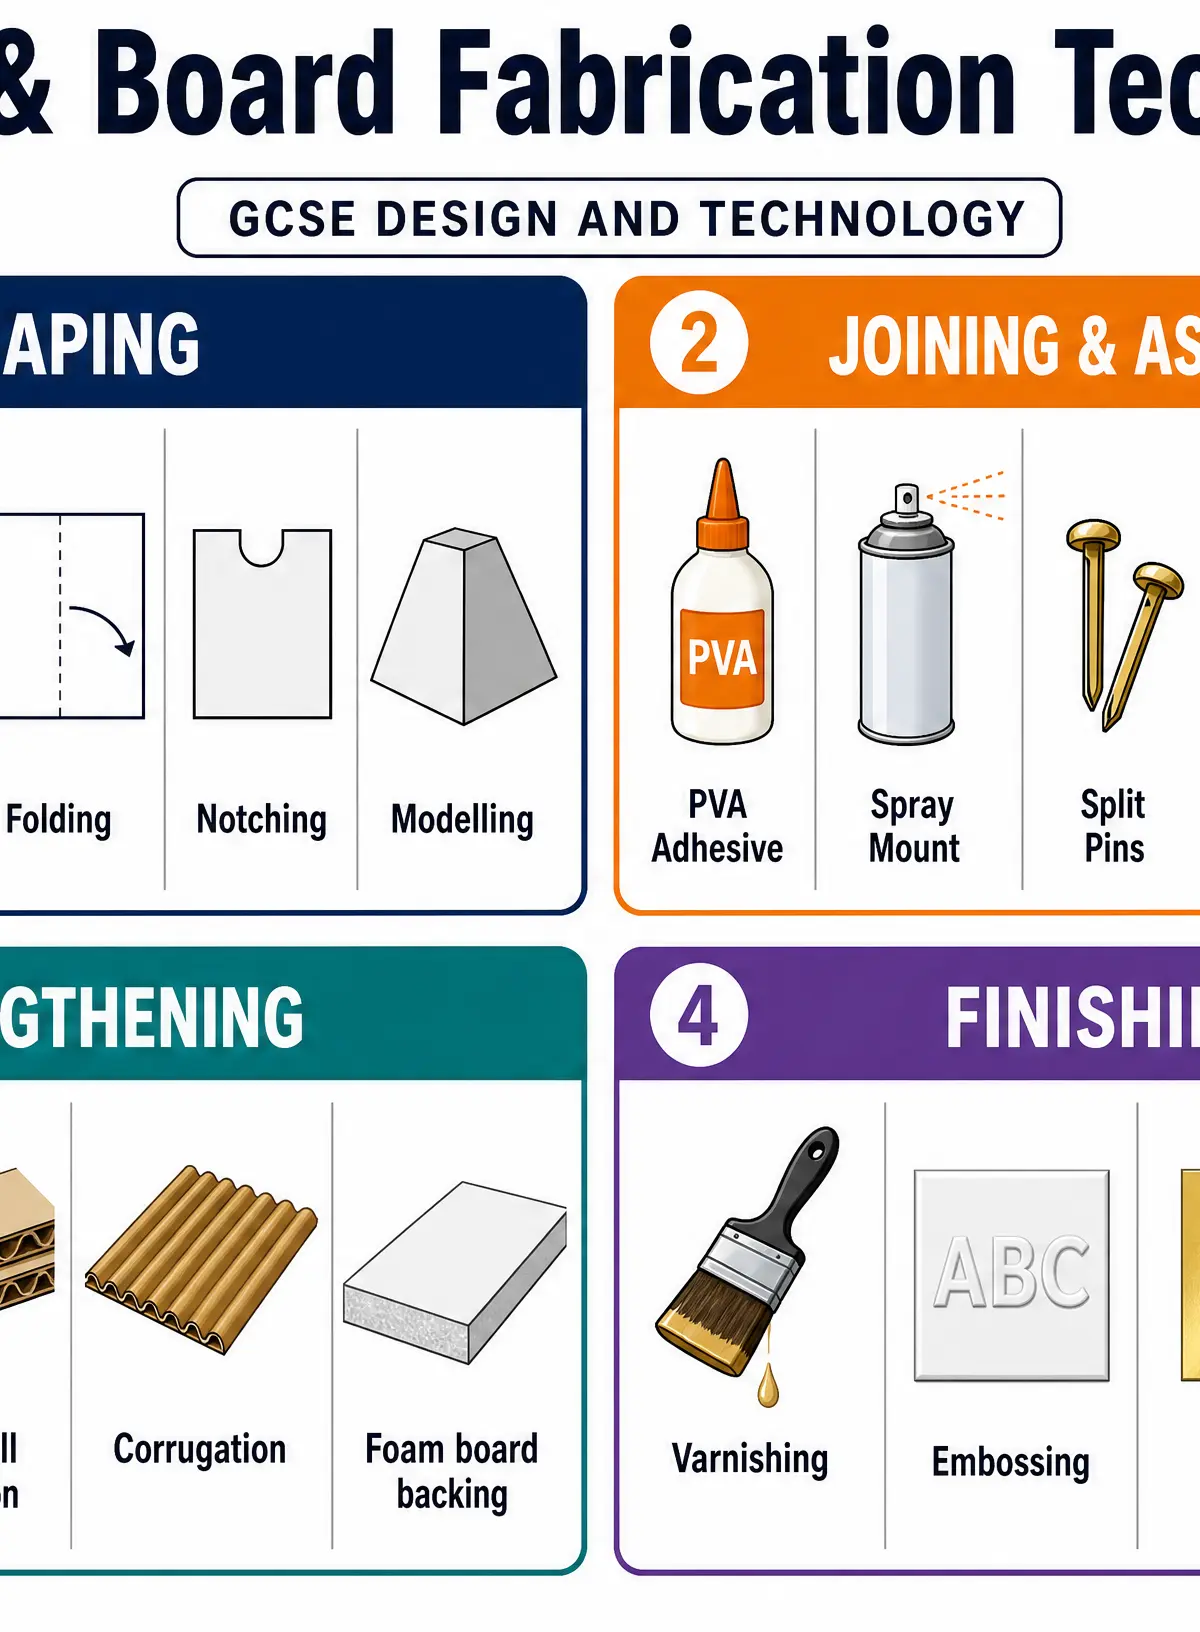
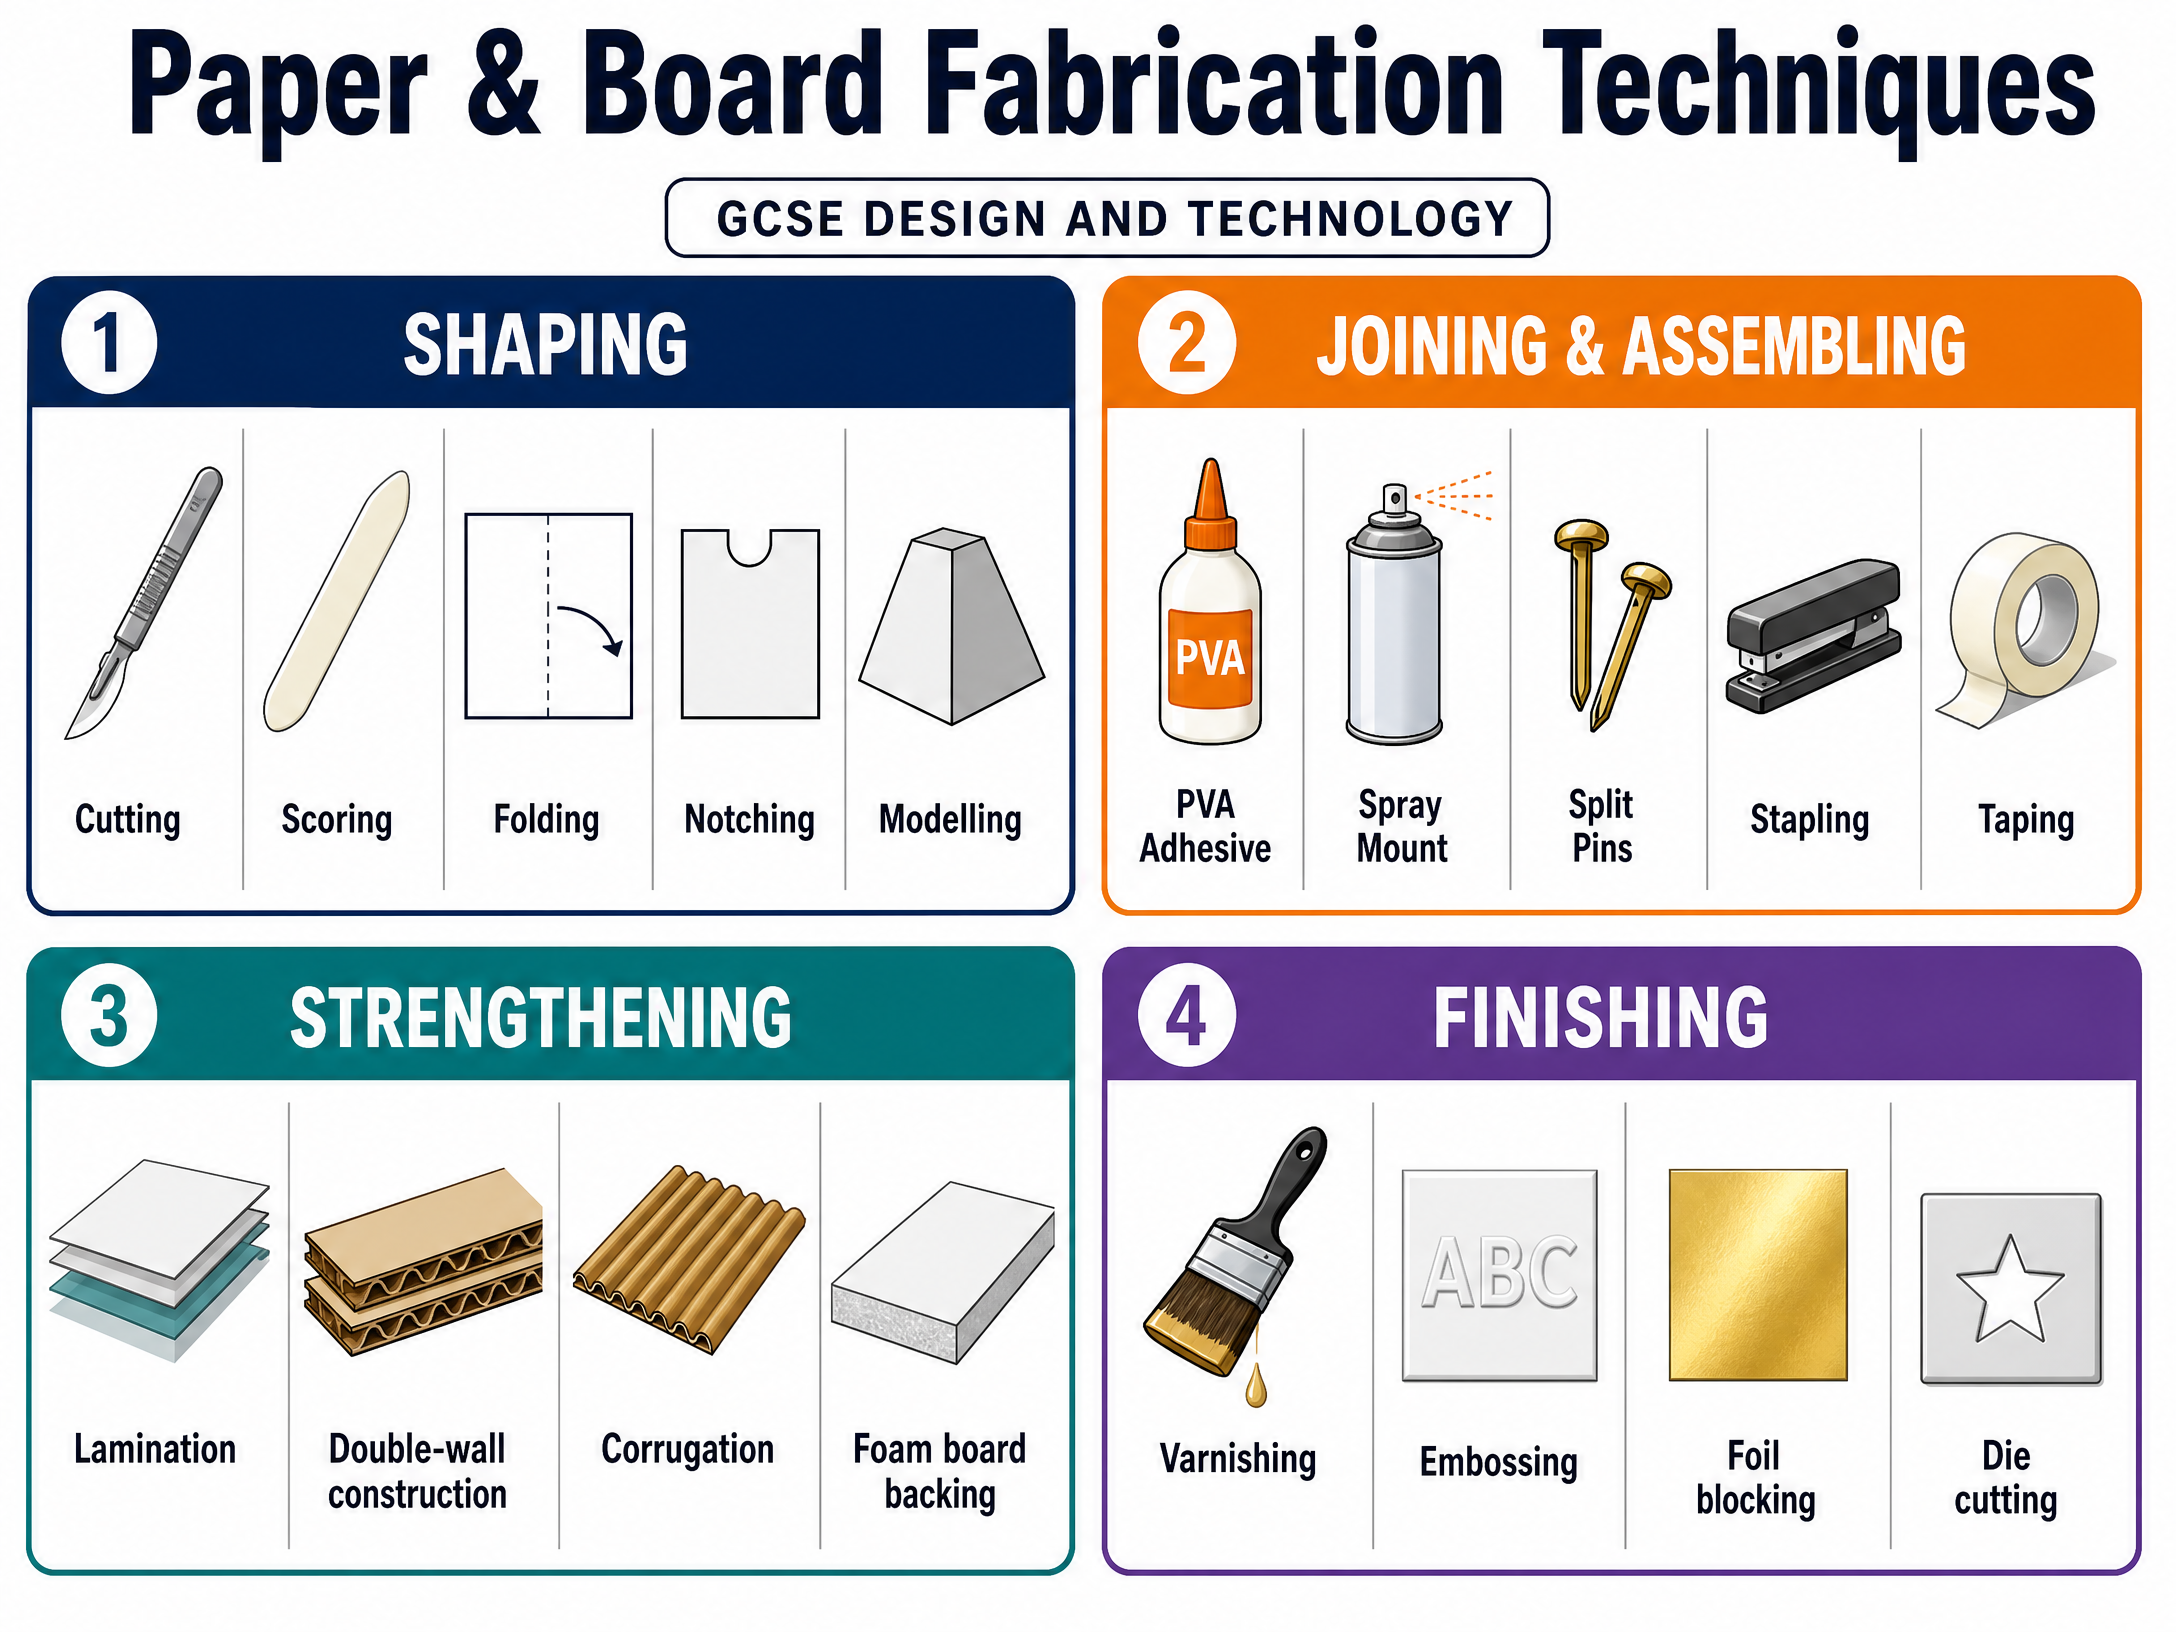
Shaping and fabricating paper and board requires precision and the correct application of specific techniques. The five primary shaping techniques are:
- Cutting: The process of separating material. For straight lines, a scalpel or craft knife must be used against a metal safety ruler on a self-healing cutting mat. Multiple light passes yield a cleaner edge than a single heavy cut.
- Scoring: Compressing the fibres of the card along a line before folding. This is typically done using a bone folder or the back of a scalpel blade against a ruler. Scoring ensures a sharp, clean fold and prevents the card surface from cracking.
- Folding: Creating a crease along a scored line. A valley fold requires scoring on the outside of the fold, while a mountain fold requires scoring on the inside.
- Notching: Cutting small V-shapes or slots into card. This allows the material to bend smoothly around curves without buckling, or facilitates interlocking joints without the need for adhesive.
- Modelling: Manipulating paper into three-dimensional forms through techniques such as rolling, curving over a former, or pleating.
Joining and Assembling
Selecting the appropriate joining method is critical. PVA (polyvinyl acetate) is a strong, water-based adhesive excellent for permanent joins and lamination, but it can warp thinner papers if applied too heavily. Spray mount is a repositionable aerosol adhesive ideal for temporary mounting or collage work. Mechanical fixings, such as split pins, are necessary when creating pivot points in moving mechanisms.
Strengthening Techniques
Examiners frequently test candidates' understanding of how to reinforce prototypes. Lamination involves bonding multiple layers of material together to dramatically increase rigidity. Creating a double-wall construction or adding internal formers (ribs) distributes load and enhances structural integrity without relying solely on thicker, heavier materials.
Portfolio/Coursework Guidance
Assessment Criteria
In your NEA portfolio, examiners look for clear evidence that you have thoughtfully selected and skilfully applied these techniques. High-quality annotation is essential. You must not only state what you did, but why you did it, and how the specific technique improved the quality of the prototype.
Building a Strong Portfolio
Document your manufacturing process thoroughly. Include close-up photographs of complex joints, clean folds, and neat cutting. If you encounter a problem (e.g., card tearing during a fold), document it, explain that you forgot to score the material, and show how you rectified the issue in the next iteration. This demonstrates iterative design and evaluative thinking, which are heavily rewarded.
Exam Component
Written Exam Knowledge
In the written paper, you will be expected to compare different materials and processes. You may be presented with a product (e.g., a perfume box) and asked to evaluate the suitability of specific materials (e.g., 300gsm foil-lined board) and manufacturing processes (e.g., die cutting and scoring). Always link your answers back to the functional requirements of the product and the scale of production.
Practical Exam Preparation
For questions assessing practical knowledge, ensure you can write clear, step-by-step manufacturing plans. Name the specific tools required (e.g., 'metal safety ruler', not just 'ruler'), describe the process accurately, and always include a relevant health and safety precaution.
Visual Resources
2 diagrams and illustrations
Interactive Diagrams
1 interactive diagram to visualise key concepts
Conceptual Flow Outline
The Paper and Board Prototype Fabrication Process
Worked Examples
3 worked examples — open one to explore the question and available guidance.
Practice Questions
Test your understanding — click to reveal model answers
Identify two tools required to safely cut a straight line in 300gsm card. (2 marks)
Hint: Think about what holds the blade and what protects the desk.
Explain why a designer might choose to use spray mount rather than PVA glue when creating a presentation mood board. (2 marks)
Hint: Consider the water content of the adhesives and the thickness of the paper being mounted.
A student is designing a lightweight, protective outer sleeve for a fragile glass bottle. Discuss the advantages of using corrugated card for this product. (4 marks)
Hint: Break down the structure of corrugated card. How does its shape provide protection?
Evaluate the use of lamination as a method for strengthening a paper and board prototype. (6 marks)
Hint: Consider both the structural benefits of lamination and the potential drawbacks in terms of time, cost, and finish.