Properties and constructions — AQA GCSE Mathematics
Verified courseTeaching note checked against the official specification.
Properties and constructions in AQA GCSE Mathematics covers the accurate drawing of triangles, angle bisectors, perpendicular bisectors, loci, and scale diagrams using a ruler, compass, and protractor. You must know the standard ruler-and-compass constructions and be able to describe regions bounded by loci, often linking them to real-world contexts.
Properties and constructions explained
Properties and constructions covers 17 specification points, including Points, lines, vertices, edges, planes,… and Use the standard ruler and compass….
Read the full explanation
Open a point below for its explanation and revision guidance.
use conventional terms and notations: points, lines, vertices, edges, planes, parallel lines, perpendicular lines, right angles, polygons, regular polygons and polygons with reflection and/or rotation symmetries use the standard conventions for labelling and referring to the sides and angles of triangles draw diagrams from written description
This row covers the vocabulary and drawing conventions of geometry. You must use terms precisely: a point has position but no size; a line has length but no width; a vertex is a corner where edges meet; an edge is a line segment joining two vertices; a plane is a flat surface. Parallel lines never meet, perpendicular lines meet at a right angle of 90°, and a right angle is marked with a small square. A polygon is a closed plane figure with straight sides; a regular polygon has all sides equal and all angles equal. Polygons may have reflection symmetry, rotation symmetry, or both. You also use standard conventions for labelling triangles: vertices are named with capital letters, and the side opposite angle A is side a, with angles marked clearly. Finally, you draw an accurate diagram from a written description, choosing sensible labels and including the stated features.
use the standard ruler and compass constructions (perpendicular bisector of a line segment, constructing a perpendicular to a given line from/at a given point, bisecting a given angle) use these to construct given figures and solve loci problems know that the perpendicular distance from a point to a line is the shortest distance to the line
Standard constructions use a ruler and compasses only, keeping arc marks visible. To bisect a line segment, draw equal arcs from each endpoint and join the crossing points. To construct a perpendicular from or at a point on a line, draw arcs centred on the point to mark two positions, then equal arcs from those to find a second point. To bisect an angle, draw an arc across both arms from the vertex, then equal arcs from the crossing points; join the vertex to their intersection. These skills build given figures and solve loci problems. The perpendicular distance from a point to a line is the shortest distance, so a locus at a fixed distance from a line is a pair of parallel lines.
apply the properties of angles at a point, angles at a point on a straight line, vertically opposite angles understand and use alternate and corresponding angles on parallel lines derive and use the sum of angles in a triangle (eg to deduce and use the angle sum in any polygon, and to derive properties of regular polygons)
Angle facts are applied in order. Angles at a point sum to 360°, angles at a point on a straight line sum to 180°, and vertically opposite angles are equal. On parallel lines, alternate angles are equal and corresponding angles are equal, which supports reasoning about figures containing a transversal. The sum of angles in a triangle is 180°; this is derived by drawing a line parallel to one side through the opposite vertex and using alternate angles, so the three angles of the triangle fit onto a straight line. From the triangle result, any polygon with n sides can be split into n − 2 triangles, giving an interior angle sum of (n − 2) × 180°. For a regular polygon, dividing this sum by n gives each interior angle, and exterior angles sum to 360°, so each exterior angle of a regular polygon is 360° ÷ n.
derive and apply the properties and definitions of: special types of quadrilaterals, including square, rectangle, parallelogram, trapezium, kite and rhombus and triangles and other plane figures using appropriate language
This topic requires you to derive and apply the defining properties of special quadrilaterals, triangles, and other plane figures using correct geometric language. A square has four equal sides and four right angles; a rectangle has four right angles with opposite sides equal; a parallelogram has two pairs of parallel sides; a trapezium has one pair of parallel sides; a kite has two pairs of adjacent equal sides; a rhombus has four equal sides. For triangles, classify by sides and angles. 'Derive' means reasoning from facts, like showing a rhombus has opposite angles equal using parallel lines. 'Apply' means using properties to find missing angles. 'Other plane figures' includes polygons. Appropriate language includes terms like parallel, perpendicular, bisect, and adjacent.
use the basic congruence criteria for triangles (SSS, SAS, ASA, RHS)
You must use the four basic congruence criteria for triangles: SSS (three sides equal), SAS (two sides and the included angle equal), ASA (two angles and the included side equal) and RHS (right angle, hypotenuse and one other side equal). Two triangles are congruent if they are identical in shape and size. These criteria let you prove congruence without checking every side and angle. Identify the matching parts in the two triangles and state which applies. For example, if two triangles share a side and have two pairs of equal angles adjacent to that side, use ASA. The included angle in SAS is between the two given sides. RHS applies only to right-angled triangles. Congruence differs from similarity.
apply angle facts, triangle congruence, similarity and properties of quadrilaterals to conjecture and derive results about angles and sides, including Pythagoras’ theorem and the fact that the base angles of an isosceles triangle are equal, and use known results to obtain simple proofs
This topic links angle facts, congruence, similarity and quadrilateral properties so you can conjecture and derive results about angles and sides. You use angle facts such as angles on a straight line summing to 180°, angles in a triangle summing to 180° and vertically opposite angles being equal. Congruence means identical shape and size; similarity means the same shape with equal corresponding angles and proportional sides. Quadrilateral properties include opposite sides of a parallelogram being equal and parallel, and diagonals of a rhombus bisecting at right angles. From these you derive Pythagoras’ theorem and prove base angles of an isosceles triangle are equal. You then use known results to build simple proofs, for example proving a triangle is isosceles by showing two angles are equal.
identify, describe and construct congruent and similar shapes, including on coordinate axes, by considering rotation, reflection, translation and enlargement
This topic covers identifying, describing and constructing congruent and similar shapes using the four transformations: rotation, reflection, translation and enlargement. Congruent shapes are identical in shape and size, so rotation, reflection and translation produce congruent images; enlargement produces a similar shape On coordinate axes you track vertex coordinates through each transformation. For a rotation, give the centre, angle and direction; for a reflection, give the mirror line; for a translation, give the column vector; for an enlargement, give the centre and scale factor. To construct an image, transform each vertex and join them in order. Describing a transformation means stating all required details so the mapping is unambiguous.
including fractional scale factors
A fractional scale factor enlarges or reduces a shape by multiplying every distance from the centre of enlargement by a fraction. A proper fraction (between 0 and 1) produces a smaller image, while an improper fraction (greater than 1) produces a larger image. For example, enlarging a shape by scale factor 1/2 from centre (0, 0) maps each vertex (x, y) to (x/2, y/2), whereas a scale factor of 3/2 maps it to (1.5x, 1.5y). The image is similar to the object: corresponding angles are equal and corresponding sides are in the same ratio. Every image vertex lies on the ray from the centre through its object vertex. Fractional factors may be given as decimals or percentages (e.g. 50% becomes 0.5), so convert carefully before multiplying.
including negative scale factors (Higher tier only)
A negative scale factor reverses the direction of an enlargement: the image lies on the opposite side of the centre from the object. For scale factor −2 with centre (0, 0), a vertex (x, y) maps to (−2x, −2y). The size change is given by the absolute value of the factor, so a factor of −1/2 produces a smaller image on the opposite side, while −2 produces a larger image on the opposite side. The image is still similar to the object: angles are unchanged and side lengths are multiplied by the magnitude of the scale factor. This content is Higher tier only. When describing a negative enlargement, state the centre and the negative scale factor, and check that each image vertex lies on the line through the centre and its object vertex but on the other side.
describe the changes and invariance achieved by combinations of rotations, reflections and translations (Higher tier only)
A combination means performing two or more transformations in sequence on a shape. You must state what changes and what stays the same. Rotations turn a shape about a fixed centre by a given angle and direction; reflections flip it across a mirror line; translations slide it by a column vector. Invariance means properties unchanged by the combination. For example, reflect a triangle in the x-axis then rotate 90° anticlockwise about the origin: the final image has the same area, side lengths and angles as the original, but its orientation and position change. A single reflection reverses orientation; two reflections in parallel lines give a translation; two reflections in intersecting lines give a rotation. Describing the combination means naming the overall single transformation that maps the original object to the final image, or listing the changes and invariants precisely.
identify and apply circle definitions and properties, including: centre, radius, chord, diameter, circumference
A circle is the set of points at a fixed distance from a fixed point. The fixed point is the centre. The radius is any straight line segment from the centre to a point on the circle; all radii of the same circle are equal. A chord is a straight line segment joining two points on the circumference. The diameter is a chord that passes through the centre; it is the longest chord and equals twice the radius, so d = 2r. The circumference is the distance around the circle, given by C = 2πr or C = πd. For example, a circle with radius 5 cm has diameter 10 cm and circumference 10π cm. You must recognise these parts in a diagram and use the relationships to find missing lengths.
including: tangent, arc, sector and segment
This row requires you to know and use the four named parts of a circle: tangent, arc, sector and segment. A tangent is a straight line that touches the circle at exactly one point, called the point of contact, and is perpendicular to the radius drawn to that point. An arc is a connected part of the circumference. A sector is the region bounded by two radii and the arc between them, like a slice of a cake. A segment is the region bounded by a chord and the arc cut off by that chord. In an MCQ you may be shown a labelled diagram and asked to select the correct name, or given a definition and asked which term matches. Distinguish carefully: a sector uses two radii, while a segment uses a chord. A diameter is a special chord through the centre, and a semicircle is a special sector and segment.
apply and prove the standard circle theorems concerning angles, radii, tangents and chords, and use them to prove related results (Higher tier only)
This Higher tier topic requires you to apply and prove standard circle theorems concerning angles, radii, tangents and chords, and use them to prove related results. Key theorems include: the angle in a semicircle is 90°; angles in the same segment are equal; the angle at the centre is twice the angle at the circumference; opposite angles of a cyclic quadrilateral sum to 180°; a tangent is perpendicular to the radius; tangents from a point are equal; and a perpendicular from the centre bisects a chord. Build a logical chain, naming each theorem used. For example, to prove the alternate segment theorem, use radii to form isosceles triangles, then apply angle sums to show the tangent and chord make equal angles with the alternate segment.
solve geometrical problems on coordinate axes
This skill uses coordinates as a precise language for geometry. Plot or read points (x, y), then use them to find lengths, midpoints, gradients, equations of lines and areas. A reliable method is: sketch the axes, label given points, calculate horizontal and vertical differences, then apply formulae. For example, for A(1, 2) and B(5, 5), the horizontal difference is 5 − 1 = 4 and the vertical difference is 5 − 2 = 3, so AB = √(4² + 3²) = √25 = 5. The midpoint is ((1 + 5)/2, (2 + 5)/2) = (3, 3.5). You may also need to prove a property, such as showing two sides are equal, or find a missing coordinate. Always justify each step with a calculation or a named geometric fact, and check if the answer should be exact.
identify properties of the faces, surfaces, edges and vertices of: cubes, cuboids, prisms, cylinders, pyramids, cones and spheres
Identify properties of 3D shapes by counting faces, surfaces, edges and vertices. A face is a flat surface; a curved surface is distinct. An edge is where surfaces meet, and a vertex is a corner. A cube has 6 square faces, 12 edges and 8 vertices. A cuboid shares these counts but has rectangular faces. A prism has a constant cross-section, with identical polygonal ends and rectangular sides. A cylinder has two circular faces, one curved surface, two circular edges and no vertices. A pyramid has a polygonal base and triangular faces meeting at an apex. A cone has one circular face, one curved surface, one vertex and one circular edge. A sphere has one curved surface, no edges and no vertices. Recall these properties for each solid.
interpret plans and elevations of 3D shapes
A plan is the view from directly above a 3D shape, and elevations are views from the front and side. To interpret them, match each 2D outline to the direction it represents: the plan shows the footprint, the front elevation shows the face seen from the front, and the side elevation shows the face seen from the side. For a cuboid 5 cm long, 3 cm wide and 2 cm high, the plan is a 5 cm by 3 cm rectangle, the front elevation is 5 cm by 2 cm, and the side elevation is 3 cm by 2 cm. Hidden edges are not drawn in these orthographic views, so use the given dimensions and the arrangement of rectangles to decide the shape. Check that every visible face is accounted for and that the views are consistent with one another.
construct and interpret plans and elevations of 3D shapes
To construct plans and elevations, imagine looking at a 3D shape from directly above (plan), from the front (front elevation) and from the side (side elevation). Draw each view as a 2D outline, using the true lengths of the visible edges and omitting hidden edges. For a cuboid 5 cm long, 3 cm wide and 2 cm high, the plan is a 5 cm by 3 cm rectangle, the front elevation is 5 cm by 2 cm, and the side elevation is 3 cm by 2 cm. To interpret, reverse the process: use the shapes and dimensions of the views to deduce the 3D shape, checking that the views are consistent. Always label each view and include units where given. This skill is assessed by asking you to draw the views of a given solid or to identify a solid from its views.
Watch and listen
Listen: Properties and constructions audio lesson
Read the full guide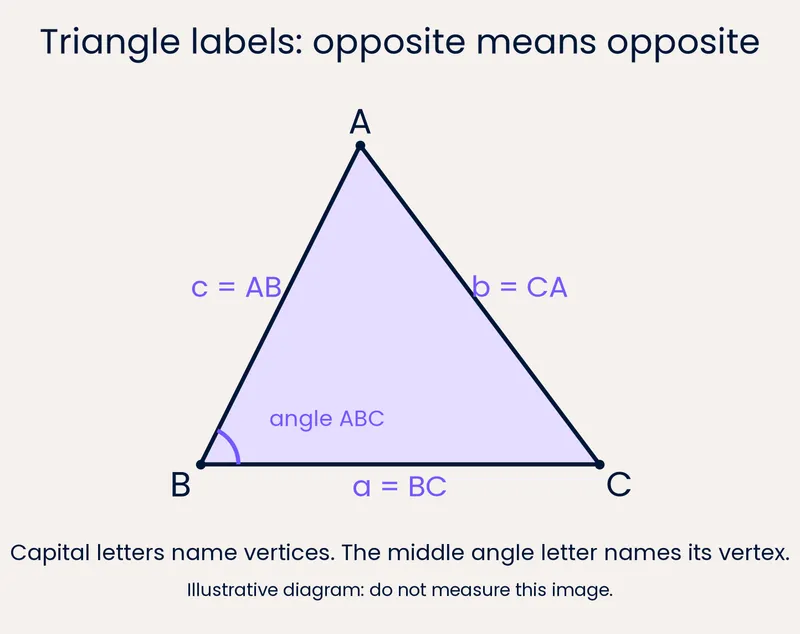
Interactive Diagrams
1 interactive diagram to visualise key concepts
Conceptual Flow Outline
Decision path for identifying a polygon and checking both requirements for regularity.
Your focus
- Use conventional geometric terms and notations accurately when describing shapes and diagrams.
- Apply standard labelling conventions to the sides and angles of triangles.
- Draw a diagram that correctly represents a written geometric description, including stated symmetry and angle properties.
Show all 52 objectives
- Carry out the standard ruler and compass constructions for a perpendicular bisector, a perpendicular from or at a point, and an angle bisector.
- Use standard constructions to complete a given figure accurately.
- Solve loci problems, including using the perpendicular distance from a point to a line as the shortest distance to that line.
- Apply the properties of angles at a point, angles at a point on a straight line and vertically opposite angles.
- Understand and use alternate and corresponding angles on parallel lines.
- Derive and use the sum of angles in a triangle to deduce the angle sum in any polygon and derive properties of regular polygons.
- State the defining properties of square, rectangle, parallelogram, trapezium, kite and rhombus.
- Derive additional properties of a named quadrilateral from its definition and known angle facts.
- Apply quadrilateral and triangle properties to solve simple geometric problems using correct terminology.
- State the four basic congruence criteria for triangles.
- Identify the included angle or included side needed for SAS or ASA.
- Use a congruence criterion to decide whether two triangles are congruent and to justify equal corresponding parts.
- Apply angle facts and quadrilateral properties to find unknown angles and sides.
- Use congruence and similarity criteria to compare triangles and solve problems.
- Derive Pythagoras’ theorem and prove the base angles of an isosceles triangle are equal.
- Construct simple geometric proofs using known results with clear reasons.
- Identify congruent and similar shapes and explain the difference.
- Describe rotations, reflections, translations and enlargements with all required details.
- Construct congruent and similar shapes on coordinate axes using the four transformations.
- Enlarge a shape by a proper or improper fractional scale factor from a given centre.
- Identify the centre and scale factor of an enlargement that produces a smaller or larger similar image.
- Explain why a fractional enlargement preserves angles and produces similar shapes.
- Enlarge a shape by a negative scale factor from a given centre.
- Identify the centre and negative scale factor of an enlargement.
- Explain how the sign and magnitude of a scale factor affect the position and size of the image.
- Apply a sequence of rotations, reflections and translations to a shape and record the final image.
- State which properties remain invariant under any combination of these transformations.
- Identify the single transformation equivalent to a given combination of two reflections or a rotation and a translation.
- Name and identify the centre, radius, chord, diameter and circumference on a circle diagram.
- Use the relationship between radius and diameter to find missing lengths.
- Calculate the circumference of a circle given its radius or diameter.
- State the defining properties of a tangent, arc, sector and segment.
- Distinguish between a sector and a segment in a labelled diagram.
- Recognise that a tangent meets a circle at exactly one point and is perpendicular to the radius there.
- State and apply the standard circle theorems concerning angles, radii, tangents and chords.
- Construct a general proof of a circle theorem using a logical chain of reasoning.
- Use circle theorems to prove related results, such as the alternate segment theorem.
- Plot and read coordinates accurately in all four quadrants.
- Calculate lengths, midpoints and gradients from coordinate pairs.
- Use coordinate methods to prove or disprove a geometric property and to find a missing point.
- Name and count the faces, edges and vertices of common 3D shapes.
- Distinguish between flat faces and curved surfaces.
- Use the properties of prisms and pyramids to classify a solid.
- Identify the plan and elevations of a given 3D shape from 2D drawings.
- Match dimensions in plans and elevations to the corresponding edges of a 3D shape.
- Explain why hidden edges are not shown in plans and elevations.
- Construct the plan, front elevation and side elevation of a 3D shape.
- Interpret plans and elevations to identify a 3D shape and its dimensions.
- Check consistency between different views of the same 3D shape.
Properties and constructions flashcards
Card 1 of 12
Square
Which command word is this?
You must use a ruler and compasses to draw the required shape or line accurately. All construction arcs must be visible. Marks are awarded for correct method and accuracy.
Properties and constructions exam tips
Topic Overview
Properties and constructions is a practical geometry topic in AQA GCSE Mathematics where you use a ruler, compass, and protractor to accurately draw shapes and loci. You will learn to construct triangles given specific side lengths and angles, bisect lines and angles, and draw perpendiculars from a point to a line. These skills are essential for solving real-world problems involving boundaries and regions.
This topic also introduces loci, which are sets of points that satisfy a given condition, such as being a fixed distance from a point or line. You will need to describe and shade regions defined by multiple loci, often in context. Mastery of constructions and loci is crucial for higher-tier questions and provides a foundation for further study in geometry and trigonometry.
Key Concepts
- →Constructing triangles using SSS, SAS, ASA, and RHS criteria with a ruler, compass, and protractor.
- →Constructing the perpendicular bisector of a line segment and the bisector of an angle using compasses only.
- →Drawing perpendiculars from a point to a line and from a point on a line.
- →Understanding loci: the locus of points at a fixed distance from a point is a circle; from a line segment is a pair of parallel lines and semicircles at the ends; equidistant from two points is the perpendicular bisector; equidistant from two lines is the angle bisector.
- →Solving problems involving scale drawings and regions defined by multiple loci, including shading the required region.
Marking Points
- Uses conventional geometric terms correctly, including point, line, vertex, edge, plane, parallel, perpendicular and right angle.
- Identifies and names polygons, including regular polygons and polygons with reflection symmetry, rotation symmetry or both.
- Applies standard labelling conventions to triangles, matching capital-letter vertices with the opposite sides.
- Draws a diagram that matches a written description, including all stated features such as parallel sides, right angles or equal sides.
- Recognises symmetry properties of a given polygon and states the order of rotation symmetry or the number of lines of reflection symmetry where appropriate.
- Distinguishes a regular polygon from an irregular polygon by checking both equal sides and equal angles.
- Recognises that only a ruler and compasses are permitted, with construction arcs left visible as evidence of method.
- Describes the perpendicular bisector of a line segment as the set of points equidistant from the two endpoints, found by equal arcs from each endpoint.
- Explains that constructing a perpendicular from or at a given point uses arcs centred on the point to mark two positions on the line, then equal arcs from those positions.
- States that bisecting an angle requires an arc across both arms from the vertex, then equal arcs from the two crossing points, joining the vertex to their intersection.
- Applies constructions to complete a given figure or to solve a loci problem, for example locating points equidistant from two fixed points.
- Knows that the perpendicular distance from a point to a line is the shortest distance to that line, so a locus at a fixed distance from a line is a pair of parallel lines.
- Applies angles at a point summing to 360° and angles at a point on a straight line summing to 180°.
- Uses the equality of vertically opposite angles when two straight lines cross.
- Identifies and uses alternate and corresponding angles on parallel lines, giving a reason for each equality.
- Derives and uses the sum of angles in a triangle as 180°, for example by drawing a parallel line to justify the result.
- Deduces the interior angle sum of any polygon with n sides as (n − 2) × 180° by splitting it into n − 2 triangles.
- Derives properties of regular polygons, including each interior angle as (n − 2) × 180° ÷ n and each exterior angle as 360° ÷ n.
- A square is a quadrilateral with four equal sides and four right angles, so it is also a rectangle, a rhombus and a parallelogram.
- A rectangle has four right angles and opposite sides equal and parallel; its diagonals are equal in length.
- A parallelogram has two pairs of parallel sides, opposite sides equal, opposite angles equal, and diagonals that bisect each other.
- A trapezium has exactly one pair of parallel sides; an isosceles trapezium has equal base angles and equal diagonals.
- A kite has two pairs of adjacent equal sides; one pair of opposite angles is equal, and one diagonal is a line of symmetry.
- A rhombus has four equal sides, opposite sides parallel, opposite angles equal, and diagonals that bisect each other at right angles.
- Triangles are classified by sides as equilateral, isosceles or scalene, and by angles as acute, right or obtuse; the angle sum is 180°.
- Other plane figures include regular and irregular polygons; a regular polygon has equal sides and equal interior angles.
- SSS: if three sides of one triangle are equal to three sides of another, the triangles are congruent.
- SAS: if two sides and the included angle of one triangle are equal to two sides and the included angle of another, the triangles are congruent.
- ASA: if two angles and the included side of one triangle are equal to two angles and the included side of another, the triangles are congruent.
- RHS: if the right angle, hypotenuse and one other side of one right-angled triangle are equal to those of another, the triangles are congruent.
- Apply angle facts correctly: angles on a straight line sum to 180°, angles around a point sum to 360°, vertically opposite angles are equal, and angles in a triangle sum to 180°.
- Use congruence criteria (SSS, SAS, ASA, RHS) to justify that two triangles are identical in shape and size, and use similarity to set up proportional sides when corresponding angles are equal.
- Apply properties of quadrilaterals, such as opposite sides of a parallelogram being equal and parallel, or diagonals of a rhombus bisecting at right angles, to find unknown angles and sides.
- Derive Pythagoras’ theorem from similarity or area arguments, and use it to find a missing side in a right-angled triangle, for example a² + b² = c² where c is the hypotenuse.
- Prove that the base angles of an isosceles triangle are equal, for example by drawing the line of symmetry from the apex to the midpoint of the base and using congruent triangles.
- Construct a simple proof by starting from known results, stating each step with a reason, and reaching the required conclusion without gaps.
- Identify congruent shapes as identical in shape and size, and similar shapes as having equal corresponding angles with sides in the same ratio.
- Describe a rotation fully by giving the centre of rotation, the angle and the direction (clockwise or anticlockwise).
- Describe a reflection by giving the equation of the mirror line, such as x = 2 or y = x.
- Describe a translation by giving the column vector, for example (3 over −2), and apply it to each vertex.
- Describe an enlargement by giving the centre of enlargement and the scale factor where required.
- Construct images on coordinate axes by transforming each vertex accurately and joining corresponding vertices in the correct order.
- A fractional scale factor between 0 and 1 produces a smaller image, while a fractional scale factor greater than 1 (an improper fraction) produces a larger image.
- Every vertex of the image lies on the ray from the centre of enlargement through the corresponding object vertex.
- For a positive fractional scale factor, the image lies on the same side of the centre as the object.
- Corresponding angles are unchanged and corresponding side lengths are multiplied by the scale factor.
- Coordinates transform as (x, y) → (kx, ky) when the centre is the origin, where k is the fractional scale factor.
- A scale factor given as a decimal or percentage must be converted to a fraction or decimal before use.
- A negative scale factor places the image on the opposite side of the centre from the object.
- The magnitude of the scale factor determines the size change: |k| > 1 enlarges, 0 < |k| < 1 reduces.
- Coordinates transform as (x, y) → (kx, ky) with k negative, so both coordinates change sign relative to the centre.
- The image remains similar to the object, with angles unchanged and lengths multiplied by |k|.
- A negative fractional scale factor such as −1/2 produces a smaller image on the opposite side of the centre.
- Describing a negative enlargement requires both the centre and the negative scale factor.
- Identify the individual transformations in the combination and the order in which they are applied.
- State that lengths, angles and area are invariant under any combination of rotations, reflections and translations.
- Recognise that orientation is reversed by an odd number of reflections and preserved by an even number.
- Determine the single equivalent transformation: two parallel reflections give a translation; two intersecting reflections give a rotation about the intersection point.
- Describe the overall change in position and orientation of the image compared with the object.
- Define the centre as the fixed point equidistant from every point on the circle.
- Define the radius as a segment from the centre to the circumference and state that all radii are equal.
- Define a chord as a segment joining two points on the circumference, and the diameter as a chord through the centre.
- Use the relationship diameter = 2 × radius and radius = diameter ÷ 2.
- Apply the circumference formula C = 2πr or C = πd to calculate the distance around a circle.
- A tangent touches the circle at exactly one point and is perpendicular to the radius at that point of contact.
- An arc is a part of the circumference of the circle.
- A sector is the region enclosed by two radii and the arc between them.
- A segment is the region enclosed by a chord and the arc cut off by that chord.
- A diameter is a chord passing through the centre; a semicircle is a special sector and segment.
- Correctly states and applies the theorem that the angle in a semicircle is a right angle.
- Uses the theorem that the angle at the centre is twice the angle at the circumference subtended by the same arc.
- Applies the theorem that angles in the same segment are equal.
- Uses the cyclic quadrilateral theorem that opposite angles sum to 180°.
- Applies the tangent–radius perpendicularity theorem and the equal tangents from an external point theorem.
- Uses the theorem that the perpendicular from the centre to a chord bisects the chord.
- Constructs a general proof with a clear chain of reasoning, naming each theorem used and justifying each step.
- Uses related results, such as the alternate segment theorem, to complete a proof.
- Correctly reads or plots coordinates, including negative and fractional values, and labels points clearly.
- Uses the difference in x-coordinates and the difference in y-coordinates to find lengths, applying Pythagoras' theorem where needed.
- Finds the midpoint of a line segment by averaging the x-coordinates and averaging the y-coordinates.
- Calculates or interprets gradient as the change in y divided by the change in x, and uses it to compare lines where appropriate.
- Forms or uses the equation of a straight line, for example y = mx + c, from given coordinate information.
- Solves a geometric problem such as finding a missing vertex, proving a triangle is right-angled or isosceles, or calculating an area on the coordinate grid.
- Communicates a logical chain of reasoning with correct notation and units where appropriate.
- Distinguishes between flat faces and curved surfaces when describing a 3D shape.
- States the number and shape of faces for cubes, cuboids, prisms, cylinders, pyramids, cones and spheres.
- Identifies edges as line segments or curves where surfaces meet, and counts them correctly for the named shapes.
- Identifies vertices as corners where edges meet, and recognises that cylinders and spheres have none.
- Recognises that a prism has a uniform cross-section and that its side faces are rectangles.
- Recognises that a pyramid has triangular faces meeting at a single apex above a polygonal base.
- Applies these properties to classify an unfamiliar 3D shape or to complete a table of properties.
- Identify the plan as the view from directly above the shape.
- Identify the front elevation as the view from the front of the shape.
- Identify the side elevation as the view from the side of the shape.
- Match each 2D view to the correct direction and use given dimensions to deduce the 3D shape.
- Recognise that hidden edges are not shown in plans and elevations.
- Draw the plan as the view from directly above, using correct dimensions.
- Draw the front elevation as the view from the front, using correct dimensions.
- Draw the side elevation as the view from the side, using correct dimensions.
- Omit hidden edges from all views.
- Label each view correctly and include units where appropriate.
- Interpret given plans and elevations to deduce the 3D shape, checking consistency between views.
Examiner Tips
- 💡Annotate diagrams with the given information, such as right-angle squares and parallel arrows, before answering.
- 💡Check whether a question asks for a sketch or an accurate drawing, and use a ruler and pencil for accurate work.
- 💡When naming a polygon, count the sides first and then check whether all sides and angles are equal.
- 💡Use the standard triangle labelling so that sides and angles can be referred to unambiguously.
- 💡Leave every construction arc visible; rubbed-out arcs remove the evidence that the correct ruler-and-compass method was used.
- 💡Check a completed construction by testing the defining property, for example confirming that a point on the perpendicular bisector is equidistant from both endpoints.
- 💡For loci questions, translate the wording into a distance rule first, then decide whether the locus is a circle, a pair of parallel lines or a region bounded by arcs.
- 💡Give a reason for every angle fact used, naming the property such as alternate angles or angles on a straight line, so the reasoning is clear.
- 💡Mark equal angles on the diagram as you find them, which reduces the chance of using the wrong pair of angles later.
- 💡For polygon questions, identify n first, then substitute carefully into (n − 2) × 180° before dividing for a regular polygon.
- 💡Check an answer against the diagram, for example confirming that an interior angle of a regular polygon is less than 180°.
- 💡When a question asks you to derive a property, show each step: state the given shape, quote the relevant definition, then use angle or side facts to reach the result.
- 💡Learn the minimum defining properties for each shape, then deduce the rest; for example, from a square's four equal sides and right angles you can deduce parallel sides.
- 💡In multiple-choice questions, eliminate options that describe a different shape or use imprecise language such as 'slanted rectangle' instead of parallelogram.
- 💡Check whether the question says 'exactly one pair of parallel sides' for a trapezium; if it says 'at least one pair', that would include parallelograms, so read carefully.
- 💡Label the equal parts on a diagram before choosing a criterion; this helps you see whether the angle is included between the two sides or the side is included between the two angles.
- 💡When writing a congruence statement, match corresponding vertices in the same order, for example triangle ABC congruent to triangle DEF means A matches D, B matches E and C matches F.
- 💡In multiple-choice questions, check each option against the four criteria; an option that uses SSA or AAA is not a valid congruence criterion.
- 💡Write a reason for every angle fact you use, for example ‘angles in a triangle sum to 180°’, so the examiner can follow your proof.
- 💡When using Pythagoras’ theorem, label the hypotenuse c and substitute carefully; check whether you need to add or subtract squares to find a shorter side.
- 💡For proof questions, work backwards from the required result to plan steps, then write the proof forwards with clear logical order.
- 💡Sketch the figure and mark equal angles or sides; this helps you spot congruent triangles and choose the correct criterion.
- 💡Use tracing paper or count squares from the centre to check rotations and enlargements before finalising your answer.
- 💡For descriptions, write the transformation name first, then list every required detail in a clear order.
- 💡When constructing on coordinate axes, label the image vertices with primes (A′, B′, C′) to avoid confusion with the original.
- 💡Check that corresponding sides remain in the same ratio for similarity, and that lengths are unchanged for congruence.
- 💡Draw construction rays from the centre through each object vertex before marking image vertices.
- 💡Measure or calculate each image distance as the object distance multiplied by the fractional scale factor.
- 💡Verify one pair of corresponding sides has the correct ratio and that all angles match.
- 💡Draw a straight line through the centre and each object vertex, then mark the image vertex on the opposite side at the correct distance.
- 💡Use the magnitude of the scale factor to check whether the image should be larger or smaller than the object.
- 💡State the centre and the negative scale factor clearly when describing an enlargement.
- 💡Trace the shape through each transformation in turn, labelling the intermediate image, so the final position is clear.
- 💡Check whether the number of reflections is odd or even to decide whether orientation is reversed or preserved.
- 💡When asked for the single equivalent transformation, identify its type first, then give the centre, angle and direction for a rotation or the column vector for a translation.
- 💡Label the centre, radius, chord, diameter and circumference on any diagram before calculating.
- 💡Check whether the question gives the radius or the diameter, and convert to the required form before substituting into a formula.
- 💡Leave answers in terms of π when asked for an exact value, and only use a decimal approximation if the question requests it.
- 💡Read the diagram labels carefully and check whether the region is bounded by radii or by a chord before choosing sector or segment.
- 💡Remember the tangent–radius right angle at the point of contact; it is often the key to identifying a tangent in a diagram.
- 💡For multiple-choice questions, eliminate options by testing the boundary: two radii means sector, one chord means segment.
- 💡Write a reason for every angle you calculate or state, naming the circle theorem used.
- 💡In proof questions, introduce letters for unknown angles and work algebraically to show the required result generally.
- 💡Check whether the question asks you to prove a result or to calculate an angle; a proof needs a logical chain, not just a final value.
- 💡Draw a clear sketch even when a grid is provided; mark the coordinates you are given and the ones you calculate.
- 💡Write down the formula you are using before substituting numbers, so your method is visible and can earn method credit.
- 💡For proof-style questions, state the geometric fact or calculation you are using and show the relevant working.
- 💡Check whether the question asks for an exact surd, a decimal to a given accuracy, or a coordinate pair, and answer in that form.
- 💡Read the options carefully and eliminate any that confuse faces with curved surfaces.
- 💡For a named shape, recall the standard counts first, then check them against the diagram if one is given.
- 💡If a shape is unfamiliar, decide whether it has a constant cross-section (prism) or an apex (pyramid) before counting.
- 💡Use precise vocabulary: face, edge, vertex, curved surface, cross-section, apex.
- 💡Label each view clearly as plan, front elevation or side elevation before matching dimensions.
- 💡Use the given lengths to check that the plan, front and side views are mutually consistent.
- 💡If a view is a rectangle, consider what that tells you about the face it represents and the shape as a whole.
- 💡Sketch the 3D shape first and mark the viewing directions to avoid confusion.
- 💡Check that the dimensions in your plan, front and side views are consistent with each other.
- 💡Label each view clearly and write units on your diagrams if the question gives them.
- 💡Always use a sharp pencil and leave all construction arcs visible. Marks are awarded for correct construction method, not just the final line.
- 💡When shading a region defined by loci, use a clear pattern or colour and ensure the boundaries are accurately drawn. Label the region if required.
- 💡For scale drawing questions, always state the scale you are using and measure accurately. Check that your final answer is reasonable in the context of the problem.
Common Mistakes
- Treating a vertex and an edge as the same thing; the correction is that a vertex is a point where edges meet, while an edge is a line segment joining two vertices.
- Calling any four-sided shape a regular polygon; the correction is that a regular polygon needs all sides equal and all angles equal, so a rectangle is not regular unless it is a square.
- Labelling a triangle so that side a is opposite angle B; the correction is that side a is opposite angle A, side b opposite angle B and side c opposite angle C.
- Assuming a shape with rotation symmetry must also have reflection symmetry; the correction is that a parallelogram has rotation symmetry but no reflection symmetry.
- Thinking a protractor or a measured angle may replace compass arcs: the standard constructions require ruler and compasses only, so the method must be shown with arcs.
- Believing the perpendicular bisector is found by measuring the midpoint and drawing any right angle: the bisector must be located by equal arcs from both endpoints.
- Assuming the shortest distance from a point to a line is measured along a slanted segment: the shortest distance is the perpendicular distance, so the perpendicular must be constructed.
- Treating a locus at a fixed distance from a line as a single line or a circle: it is a pair of parallel lines, one on each side of the given line.
- Confusing alternate and corresponding angles: alternate angles lie on opposite sides of the transversal in a Z shape, while corresponding angles lie in matching positions in an F shape, and both are equal only when the lines are parallel.
- Using 360° for the sum of angles in a triangle: the triangle sum is 180°, and 360° applies to angles at a point or to the exterior angles of a polygon.
- Calculating a polygon interior angle sum as n × 180°: the correct sum is (n − 2) × 180°, because the polygon splits into n − 2 triangles.
- Assuming vertically opposite angles are supplementary: vertically opposite angles are equal, while adjacent angles on a straight line are the pair that sum to 180°.
- Thinking a rhombus must have right angles: a rhombus has four equal sides but its angles need not be 90°; a square is the special rhombus with right angles.
- Confusing a trapezium with a parallelogram: a trapezium has exactly one pair of parallel sides, while a parallelogram has two pairs.
- Believing a kite always has all four sides equal: a kite has two pairs of adjacent equal sides, which may be of different lengths.
- Using 'diamond' instead of 'rhombus' or 'kite': use the precise terms rhombus and kite as defined in the specification.
- Using SSA (two sides and a non-included angle) as a congruence criterion: SSA does not always prove congruence, so use SAS with the included angle instead.
- Mixing up ASA and SAS: ASA uses two angles and the side between them, while SAS uses two sides and the angle between them.
- Applying RHS to a triangle that is not right-angled: RHS requires a right angle, so check for the 90° angle first.
- Misidentifying the hypotenuse in Pythagoras’ theorem: the hypotenuse is always the side opposite the right angle, not simply the longest-looking side; correct by checking the right angle first.
- Assuming two triangles are congruent when only two sides and a non-included angle match; correct by using a valid congruence criterion such as SAS (included angle) or SSS.
- Treating similar shapes as congruent; correct by remembering similar shapes have equal angles but sides in proportion, so lengths may differ by a scale factor.
- Using a quadrilateral property that does not apply, such as assuming diagonals of every parallelogram bisect at right angles; correct by checking the specific quadrilateral type, since that property belongs to a rhombus.
- Describing a rotation without stating the centre, angle or direction; correct by giving all three pieces of information.
- Confusing reflection and rotation when the image looks similar; correct by checking whether the orientation is reversed (reflection) or turned (rotation).
- Applying a translation to only one vertex; correct by applying the same column vector to every vertex of the shape.
- Dividing by the scale factor instead of multiplying: for scale factor 1/2, multiply each distance from the centre by 1/2, not by 2.
- Assuming all fractional scale factors make a shape smaller: improper fractions like 3/2 will enlarge the shape.
- Changing the angles of the shape: enlargement preserves angles, so only lengths change.
- Treating a percentage such as 50% as 50 rather than 0.5 before multiplying.
- Placing the image on the same side of the centre: a negative factor always puts the image on the opposite side.
- Using the signed factor to scale lengths: lengths are multiplied by the magnitude |k|, while the sign controls direction.
- Forgetting to reverse both coordinates when the centre is the origin: apply the negative sign to both x and y.
- Thinking that a combination of transformations changes the size or shape of the figure; correction: rotations, reflections and translations are all congruences, so lengths, angles and area are invariant.
- Assuming the order of transformations never matters; correction: in general the final image depends on the order, so apply them in the stated sequence.
- Believing that two reflections always produce a reflection; correction: two reflections in parallel lines produce a translation, and two reflections in intersecting lines produce a rotation.
- Confusing orientation with position; correction: orientation describes the order of vertices (clockwise or anticlockwise), while position is where the shape sits on the grid.
- Calling any line across the circle a diameter; correction: only a chord that passes through the centre is a diameter.
- Using the diameter in place of the radius in C = 2πr; correction: either halve the diameter first or use C = πd.
- Thinking a chord must pass through the centre; correction: a chord is any segment joining two points on the circumference, and the diameter is the special chord through the centre.
- Confusing circumference with area; correction: circumference is the distance around the circle, measured in units such as cm, while area is measured in square units such as cm².
- Confusing a sector with a segment: a sector is bounded by two radii and an arc, whereas a segment is bounded by a chord and an arc.
- Thinking a tangent crosses the circle at two points: a tangent touches at exactly one point, the point of contact.
- Calling any line across the circle a diameter: a diameter must pass through the centre; other chords do not.
- Believing an arc must be shorter than a semicircle: an arc can be minor or major, so it may be more than half the circumference.
- Assuming a line is a tangent without checking it touches at exactly one point and is perpendicular to the radius there; correct by verifying the right angle at the point of contact.
- Using the angle at the centre theorem with the wrong arc, so the angle at the centre is not twice the chosen angle at the circumference; correct by identifying the common arc first.
- Treating a cyclic quadrilateral as having opposite angles equal rather than summing to 180°; correct by using the supplementary angle fact.
- Giving a numerical example instead of a general proof; correct by using letters for angles and showing the result holds for all cases.
- Subtracting coordinates in the wrong order and losing a sign: for example, treating the vertical difference between y = 2 and y = 5 as 2 − 5 = −3 and then squaring it is acceptable, but using −3 as a length is not. Correct by using the absolute difference or by squaring immediately.
- Confusing the midpoint with the gradient or with one of the endpoints. Correct by remembering that the midpoint averages the x-coordinates and averages the y-coordinates separately.
- Assuming a quadrilateral is a rectangle or a parallelogram from its appearance on the grid without checking side lengths, gradients or diagonals. Correct by calculating the required properties.
- Forgetting that a horizontal line has gradient 0 and a vertical line has an undefined gradient, then trying to use the same formula for both. Correct by identifying vertical lines separately.
- Rounding too early in a multi-step problem, which changes the final answer. Correct by keeping exact values until the final step.
- Calling the curved surface of a cylinder or cone a face. Correct by using the term curved surface and reserving face for flat surfaces.
- Saying a cylinder has vertices because it has circular edges. Correct by noting that a vertex is a point where edges meet, and a cylinder has no such points.
- Confusing a prism with a pyramid: a prism has a constant cross-section and rectangular side faces, while a pyramid has triangular faces meeting at an apex.
- Counting the same edge or vertex twice when a shape is drawn in a tilted orientation. Correct by marking each edge or vertex as you count it.
- Thinking a sphere has one face because it looks round. Correct by describing it as having one curved surface, no edges and no vertices.
- Confusing the plan with the front elevation; the plan is always the view from above, not from the front.
- Assuming that a side elevation is the same as a front elevation; they show different faces and may have different dimensions.
- Drawing hidden edges in a plan or elevation; these views show only visible outlines, so hidden edges are omitted.
- Drawing the plan as the front view; the plan must be the view from above.
- Including hidden edges in a view; only visible outlines should be drawn.
- Mixing up the dimensions for different views, for example using the length instead of the width in the side elevation.
- Students often think that the locus of points equidistant from two points is a straight line parallel to the line joining them, but it is actually the perpendicular bisector of the line segment joining the two points.
- When constructing an angle bisector, students may incorrectly place the compass at the ends of the angle arms instead of at the vertex, leading to an inaccurate bisector.
- Students sometimes forget that the locus of points at a fixed distance from a line segment includes semicircles at the endpoints, not just parallel lines.
Revision Plan
- 1Week 1: Revise the basic constructions: perpendicular bisector, angle bisector, and perpendicular from a point to a line. Practice each construction at least five times until you can do them accurately without instructions.
- 2Week 1: Learn the four standard loci: circle, parallel lines with semicircles, perpendicular bisector, and angle bisector. For each, draw diagrams and write a definition in your own words.
- 3Week 2: Practice constructing triangles given different combinations of sides and angles (SSS, SAS, ASA, RHS). Use a scale of 1 cm = 1 unit for scale drawing questions.
- 4Week 2: Work through exam-style questions that involve shading regions defined by two or more loci. Focus on interpreting the conditions and combining the loci correctly.
- 5Week 2: Complete a past paper question on properties and constructions under timed conditions. Review your answers, checking that all construction arcs are visible and regions are correctly shaded.
Exam Question Types
- 📋Construction questions: 'Construct the perpendicular bisector of line AB' or 'Construct the bisector of angle XYZ'. You must show all construction arcs and use a ruler for final lines.
- 📋Scale drawing and loci: 'A treasure is buried within 5 m of point A and equidistant from points B and C. Shade the region where the treasure could be.' You need to draw the loci accurately and shade the intersection.
- 📋Triangle construction: 'Construct a triangle with sides 7 cm, 5 cm, and 4 cm. Measure the largest angle.' Use a compass and ruler, and measure accurately.
- 📋Problem-solving with loci: 'A dog is tied to a post by a 3 m leash. The post is 2 m from a wall. Draw and shade the region the dog can reach.' This requires combining a circle and a straight line boundary.
Command Word Expectations (AQA)
You must use a ruler and compasses to draw the required shape or line accurately. All construction arcs must be visible. Marks are awarded for correct method and accuracy.
You may use a ruler and pencil to draw a diagram, but if it is a construction, you should still use compasses. 'Draw' often implies a sketch, but in geometry it usually means accurate drawing.
You must clearly indicate the required region by shading it. The boundaries of the region should be drawn accurately, often using loci. Use a pencil and keep shading neat.
How Students Lose Marks (Examiner Pitfalls)
Step-by-Step Worked Solutions
Question: Construct a triangle ABC with AB = 8 cm, angle BAC = 60 degrees, and AC = 6 cm. Measure and write down the length of BC.
- 1.Step 1: Draw a line segment AB of length 8 cm using a ruler.
- 2.Step 2: At point A, use a protractor to measure an angle of 60 degrees from AB. Draw a faint line along this direction.
- 3.Step 3: With centre A, use a compass to mark a point C on the 60-degree line such that AC = 6 cm.
- 4.Step 4: Join B to C to complete the triangle.
- 5.Step 5: Measure the length of BC with a ruler. It should be approximately 7.2 cm (accept 7.1 to 7.3 cm).
Question: A garden is represented by a rectangular region ABCD where AB = 10 m and BC = 6 m. A sprinkler is placed at point A and waters all points within a radius of 4 m. A second sprinkler is placed at point C and waters all points within a radius of 3 m. Shade the region that is watered by both sprinklers.
- 1.Step 1: Draw a rectangle ABCD with AB = 10 cm and BC = 6 cm (using a scale of 1 cm = 1 m).
- 2.Step 2: With centre A, draw a circle of radius 4 cm. Shade the interior lightly.
- 3.Step 3: With centre C, draw a circle of radius 3 cm. Shade the interior lightly in a different direction.
- 4.Step 4: The region watered by both sprinklers is the intersection of the two circles. Shade this overlapping region clearly.
- 5.Step 5: Ensure all construction arcs are visible and the final region is clearly indicated.